How to recover lost data on a smartphone? HTC phone data recovery Recover file in htc one
Phone recovery phone/smartphone HTC model desire c in the operating room Android system 4.0 with color screen, 16.78 million colors - 320x480 dpi made of brick. A modern mobile phone is such a complex thing that it is better not to delve into its insides unless necessary.It happens that, due to ignorance or carelessness, after an unsuccessful flashing or software change, the phone does not turn on and is blocked. In this condition, the HTC phone/smartphone model desire c on the Android 4.0 operating system with a color screen, 16.78 million colors - 320x480 dpi called "brick".
It’s clear what to do with a brick, but what to do with such a phone? How to revive it and start it? Of course, there is no universal remedy; for each model HTC desire v, one m8, one m7, one m9 and other models, there are recovery methods phone.
Errors on the phone, how to turn on the HTC one a9, 626, desire 816. Restoring from a brick state.
Information on how to restore HTC desire 300, desire 600 dual sim, eye, HTC desire 820, one e9, desire 326g phone after flashing or from a locked state, or when the phone does not turn on, you can read on specialized forums and websites.
Carelessness or error when flashing the firmware of the HTC phone/smartphone model wildfire s on the Android 2.3 operating system with a TFT screen - 320x480 dpi.
If you did something unhealthy to your HTC desire 326g, one plus, sense phone, and after that it stopped loading at all and won’t let you into recovery, FTM, or fastboot, then don’t despair. There is one more remedy left:
Restoring dead HTC phones that won't turn on at home.
- recovery of HTC phones after unsuccessful firmware. The description posted on the site uses the so-called Jag method. The essence of the method is that it is necessary to make a special Jag plug by soldering contacts (4 and 5) together through a 301 kOhm resistor. This Jag is inserted into the phone HTC phone desire v Super LCD - 480x800 dpi with battery removed. More details on how to restore your phone this way are described here.Restoring your HTC phone to working condition.
- for phone owners. You can view a list of all supported devices, such as the HTC one m8 phone, color Super LCD 3, touchscreen - 1920x1080 dp and others. Motorola FAQ on phone recovery is posted at the link above. The site also provides a description of how to restore a phone by closing the contacts when the battery is removed.Before restoring your phone, you need to download and install special program on PC: Random "s Developments Flash & backup. Next you need to: remove the battery, connect pins 4 and 5 (see photo) to each other on the phone connector (see photo), keeping the needles closed, insert the battery, open the needles, insert the cord into the connector and connect to the computer, in Random's Developments Flash&backup program should display a message that the HTC one m7 color Super LCD 3, touchscreen - 1920x1080 dpi is connected.
Restoring an HTC phone from a brick state.
- this method of restoring HTC desire hd, 626g dual sim, incredible s phones of different models, different manufacturers. When restoring an HTC desire 700, g, 620 phone, special software is used: a standard flasher from MTS, a programmer from ZTE and a HEX editor. A detailed description with screenshots of the actions is posted on this page of the site (see link).Restoring an HTC phone using the SEMCtool program.
- these instructions are for restoring some HTC models. Symptoms of failure: HTC desire 210 dual sim, desire 620g dual sim, 510 hangs on “Please wait”, flashes white display, no network signal, no connection via DCU-60, neither via “C” nor via “2+5” . The method for restoring HTC one m9 phones color Super LCD 3, 16.78 million colors, touch - 1920x1080 dpi posted on this site is using a service cable, together with SEMCtool v8.7 software, which can be downloaded for free on this site.Restoring a water-damaged HTC cell phone that was drowned.
- instructions with pictures on how to restore an HTC desire 400, 816g, one max phone after it falls into water. In order to prevent corrosion of the phone elements of the HTC one a9 color AMOLED, touchscreen - 1920x1080 dpi, you need to very quickly remove it from the water and remove the battery. Then the case is removed and the phone is placed in a jar filled with rice for two days. The fact is that rice absorbs moisture very well and is an excellent absorbent. Ordinary homemade rice will draw out all the moisture from the smallest components of the HTC mozart, radar, one e8 phone, and also prevent corrosion. You can use cat litter as an absorbent at home.How to resolve "Operation Error" in Java on HTC phones.
- instructions for users of HTC desire 526g dual sim, butterfly, desire 310 dual sim phones who have problems installing applications or games on their phone. If, when entering the application/game folders, the message “Error during operation” pops up, this means that the Java machine on the HTC 626 color Super LCD, touchscreen - 1280x720 dpi phone has crashed. This problem can be resolved by simply removing and inserting the memory card into the phone. If this does not help, more complex actions will be required. To restore the functionality of the Java machine, you will need to reflash the firmware FS file and finalize it. More details on how to do this are described in this article.How to turn on your HTC phone.
To turn on the HTC 516 dual, desire 616 dual, 820g touch phone, you must do the following:
Press and hold the Power key until the phone vibrates.
- If the phone was turned on, but the screen went dark, press and release the Power key to turn it on.
- an image of a lock will appear on the screen; to unlock the screen, drag the lock icon or click on it.
- when prompted to enter a code, enter the PIN code from your SIM card. In most cases this is 0000 and click OK.
- wait for the phone to start.
Note: The PIN code for the SIM card is located on a plastic card or in the package received when purchasing a SIM card in the salon cellular communication. But be careful, if the PIN code is incorrect three times, you can activate the SIM card only through the PUK code, which is also included in the package received when purchasing the SIM card. If the PUK code is lost, it can only be restored using the passport of a citizen of the Russian Federation for which the SIM card is issued. Therefore, do not enter your PIN incorrectly more than three times. If you have lost your PIN code and there is no way to recover it through your telecom operator, you can do the following.
Cancel the PIN code prompt when you turn on your HTC 601 dual, desire 500 dual sim, sensation. To do this, find another SIM card with a PIN code you know (you can assign a PIN code in the settings) and insert it into your phone. Turn on the phone according to the steps described above, when entering the password, enter the PIN code you know from another SIM card. Having successfully turned on the phone, go to the phone settings and cancel the request to enter a PIN code when turning on the phone HTC desire 816 color, touch - 1280x720 dpi. Having done this, turn off the phone and change the SIM cards. Now, when you turn on the phone, the system will not require you to enter a PIN code.
This is, of course, elementary advice, but there are solutions to more serious problems.
Advice. The SIM PIN is initially provided by your network operator, but can be changed in the Settings menu. To correct an error when entering your SIM card PIN, tap the “Delete” icon.
HTC phone won't turn on! Error during phone self-test
The very first thing you need to do is try to reflash your HTC phone windows phone, hd2, one tab. But the problem of the phone not turning on can be not only due to the “crashed” software, but also due to a breakdown of the phone’s on/off button, or a breakdown or failure of the battery - charger and etc.
HTC phone won't turn on. What to do?.
- Very detailed description fixing the problem phone HTC jetstream, flyer 3g 32gb wi fi, evo view 4g does not turn on, how to turn on the phone. The article is divided into points, with a solution to each problem point by point: checking the power source - the battery, the power button is faulty, the power button circuits, the power controller or its soldering is broken, secondary power sources - power supply to the processor, memory, etc. devices, setup software mobile phone phone HTC desire 816 color, touch - 1280x720 dpi.Instructions for restoring a phone HTC desire 300 on the Android 4.1 OS platform on a screen with a resolution of 800x480, color, touch type from a non-working state - brick More details on how to restore the device, turn on the touch HTC one x, one s, desire c, wildfire s, desire v, one m8, one m7, one m9, one a9, 626, desire 816, desire 300, desire 600 dual sim, eye, sensation xe, desire 820, one e9, desire 326g, one plus, sense, desire hd, 626g dual sim, incredible s, desire 700, g, 620, desire 210 dual sim, desire 620g dual sim, 510, desire 610, desire 400, 816g, one max, mozart, radar, one e8, desire 526g dual sim, butterfly, desire 310 dual sim, 516 dual, desire 616 dual, 820g, 601 dual, desire 500 dual sim, sensation, desire x, one v, 8s, desire sv, windows phone, hd2, one tab, jetstream, flyer 3g 32gb wi fi , evo view 4g, p510e, one x and what to do if your cellular smartphone does not turn on.
Popular reviews on HTC
| “I called you, but why didn’t you pick up?” “I didn’t hear the phone ringing. Tell me, where can I download a loud ringer for my phone?” | |
| Where can I download ringtones for free or listen to music on my HTC phone? | |
| Social network vk.com is the most visited network in our country. Initially, the network could only be used on a computer; 10 years ago there were no phones with touch screen and certainly not HTC tablets. | |
| If for some reason you have difficulties connecting your HTC phone to a laptop or PC via wifi, bluetooth, usb, read the following instructions. | |
Most of the articles in the X-Mobile section are devoted to hacks and tweaks that require obtaining root rights, modifying the firmware or replacing it with a custom one. However, not every reader is ready to subject their smartphone to such operations, fearing that they can turn the device into a brick or lead to instability in operation. Today I will debunk these myths and show that even in the most stalemate situation, bringing a smartphone back to life is not so difficult.
Destroying myths
Let's talk about what it really means to “turn a smartphone into a brick” and what other pitfalls can await the user on the way to changing the system and installing custom firmware. What glitches can be caught in this case and is it possible to kill a smartphone by reflashing it incorrectly? Will you lose the warranty forever or can the smartphone be returned to its previous condition? Can custom firmware really fail a smartphone owner at the most inopportune moment and are they worth it?
Myth 1. Incorrect flashing can kill a smartphone
A fall from the fifth floor can kill a smartphone, but not flashing it. The main problem that anyone who wants to reflash a smartphone faces is that during the installation of the firmware, a failure may occur, which will lead to its inoperability, and the smartphone will actually turn into a brick.
All this is true, but only on paper. To understand why, it’s enough to understand how the process of flashing a smartphone works and what system components are used. To be able to install third-party firmware on a smartphone, you need to unlock the bootloader (not in all cases), get root and install a custom recovery console (ClockworkMod or TWRP), capable of installing firmware with any digital signature.
The recovery console is stored in a separate partition of the internal NAND memory and is in no way connected with the installed operating system. After installing a modified version of the console, it will be possible to flash custom firmware or even another OS (Firefox OS, for example). If a failure occurs during the installation of the firmware, the smartphone will not be able to boot it, but the recovery console will remain in place, and all you need to do is boot into recovery again and reinstall the firmware.
In addition, any custom recovery console contains a backup/restore function that allows you to backup copy main firmware and restore it unchanged (with all applications, settings and data) in the event that something goes wrong. In fact, the smartphone can be returned to its original state.


You may ask: what happens if the installation of the Recovery Console itself fails? Nothing, in this case the opposite situation will turn out when operating system will remain in place, and the console will be lost. To deal with it, you just need to re-flash recovery directly from Android.
Hypothetically, one can imagine a situation where both the firmware and the recovery console are killed (although this is quite difficult to do), but even in this case, the primary bootloader, flashed into the permanent memory of the smartphone, will always remain in place.
Conclusion: it is impossible to kill a smartphone by installing third-party firmware through a custom recovery console. Either the recovery or the primary bootloader will always remain in place.
Myth 2. Custom firmware is unreliable
Firmware is different from firmware. In the vastness world wide web you can find a huge amount Android builds for every taste and color, and most of them are really slag, which can lead to instability in the operation of the smartphone and loss of some functionality. Therefore, the first thing to remember is that you should only deal with serious custom firmware developed by large teams of experienced developers. First of all, these are CyanogenMod, Paranoid Android, AOKP, OmniROM and MIUI.
Second. There are two types of firmware: officially supported and ported third party developers. The same CyanogenMod, for example, has official version for the Nexus 4 smartphone, but does not have one for the Motorola Defy. But for Defy there is an unofficial port of CyanogenMod 11 from a developer with the nickname Quarx. The difference between them is that the CyanogenMod team is responsible for the support and proper operation of the first, while the second is Quarx personally. Official firmware versions are usually fully functional, but the correct operation of the latter depends on the third-party developer.
Well, third. There are stable and development versions of the firmware. Stable versions CyanogenMod have the index M (CyanogenMod 11.0 M7, for example). This firmware version usually does not contain bugs. Development versions (in the case of CyanogenMod these are daily nightly builds) may contain bugs and are therefore not recommended for everyday use.
Conclusion: if you install a stable official version of the “normal” firmware on your smartphone, the risk of encountering bugs is minimal. Everything else is for experimenters.
Myth 3. Software that requires root rights can brick a smartphone
In theory, an application with root rights can do anything with the smartphone's firmware, including erasing it completely. Therefore, you need to be extremely careful with such software. The software we talk about on the pages of the magazine is completely safe and tested in our own skin. In addition, for all the time I have been using smartphones on Android (and this is starting from version 1.5), I never I haven’t encountered a situation where software with root support killed a smartphone.
Software distributed through Google Play, usually fully corresponds to the stated characteristics, and if it led to a brick or left a backdoor in the depths of the smartphone, it would not last even a week in the store. In any case, here you need to follow the “trust but verify” rule and carefully read the instructions for using root applications.
Myth 4. Root rights make a smartphone vulnerable to viruses
What makes a smartphone vulnerable to viruses is not root rights, but the bugs used to obtain them. Rooting tools and viruses can exploit the same Android vulnerabilities to gain root privileges, so the fact that the device is rooted does not change anything. A well-written virus will not ask for permissions in the standard way, revealing its presence; instead, it will take advantage of the same vulnerability to obtain them covertly.
Moreover, having root, you get the opportunity to install the latest Android version(in the form of custom firmware), in which these bugs have already been fixed. Also, do not forget that most custom firmware allows you to disable root or create white lists of applications that can use these rights.
Myth 5. A rooted smartphone may fail
Software designed to obtain root does four simple things: launches an exploit that allows you to gain root rights in the system, mounts the /system partition in write mode, copies the su binary required to obtain root rights in the future to the /system/xbin directory, and installs the SuperSU or SuperUser application, which will take control whenever any application requests root privileges using su.
None of these steps can crash or kill the smartphone. The only thing that can happen is that the exploit will cause a segmentation fault and the smartphone will reboot, after which it will continue to work normally.

Myth 6. By getting root and installing custom firmware, I will lose the warranty
The guarantee is lost not from the fact of obtaining root, but due to its detection by the service center. Most devices can be unrooted using the Universal Unroot application or by reinstalling the stock firmware using the official application from the manufacturer.
There are, however, two exceptions to this rule. The first is the Knox system, pre-installed on new smartphones and samsung tablets, such as Galaxy S4, S5, Note 3 and Note 10.1. Knox delivers an elevated level Android security, responding to any firmware modifications and installation of third-party kernels and firmware. If the user performs these actions, the system sets a trigger that confirms the fact of the modification. The trigger is implemented in hardware (eFuse chip), so it cannot be reset to its initial position. On the other hand, it is not entirely clear whether it will refuse service center on this basis, repair the device. Second: the eFuse chip is installed on some other devices (for example, smartphones from LG), and it also allows you to accurately determine whether the smartphone has been rooted or flashed.
If we talk about custom firmware, everything is more complicated. Typically, the flashing operation requires unlocking the bootloader, and this can be done either using special exploits or using the smartphone manufacturer's web service. In any case, the unlocked bootloader will definitely indicate that the smartphone did not belong to a blonde.
On some smartphones, it is possible to lock the bootloader back, but you should learn about this separately, and also keep in mind that the newly locked bootloader will most likely receive the status Re-locked, and not Locked, as it was originally (this happens on HTC smartphones, For example). The only exceptions here are smartphones and tablets of the Nexus line, the bootloader of which can be locked and unlocked in three clicks without any dancing with a tambourine, and no one will find fault with anything.
INFO
On Linux, ADB and Fastboot can be installed separately from Android SDK. On Ubuntu: sudo apt-get install android-tools-fastboot. On Fedora: sudo yum install android-tools.
To prevent Knox from interfering with root applications, you can disable it using the following command from the terminal: su pm disable com.sec.knox.seandroid.
conclusions
Getting root and flashing a smartphone are absolutely safe operations that cannot completely destroy the smartphone. technical reasons. The only exception is an attempt to hack the bootloader in order to unlock it. In this case, the eFuse chip (if the smartphone has one) may work and block the ability to turn on the smartphone.
Fortunately, today smartphone manufacturers either prefer not to block the ability to turn on a smartphone with a hacked bootloader (by setting a trigger indicating the fact of such an action, as Knox does), or implement a special web service that allows you to painlessly unlock the bootloader with loss of warranty on the smartphone. which saves users from having to risk breaking the bootloader.
Problems that may arise during flashing
So, now let's talk about what problems can arise when getting root and flashing and how to deal with them.
Scenario one: after an unsuccessful flashing, the smartphone stopped booting
Unsuccessful flashing can be caused by several factors: the battery died and the firmware was only half filled; the firmware turned out to be faulty or intended for a different smartphone model. In the end, there was simply not enough space on the smartphone, which can happen when trying to install the latest version of Android on a smartphone that is three or four years old.
Outwardly, all these problems usually manifest themselves either in endless resets of the smartphone to the initial manufacturer logo, or in the so-called boot loop, when the boot animation plays on the screen for more than five to ten minutes. There may also be problems with the screen (multi-colored ripples) and a non-working touch screen, which also prevent the use of the smartphone.
In all these cases, it is enough to do one simple thing: turn off the smartphone by long pressing the power button, then turn it on while holding down the volume down button (some smartphones use a different combination), and after you get into recovery, reinstall the firmware (Install zip from sdcard - > Chooze zip from sdcard) or restore the backup (Backup and restore -> Restore). Everything is easy and simple.
Scenario two: the firmware works, but recovery is not available
This can happen after a failed installation or update of the Recovery Console. The problem is that after rebooting the smartphone and turning it on while holding down the volume down button, a black screen appears, after which the smartphone either resets or freezes.
Solving this problem is not easy, but very simple. You can install the recovery console on the vast majority of smartphones using the TWRP Manager, ROM Manager or ROM Installer applications. They themselves determine the smartphone model, download and flash the required recovery, without requiring a reboot. If you can’t restore the console with their help, just find instructions on the Internet for recovery installation to your device.
Scenario three: neither firmware nor recovery is available
To be honest, it is difficult for me to imagine such a scenario, but, as practice confirms, it is quite real. There are two ways to get out of this situation: use fastboot to upload recovery to your smartphone, or use a tool from the manufacturer to install stock firmware. We'll look at the second method in more detail in the next section, and I'll talk about fastboot here.
Fastboot is a tool that works directly with the device’s primary bootloader and allows you to upload firmware to your smartphone, recovery, and unlock the bootloader (in Nexus devices). Fastboot support is available in many smartphones and tablets, but some manufacturers block the ability to use it. So you will have to consult the Internet about its availability.
To access fastboot, you will need drivers and the Android SDK. When they are installed, open the command line, go to the SDK installation directory, then to the platform-tools directory, turn off the smartphone, turn it on with the volume buttons pressed (both) and connect it using a USB cable to the PC. Next, you need to find the recovery image in .img format for your device and run the command:
$ fastboot flash recovery image.img
Or even force the smartphone to boot recovery without actually installing it:
$ fastboot boot image.img
In the same way you can flash official firmware update:
$ fastboot update update-file.zip
You can find a recovery suitable for your device either on the TWRP website or in the XDA-Developers and 4PDA forums.
We return the smartphone to its original state
In this section, I will talk about ways to return your smartphone to clean stock, no matter what state it is in. These instructions can be used both to unbrick your smartphone and to remove traces of rooting and flashing. Unfortunately, I can't tell you about everyone possible models, so I’ll focus on the four most popular flagships: Nexus 5 (I call this copy the control one), Galaxy S5, LG G2 and Sony Xperia Z2.
Nexus 5 and other Google phones
Restoring Nexus devices to their original state is easier than any other smartphone or tablet. In fact, it is so simple that there is not even anything to talk about. In fact, all you need to do is install the ADB/fastboot drivers (on Linux you don’t even need them), download the archive with the firmware and run the script. The whole operation looks like this step by step:
- from here.
- Download and install Android SDK.
- Download the archive with the firmware for the desired device from the Google website.
- Turn off the device, turn it on with the volume buttons pressed (both) and connect using a USB cable.
- Unpack the archive with the firmware and run the flash-all.bat (Windows) or flash-all.sh (Linux) script and wait for the operation to complete.
- We launch the command line, go to the directory with the Android SDK, then platfrom-tools and execute the fastboot oem lock command to lock the bootloader.
For those who are interested in what the script does, here is a list of commands:
Fastboot flash bootloader bootloader-DEVICE-NAME-VERSION.img fastboot reboot-bootloader fastboot flash radio radio-DEVICE-NAME-VERSION.img fastboot reboot-bootloader fastboot flash system system.img fastboot reboot-bootloader fastboot flash userdata userdata.img fastboot flash recovery recovery.img fastboot flash boot boot.img fastboot erase cache fastboot flash cache cache.img
Galaxy S5
Co Galaxy smartphone S5 is a little more complicated, but overall quite simple. This time you will need the Samsung Odin application, which will be used to flash the smartphone’s firmware. Sequencing:
- Download and install latest version Samsung USB drivers from here.
- Download and install the latest version of Odin from here.
- Go to the website samfirmware.com, enter the SM-G900F model in the search, find the firmware marked Russia, download and unpack.
- Turn off the smartphone and turn it on with the Volume Down and Home buttons pressed, wait five seconds until a warning message appears.
- Press the volume up button to put the smartphone into Odin mode.
- We connect the smartphone using a USB cable.
- Launch Odin, press the PDA button and select the file with the extension tar.md5 inside the directory with the unpacked firmware.
- Click the Start button in Odin and wait until the firmware process is completed.
As I already said, this operation will return the smartphone to its original state, but will not reset the trigger, installed by the system Knox (if it was in the standard firmware). Therefore, the service center may refuse to repair.

LG G2
Restoring the LG G2 to its factory state will also not cause any problems. The number of steps in this process is somewhat larger, but they themselves do not require special preparation and knowledge. So, what to do to return the G2 to factory firmware:
- Download and install ADB Driver Installer from here.
- Download the official firmware (Europe Open 32G or Europe Open) from here.
- Download and install LG Mobile Support Tool, as well as FlashTool (goo.gl/NE26IQ).
- Turn off the smartphone, hold down the volume up button and insert the USB cable.
- Expand the FlashTool archive and run the UpTestEX.exe file.
- In the window that opens, select Select Type -> 3GQCT, Phone Mode -> DIAG, in the Select KDZ file option select the firmware downloaded in the second step.
- Click the CSE Flash button at the bottom of the screen.
- In the window that opens, click Start.
- In the next window, select the country and language and click Ok.
- We wait for the firmware to finish, and then turn off and turn on the smartphone.
This is all. But keep in mind that, as in the case of Samsung, the smartphone will still have Rooted status, and this cannot be fixed.
Sony Xperia Z2
Now about how to return to factory condition Sony smartphone Xperia Z2. As in the previous two cases, this will require stock firmware And official utility for firmware. You launch the utility on your PC, connect your smartphone using a USB cable and start the update process. Step by step it all looks like this:
- Download and install ADB Driver Installer from here.
- Reset your smartphone to factory settings.
- Download and install Flash Tool from the official Sony website and the latest firmware from here.
- Copy the firmware file to the C:/Flashtool/Firmwares directory.
- Turn off the smartphone and turn it on while holding down the Volume Down and Home keys.
- We connect the smartphone to the PC using a USB cable and launch the Flash Tool.
- Click the button with the lightning icon in the Flash Tool. In the window that opens, select Flashmode, double-click on the firmware in the list that opens.
WARNING
In many smartphones, an unlocked bootloader will not allow an over-the-air update.
In 90% of cases, unlocking the bootloader will entail deleting all data from the smartphone, including the memory card.
conclusions
Flashing a smartphone, and even more so gaining root access, is not at all such a scary and dangerous operation as it may seem at first glance. If you do everything correctly and do not resort to tools that unlock the smartphone’s bootloader, bypassing the manufacturer’s tools, you will not be able to brick your smartphone. Yes, in some cases you will have to tinker to get everything back in place, but what is better - to use a locked smartphone that does not allow you to do even half of the things that it is capable of, or to gain complete control over the device? In the end, reinstalling Windows on PC it doesn't scare anyone.
HTC Desire 516 Dual Sim is a smartphone that, like many other Android devices, can be flashed in several ways. Reinstalling system software is a need that does not arise very rarely for owners of the model in question. Such manipulations, if performed correctly and successfully, allow you to somewhat “refresh” the device in software terms, as well as restore functionality lost as a result of failures and errors.
The success of stitching procedures is determined by the correct preparation of tools and files that will be needed during the work process, as well as strict adherence to instructions. In addition, do not forget the following:
Responsibility for the result of manipulations with the device lies solely with the user who carries them out. All the actions described below are performed by the smartphone owner at his own peril and risk!

Preparatory procedures preceding the actual process of transferring files to device partitions can take quite a long time, but it is highly recommended to carry them out in advance. Especially in the case of the HTC Desire 516 Dual Sim - the model quite often creates problems for its users in the process of manipulating the system software.
Drivers
Installing drivers for pairing the device and software tools for firmware is usually not difficult. You just need to follow the instructions for Qualcomm devices from the article:

Just in case, an archive with drivers for manual installation always available for download via this link:
Backup
In view of possible occurrence the need to restore the smartphone software, as well as the mandatory deletion of user data from the device during the software installation process, you need to save all the valuable information contained in the phone’s memory in a safe place. And it is also highly recommended to create a backup of all partitions using ADB Run. Instructions can be found in the material at the link:

Since several methods of installing software are applicable to the device in question, which differ quite significantly from each other, download links necessary programs and files will be posted in the description of the methods. Before proceeding directly with the instructions, it is recommended that you familiarize yourself with all the steps that you will have to carry out, and also download all necessary files.

Firmware
Depending on the state of the device, as well as the goals set by the user performing the firmware, the method of carrying out the procedure is selected. The methods described below are arranged in order from simple to more complex.
Method 1: MicroSD + Factory Recovery Environment
The first method by which you can try to install Android on HTC Desire 516 is to use the capabilities of the “native” recovery environment provided by the manufacturer. This method is considered official, which means it is relatively safe and easy to implement. You can download the software package for installation according to the instructions below using the link:
As a result of completing the steps below, we get a smartphone with installed official firmware, intended for the European region version.
There is no Russian language in the package! The Russification of the interface will be discussed in the additional step of the instructions below.

Additionally: Russification
To Russify the European version of the OS, you can use the Android application Morelocale 2. The program is available on Google Play.


Method 2: ADB Run

The result of following the instructions below will be a smartphone with the official firmware version 1.10.708.001 (the latest available for the model) containing the Russian language. You can download the archive with the firmware from the link:
- Download and unpack the archive with the firmware.
- The folder obtained as a result of unpacking contains multi-volume archive, containing the most important image for installation - "System". It also needs to be extracted into the directory with the rest of the image files.
- Install ADB Run.
- Open in Explorer the directory with ADB Run, which is located along the path C:/adb, and then go to the folder "img".
- Copying files boot.img, system.img, recovery.img, obtained as a result of unpacking the firmware, into folders with appropriate names contained in the directory C:/adb/img/ (that is, the file boot.img- to the folder C:\adb\img\boot and so on).
- Writing the three above file images to the corresponding sections of the HTC Desire 516 flash memory can be considered a full installation of the system. In normal cases, it is not necessary to install the remaining image files, but if there is such a need, copy them to the C:\adb\img\all folder.
- Enable USB debugging and connect the device to the PC.
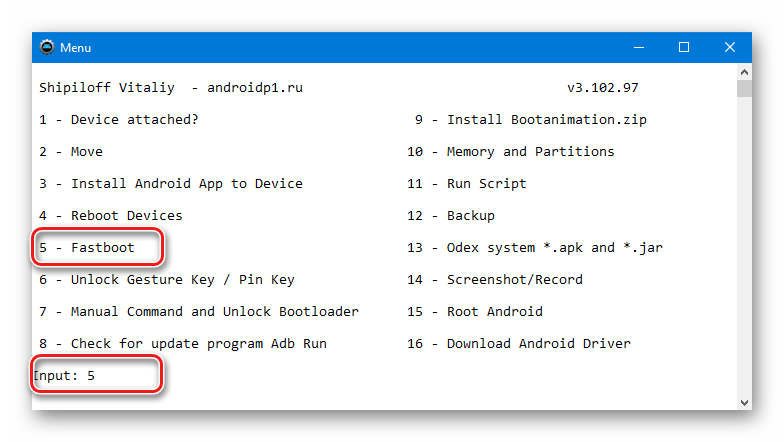
- We launch Adb Run and use it to reboot the device into mode "Fastboot". To do this, first select point 4 "Reboot Devices" in the main menu of the application,

and then enter the number 3 from the keyboard - item "Reboot Bootloader". Click "Enter".
- The smartphone will reboot to the state "Download", what does the loading screensaver frozen on the screen indicate? "HTC" on a white background.
- In ADB Run, press any key, and then return to the main menu of the program - item "10 – Back to Menu".

Choose "5-Fastboot".
- The next window is a menu for selecting a memory partition into which the image file will be transferred from the corresponding folder in the C:\adb\img directory.

- Optional but recommended procedure. We clean the partitions that we are going to write, as well as the partition "Data". Choose "e - Clear Partitions (erase)".

And then, one by one, we go to the points corresponding to the names of the sections:


"Modem" And "Splash1" NO NEED to wash!
- We return to the image selection menu and write down the sections.


And "System" to HTC Desire 516 memory.

Image "System" in essence, it is the Android OS, which is installed in the device in question. This section is the largest in volume and therefore its rewriting takes quite a long time. The process cannot be interrupted!

And wait for the process to complete.

This will lead to the smartphone rebooting, a long startup time, and eventually the HTC Desire 516 initial setup screen will appear.

Method 3: Fastboot
If the method of flashing each partition of the HTC Desire 516 memory separately seems too complicated or time-consuming, you can use one of the Fastboot commands, which allows you to write the main part of the system without, in some cases, unnecessary actions on the part of the user.


fastboot devices

The system's response should be serial number 0123456789ABCDEF and inscription "fastboot".


fastboot flash partition name image file name.img
For example, let's write the section "modem". By the way, for the device in question, writing the “modem” section is a procedure that may be necessary after restoring the smartphone from a non-working state, if as a result the smartphone works as it should, but there is no connection.
Copy the required image(s) to the directory with Fastboot (1) and send the command(s) (2):
fastboot flash modem modem.img


Method 4: Custom firmware
The HTC Desire 516 model has not gained wide popularity due to its hardware and software features, therefore, unfortunately, it is impossible to say that a lot of modified firmware is available for the device.

One of the ways to transform and refresh the device in question in software terms is to install an Android shell modified by one of the users of the device, called Lolifox. You can download all the necessary files that you will need when performing the steps in the instructions below using the links below.
In the proposed solution, its author has done serious work in terms of changing the OS interface (looks like Android 5.0), deodexed the firmware, removed unnecessary applications from HTC and Google, and also added an item to the settings that allows you to manage startup applications. In general, the custom works quickly and stably.
Installing custom recovery.
To install a modified OS, you will need custom recovery capabilities. We will use ClockworkMod Recovery (CWM), although there is also a TWRP port for the device, which you can download. In general, installation in D516 and work with different custom recovery similar.


Installing custom Lolifox
Once the modified recovery is installed in the HTC Desire 516, installing custom software is not difficult. It is enough to follow the instructions from the lesson at the link below, which involve installing zip packages.
Let us dwell only on a few points recommended for implementation for the model under consideration.


Method 5: Recovering inoperative HTC Desire 516
When operating and flashing any Android device, trouble can occur - as a result of various failures and errors, the device freezes at a certain stage, stops turning on, endlessly reboots, etc. Among users, the device in this state was called “brick”. The following may be a way out of the situation.
The recovery methodology (“unscrapping”) of HTC Desire 516 Dual Sim involves performing quite a large number of actions and using several tools. We carefully follow the following instructions step by step.
Switching the smartphone to “Qualcomm HS-USB QDLoader9008” mode
- Download and unpack the archive with all the necessary files and tools for recovery.
The result of unpacking should be the following:
- To restore, you need to put the smartphone into a special emergency mode QDLoader 9006. Remove the cover covering the battery.
- We remove the battery, SIM cards and memory card. Then unscrew 11 screws:
- Carefully remove the part of the case covering the motherboard of the device.
- On the motherboard we find two contacts marked "GND" And "DP". Subsequently, they will need to be bridged before connecting the device to the PC.
- We install the QPST software package from the folder of the same name, obtained as a result of unpacking the archive using the link above.
- Go to the directory with QPST (C:\Program Files\Qualcomm\QPST\bin\) and run the file QPSTConfig.exe
- Opening "Device Manager", prepare a cable connected to the USB port of the PC. Closing the contacts "GND" And "DP" on the D516 motherboard and, without opening them, insert the cable into the MicroUSB connector of the phone.
- Remove the jumper and look out the window "Device Manager". If everything is done correctly, the device will be detected as "Qualcomm HS-USB QDLoader9008."
- Go to QPSTConfig and make sure that the device is detected correctly, as in the screenshot below. Don't close QPSTConfig!
- Open the folder with the QPST files again and run the file emmcswdownload.exe on behalf of the Administrator.
- Add the following files to the fields of the window that opens:

- We press the buttons and indicate to the program the location of the files:

- We check that all fields are filled in correctly (should be like in the screenshot below) and click "Download".
- As a result of the operation, HTC Desire 516 Dual Sim will be switched to a mode that is suitable for writing a dump to memory. In Device Manager, the device should be identified as . If, after manipulations via QPST, the device is determined to be somehow different, manually install the drivers from the folder "Qualcomm_USB_Drivers_Windows".


Additionally
In the event that errors occur during QPST operation and the smartphone switches to "Qualcomm HS-USB Diagnostics9006" We can’t do it, we try to perform this manipulation through the MiFlash program. You can download the firmware version suitable for manipulating HTC Desire 516 Dual Sim, as well as the necessary files, from the link:
- Unpack the archive and install MiFlash.
- We follow steps 8-9 described above in the instructions, that is, we connect the device to the computer in a state where it is detected in Device Manager as "Qualcomm HS-USB QDLoader9008".
- Launch MiFlash.
- Press the button "Browse" in the program and indicate the path to the directory "files_for_miflash", located in the folder obtained as a result of unpacking the archive downloaded from the link above.
- Click "Refresh", which will lead to the device being detected by the program.
- Calling up the list of button options "Browse" by clicking on the triangle image next to the last one

and selecting from the menu that opens "Advanced...".
- In the window "Advanced" using buttons "Browse" add files from the folder to the fields "files_for_miflash" in the following way:

After all files have been added, click "OK".
- Next, you will need to be careful. Making the window visible "Device Manager".
- Press the button "Flash" in the flasher and observe the COM ports section in "Dispatcher".
- Immediately after the moment when the smartphone is detected as "Qualcomm HS-USB Diagnostics9006", we close MiFlash without waiting for the end of the manipulations in the program, and move on to the next stage of restoring HTC Desire 516.


File system recovery

Thus, having studied how to install system software in the HTC Desire 516 Dual Sim, the user gains full control over the device and can quite easily restore the device’s functionality if necessary, as well as give the smartphone a “second life” using customization.
Last time I told you how you can install alternative firmware from Cyanogen on HTC Desire S, now let's figure out how to return the phone to its factory appearance.
Before reading, I recommend that you read the previous article Firmware Cyanogenmod 7.1 on HTC Desire S
As a rule, those who use custom firmware rarely return to the factory one. First of all, this is due to the fact that the vendor will release 1-2 updates for the device, and that’s it. The product line has already been updated, and new firmware is being written for it, thereby forcing the final consumer to purchase a new unit. It is clear that not everyone can afford to buy a new modern and technological device every six months (or even more often), but I really want to have new software features. As a result, on these Internets of yours, alternative ROMs for various devices, based on the firmware from the latest devices hitting the shelves. But there are still cases when the device needs to be returned to its factory form, usually this is associated with a trip to the service center (as a rule, if there is “wrong” firmware in the device, the service center refuses warranty claims, so it is better not to risk it). Or with the sale of the device (many people ignorant of “all these matters” are confused by the interference of “dirty paws” in stock configurations)
Introductory
So, given:1. HTC Communicator Desire S – 1 pc.
2. Custom firmware, for example CyanogenMod (or another - it doesn’t matter) – 1 piece.
3. The device received S-OFF
4. Recovery replaced by ClockworkMod
Task: return the device to its original state “out of the box”
Hop-hop hiphop backup, make a hiphop backup
Backup can be done in two ways:1. Keep only data and programs– it is recommended to do this if you decide to say goodbye to this model of communicator forever (you are selling, for example), but will remain on the Android platform. Titanium Backup or similar programs. This backup can be restored on any (almost) device with Android on board.
2. Save all ROM– it is recommended to do this if you plan to return to the same firmware in the future (for example, after returning the device from a service center). Go to recovery mode and select item backup and restore. This backup can only be restored to HTC Desire S (not necessarily to the same one)
Well, of course, you don’t have to make a backup at all if you are sure that you definitely won’t need it.
Restoring native ROM, HBOOT, S-ON and recovery
If you saved the stock ROM before flashing custom firmware, then let me congratulate you - you are an extremely sensible person. Now all that remains is to go into recovery and restore this ROM back. If there is no backup, or it is lost, go to XDA and select the appropriate firmware version. Then install the driver for USB and run the flasher. We wait a little and voila!After restoring the ROM, the firmware will be stock, recovery and root will disappear, but S-OFF will remain, and even the HBOOT version is absolutely wrong, and this is not childish. It's okay, it can be overcome. We will need this archive (registration on 4pda.ru is required for downloading). Unpack the archive to any convenient place, for example c:\EngSOff. After that, open CMD with admin rights and perform several magical manipulations to obtain temporary root access:
Cd c:\EngSOff adb push fre3vo /data/local/tmp/ adb shell chmod 777 /data/local/tmp/fre3vo adb shell /data/local/tmp/fre3vo -debug -start FAA90000 -end FFFFFFFF adb shell (make sure that #) exit icon appeared in the command line prompt
Now, without pulling the device off the cord, we launch Flash.bat from the same archive. If everything went well, you will see on the screen
SAGA PVT SHIP S-ON RL
HBOOT-0.98.0002
If not, then, without turning off the phone, repeat the entire operation again.
Conclusion
Well, that's all, my dear customizers. The device is in factory condition, all that remains is to format the SD card with sectors filled with zeros, and you can sell it. Well, or go to the SC, depending on how lucky you are.P.S.
And remember, everything you do with your phone is at your own risk. The author of the article is not responsible for damaged devices, nerves and other problems associated with flashing YOUR device.