How to install a Joomla template - troubleshooting possible problems. How to install a template on uCoz. Step-by-step instructions What is included in the template kit
This installation method can be used if you already have an existing Joomla and want to simply change the appearance of the site using a template.
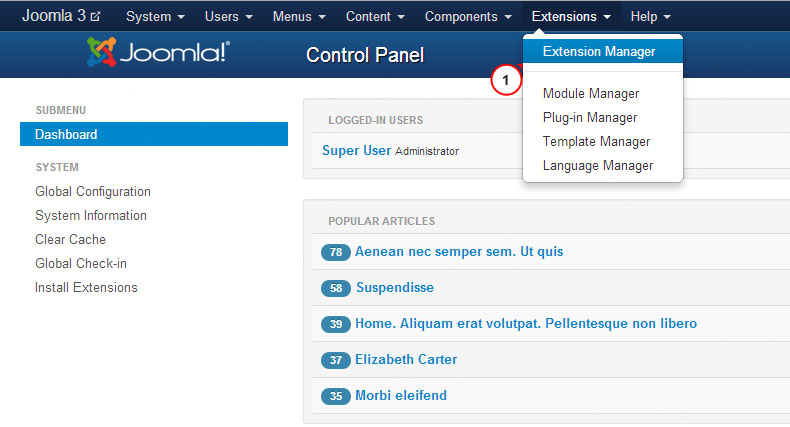
1. Open the Joomla control panel and go to the menu "Extensions > Extensions Manager".
2. Using the button Package File "Browse" find the file "theme###.zip" in folder "joomla" template. Click the button to install the Joomla template.

3. Install all modules from the folder 'sources_XXX.zip'(this folder must first be unzipped according to the instructions in the file 'info.txt').
4. The next stage is installing demo data.
To install demo data, you must complete the following steps:
Step 1. Upload demo images.
Connect to the server using an FTP client. To download demo images, open the folder "sources" in the template.
The folder is here "to_the_root_directory", containing the files that need to be placed in the Joomla root folder.
Step 2. Import SQL file.
The last and most important step of installing demo data is importing the SQL file using a database management tool (phpMyAdmin).
SQL File - "dump. sql» is in the folder "sources" template.
Do NOT import the SQL file if you have a live website because... it will completely overwrite existing data!
Attention: Before importing the SQL file, make sure that the prefix of the database tables matches the prefix in the SQL file.
The table prefix can be checked directly in the database through a database management tool. Pay attention to the table names. The prefix is a set of characters before the table name. ( for example, in the table "jos_assets" the prefix is "jos_"). You can also find the database prefix in the “configuration.php” file in the Joomla root folder. Line 19: public $dbprefix = "jos_"; ( where "jos_" is the prefix)
If the table prefixes do not match, open the file "dump. sql" in a text editor and, using Find and Replace (hotkeys CTRL+F or CTRL+H), replace the prefix "jos_" ( in the SQL file) database prefix. You can also use a detailed video tutorial on how to change the prefix in an SQL file.
or how to import SQL file using phpMyAdmin tool
Refresh your browser window. Please send us a request if you have any questions.
From the author: Greetings dear friend. In the Joomla content management system, the design of custom site pages is mainly defined in a template, which is installed in the system and specifies the rules for displaying page elements, describes the available positions for displaying modules, and also contains layout overrides for some components and modules. Therefore, in this article we will talk about how to install a Joomla 3 template.
At this time, a huge number of different templates have been created for CMS Joomla, which are available in both paid and free versions, respectively, before we begin studying the topic of installing a joomla 3 template. You need to download or buy the template you need, which will installed on the system. You can also create a template yourself by studying the course Creating a Template on Joomla.
For this tutorial I will be using the free Master2 template from Yootheme.
A template is a specific set of files and directories, which contains a file with the extension .xml - this is a manifest file that contains instructions for installing the template. Accordingly, if this file does not exist, it means that the installation will not be completed. For correct installation, the file structure must be packaged in a .zip archive (.rar archives are not supported).
Now that the template is prepared, go to the admin panel of the installed Joomla content management system.


And click the “Download and Install” button.

After installation is complete, you will see a corresponding message in the extension manager. Now that the template has been successfully installed, you need to go to the template manager.

Where and activate the newly created template as the default template.

At the same time, in the template manager, the template title is displayed as a link that will redirect you to the settings page of the selected template.

In this case, for each template on this page, there will be different sets of settings.
After this, the installation of the joomla 3 template is completely completed, now you can go to the user part of the site and check the operation of the new template, the only thing is that before that I would recommend filling it with content, otherwise the new template may not look as you would like.
This concludes the question of how to install a Joomla template, so let’s say goodbye. All the best to you and happy coding!!!
Want to know what it takes to create a website?
Watch the video and learn a step-by-step plan for creating a website from scratch!
To create a website you can go in two ways. Make a website yourself, that’s what we do on this site. Or contact a specialized company that creates a website and promotes it online. The second option seems simpler. For example, you need to create a website for Voronezh, your home city. Look for a company that creates a website with localization in Voronezh and after a while you will be the owner of a working website. If you want to do everything yourself, read on.
The Joomla 3 template is quite reasonably called the clothing of the site. We wanted to change the appearance of the site, installed a new template and that’s it. The site has a new design. There are more serious reasons for changing the pattern. For example, the template becomes outdated, is not updated by the author, and with the next Joomla update, the template begins to “glitch”. In any case, whatever the reason is to change the default Joomla template, you need to install the template first. There are three ways to do this.
What is a Joomla template
A Joomla template is a system extension that can be created and published by any author. On the Internet you can find options for free and paid templates from a variety of authors.
The difference between paid and free Joomla templates is the author’s technical assistance (support) and the possible presence of external links to the author’s site or sites. Those. support is present in paid templates, and external links appear on free templates.
How to check a template for viruses
- It doesn't matter where you get the template. At the end of the article there are several links to excellent free templates (by author). Download the template in a zip archive.
Checking the template for viruses
- To be safe, check the downloaded template file for viruses. Do this in at least two ways:
- Check the security of the template with your antivirus installed on your computer;
- Check the template archive file on the Virustotal website ( https://www.virustotal.com/)
Checking the template directory
Check out the downloaded plugin. Unpack it. There is a high probability that the archive you downloaded contains two archives: the template itself, plugins and modules for it. There can be many of them.
You need to select the template archive and the system plugin archive. Template modules are add-ons and are optional for the initial installation.
Now the important thing!
Three ways to install a Joomla 3 template
There are three ways to install a Joomla 3 template.
- Installing a template from the Joomla site panel;
- Via FTP;
- By URL of the file from the storage.
Template installation method No. 1. Install template from Joomla site panel

The most acceptable option for installing a Joomla template to understand the quality of the template and its readiness for work. If the author of the template assembled it correctly, then this installation method will work and there is a high probability that there will be no pitfalls in further work.
- To install the template, go to the tab: Extensions>>>Install;
- Select “Load file from package” from the manager menu;
- Select the downloaded template on your computer;
- Install;
- Correct and correct installation will be indicated by a green information bar;
- To check the installation of a Joomla template, go to the template manager and see the installed template in the list.
Template installation method No. 2. Install template via FTP
- Unpack the Joomla template archive file until all template files and folders are visible;
- We enter the site directory via FTP using an FTP client (FilleZilla or WinSCP);
- In the root directory of the site, find the tmp folder. Clean it up by deleting everything except the index.html file;
- Upload the template folders and files to the tmp folder;
- Return to the site panel. On the Extensions tab>>>Extension Manager>>>Install, select the “Install from directory” menu item;

- Check that the path to the tmp directory is correct and click the “Check and Install” button;
Note: You can do the same, but upload the template in your own folder. Then you need to add tmp/template directory to the path.
Template installation method No. 3. Install template by URL from storage
In the Extension Manager>>>Install there is a button “Install from URL”. In theory, it allows you to install a template from an open file storage. I have never used such a setup.

Several authors of free Joomla templates
- Joomshaper (HELIX3 basic). https://www.joomshaper.com/joomla-templates/helix3
- JoomLead. https://joomlead.com/
- Joomdev. https://www.joomdev.com/
- Agethemes. http://agethemes.com
“Dark horses” come across not only among people, but also among CMS. One of these “horses” is DLE.
While there is a lot of information about other PHP engines on the Internet, you can only find a few decent materials about this CMS. Let's make this article worthy by telling readers how to install a template on DLE:
Known about unknown CMS
This engine is not as popular on the world Internet as WordPress or Joomla. It is the creation of Russian programmers. Therefore, you can most often stumble upon a site running on this CMS and template for DLE in RuNet.
CMS DLE is positioned by its creators as the basis for the deployment of information portals and blogs. The internal engine system is adapted for heavy loads and has a high degree of fault tolerance:
Like most engines, DLE (DataLife Engine) runs on php and MySQL. The main disadvantage of this content management system is that it is paid. Despite this, DLE ranks fourth in terms of prevalence among resources located in the ru zone. Although most of them (59 thousand sites) use pirated versions of the engine.
A license for a basic CMS package for a period of 1 year costs RUB 2,190. Its extension for the second year (and subsequent ones) will cost 1,490 rubles. The price of the extended version is 2790 rubles.
In addition to paid versions, there is also a free version. This version of the CMS is presented by the manufacturer as a trial version of the engine and the basis for creating your first website:
The main disadvantage of DLE is its poor security. Back in 2008, experts criticized CMS for the poor security of its internal system when handling requests. Most likely, this problem has not been eliminated today.
According to Yandex analytical data for 2011, sites that work specifically on the basis of CMS DLE are most often infected. The latest release of the engine at the moment is version 10.3. It was released in September 2014.
Features of the template for DLE
Templates for DLE websites have a number of features that fundamentally distinguish this CMS from other content management systems:
- The engine template structure is built on the basis of TPL files. This greatly simplifies the process of layout and adaptation of the template design;
- The main structure file is main.tpl. All additional template elements ( menu, sidebar) are also specified using TPL files;
- Style decisions are written in two files: styles for the software part are specified in engine.css, and everything else is specified in style.css:
Before installing the DLE template, download its installation package and place it in the templates folder:
Then you need to go to the site’s control panel (file admin.php). After that, in the menu on the left side, select “ Script settings», « System settings»:
At the bottom, in the “General settings” section, go to “ Default site template" Select the desired template from the drop-down list. After making changes, do not forget to click the “Save" button:
After this, the new template will be activated and the site will change its appearance. But before you put the template on DLE, do not forget to unzip it.
IN CMS DLE Unlike other popular content management systems, the template installation does not occur from the archive.
Unfortunately, most of the templates for DLE, like the engine itself, are paid. But if you search hard, you can find a couple of decent resources on the RuNet where you can download templates for free. Here are a few of them:
- dle-shablony.net – about 50 different templates are available here for free download. But they are all “lumped” in one general section without sorting by category. Although among them you can find very “strawberry” specimens:
- newtemplates.ru – the site presents a large collection of paid and free templates. All of them are conveniently sorted by thematic headings. But even among the paid ones you can find samples costing $5-10 and with a circulation of only 5 copies. And this will provide the resource with a design with a fairly high degree of uniqueness!
- 10.dle-shabloni.ru is a cool resource with a huge collection of templates for DLE websites. Tags will help you find the ones you need by topic or even color. You can see how the template works using the built-in demo version or in the video played in the Youtube video player window:
Don't forget that each template was developed for a specific version of CMS DLE. Their compliance must be checked before downloading the selected sample.
How to edit a DLE template
Unlike other popular content management systems, DLE has a simpler template design. Thanks to this, editing them is much faster and easier. The administrative part of the engine includes an integrated code editor.
To access this tool you need:
- Go to the site admin panel;
- In the menu on the left, select “ Template management", "Site templates";
- In the drop-down list located in the " Selected template for editing"Install the desired instance and click on the "Run" button:
- After this, the built-in code editor window will appear below. But before you edit the template, you need to select a file to edit. The template file tree is located on the left. After clicking the cursor on the desired source, its contents will be displayed in the editor window:
As you can see from the figure, the tpl file is a regular html, the structure of which is easy to understand. But before editing this code, it is strongly recommended that you familiarize yourself with the design features of the DLE engine.
How to install a Joomla template - troubleshooting possible problems - 4.5 out of 5 based on 2 votes
Selecting, installing and customizing a template is one of the most important stages in creating a website on Joomla.
In this tutorial we will look at how to install a Joomla template, what methods of installing Joomla templates exist and how you can solve some problems that may arise when installing a template.
Before we start looking at the methods and features of installing a Joomla template, I will give you a couple of tips.
#1. After you, make sure that this archive contains exactly the template, and it has everything necessary to install it. For automatic installation, it is necessary that the archive with the template have a ZIP extension, and inside it must be the following files:
templateDetails.xml - which contains parameters for setting the template;
index.php - contains the entire template structure.
In addition, make sure that the archive contains the following folders:
css - contains style files;
images - contains images used for the template.
These are not all the files and folders that may be present in the template. The set of files and folders depends on the template; here are only those without which the template cannot work. It often happens that the archive you downloaded contains several more archives, therefore, based on the above signs, you need to determine which of the archives is a template and extract it for subsequent installation.
#2.
In order to select the required template, it is best to install demo data, or create several sections, categories, menus and materials so that your site has at least some appearance. It’s just that if you install a template on Joomla, which does not have a menu, materials and necessary modules, then you will not be able to see what this template looks like. Therefore, I advise you to install Joomla with demo data, specifically in order to select a template, and then, after you decide on the choice of template, install pure Joomla and the selected template, and start creating the necessary elements.
There are several ways to install a Joomla template.
To install the template using the installer, in the Joomla administrative panel, select the item: “Extensions” >> “Install/Uninstall”. Then, through the “Browse” button, find and select the archive with the theme, and then click on the “Open” button.


Now click on the button: "Upload File & Install".

If everything is fine, then you will see the following message:

But that's not all, now you need to indicate that this particular template needs to be used for your site. To do this, go to: “Extensions” >> “Template Manager” and from the list of templates presented there, select the one you want to use and click on the “Default” icon.

As a result, a yellow asterisk will appear opposite the template you selected.

After that, you can go to the site and see what it looks like.
Sometimes it is impossible to install a template using the installer. In most cases, this happens because the templateDetails.xml file is missing or there are errors in it. Therefore, if you were unable to install the template using the first method, try installing it manually.
To do this, create a folder with the same name as the template archive and unpack it into this folder. After this, you need to move this folder to the following location: folder_with_your_site/templates. If your site is on a local location, then simply copy the folder; if it is on an Internet hosting, then upload the folder via FTP.
After moving the folder, go to the Joomla admin panel: “Extensions” >> “Template Manager” and assign this template as the default.
There is another way to install templates, which for some reason few people mention. This method will appeal to beginners who don’t particularly understand how to customize a template. Some studios that produce templates, in addition to the usual archive with the template, offer the use of quick launch packages. The quick launch package is a regular Joomla distribution of a certain version, in which this template has already been implemented and all the necessary settings have been made, as well as all the necessary extensions have been installed, if they are needed for the correct functioning of this template.
That is, you just have to install the proposed Jomla assembly with an already implemented template, as well as regular Joomla, and as a result you will immediately have a ready-made website using the template you need. You can find such templates in the section.
But there are two problems here that can be easily solved.
#1. All studios that produce such templates are foreign, so in this package they provide the English version of Joomla. This problem can be solved by installing Russian localization for the front and administrative panels of Joomla. You can get localization by going to joomlaportal.ru. There, in the right sitebar, there will be links to download language packs.
#2.
The second problem is that the theme will not always be integrated into the latest version of Joomla, especially if the template was released a long time ago. You can solve this problem by installing this version of Joomla, and then updating it to the required version. You can download update packages at joomlaportal.ru.
Now a little about the problems that may arise after you have installed the template and decided to see how it will look.
The thing is that the appearance of a Joomla template largely depends on the location of the modules, and therefore if they are located on your site differently than the intended location in the template, then it will look different, or even clumsy.

For those who don’t know, most of the information is displayed using modules in Joomla. There are modules that display a menu, popular materials, additional materials, a login form, etc. Each of these modules is published in a specific position. Therefore, in order to customize the template, you need to find out in what places the module positions are located and what they are called. You can view this by adding the following to the main site address: ?tp=1, for example: http://your_site.ru?tp=1 and pressing Enter. For example, applying this to a standard Joomla template, we get the following picture:
Another way to find out the location of the modules is to go to the Joomla admin panel: “Extensions” >> “Template Manager”, click on the required template from the list and click on the “View” icon.
Everything before the curly braces, i.e. top, left, user3, user2, etc., is the module position that must be specified for each module.
Now, having looked at how the modules are located in the demo template, and comparing them with the position in which each of the modules should be located, you need to change the positions for certain modules.

In some templates, it is possible to change various template parameters. To check if your template has this feature, go to the Joomla admin panel: “Extensions” >> “Template Manager”, select the desired template and click on the “Edit” icon.
As a result, on the loaded page, on the right, a block will be displayed: “Parameters” where various settings can be placed. You can change these settings and see how the appearance of your site will change. Often, using such settings, you can change the template width, color, fonts, the width of individual blocks and solve certain problems with the template display.