How to install windows xp on a modern computer. Step-by-step instructions for installing Windows XP. Required additional software
Windows XP is a good option for installing on a netbook, on a weak desktop computer, or on a laptop that was released many years ago.
The Windows XP operating system, despite the fact that it was released in 2001, is still well suited for working on low-power, outdated computers. More modern operating systems Windows 10, Windows 8.1, Windows 8, Windows 7 place more severe demands on computer hardware.
During times creating Windows XP, to install the operating system, CDs were used that were inserted into the CD/DVD drives of the computer. Era of portable USB flash drives has not yet arrived, so Microsoft has not provided a tool to install the system with bootable flash drive.
Installing Windows XP via a USB flash drive takes place in three stages:
- Creating a bootable USB flash drive.
- Selecting to boot from a USB flash drive in the computer BIOS.
- Installing Windows XP on a computer from an installation flash drive.
Creating a bootable USB flash drive with Windows XP
To create a bootable USB flash drive, we use the free WinSetupFromUSB program. We also need a blank USB drive for recording on the system’s flash drive.
There is a detailed article on my website. Read the article, write down the instructions operating system to a flash drive.
Selecting boot priority in BIOS
Insert the USB flash drive with Windows XP into the USB connector, and then turn on the computer. Immediately after starting the PC, you need to press a specific keyboard key to enter the BIOS settings to select the boot priority from the bootable USB flash drive or DVD drive A.
On different devices different keys or key combinations are used.
After starting the computer, testing the equipment begins, at this time you need to quickly press the key to enter the BIOS. The most commonly used keys are "Del", "F2" and "F8" for fast loading.
Work in the BIOS is carried out using keyboard keys. The BIOS window provides explanations for English language, which keys need to be used to configure.
In the AMIBIOS settings, go to the Advanced BIOS Features menu, where you need to select as the first boot USB devices disk, moving it to first place.
AMI BIOS ver.3.31a
In other BIOS versions, open the Boot tab, select USB flash drive , install it as the first boot device if you are installing from a USB flash drive. Select DVD drive, if you are installing from disk.
Save the settings and then exit the BIOS. Immediately after this, the computer will boot from the installation flash drive or from a CD/DVD disk if an optical disk is used to install Windows XP.
If you didn't manage to enter the BIOS in time, it's okay: restart your computer again, and then try again.
How to install Windows XP from a USB flash drive
In the first window with the inscription “Press any key to boot from CD” you need to press any key on the keyboard.
To create a flash drive, we used the WinSetupFromUSB program, so the MultiBoot USB window will open on the screen, in which you need to select "Installation Microsoft Windows XP SP3 x86 - Russian version".
If you install from disk, the window located above does not appear.
The installation of Windows XP begins. After downloading necessary files The Windows XP Professional Setup window opens. Necessarily
Press any key, otherwise the installation will not start. 
Press the " Enter» to start installation of the operating system.
All offered options:
1. Proceed with installing windows xp (Enter key)
2. Restore Windows (R key)
3. Exit the installer (F3 key)

We accept the license agreement by clicking on the " F8».

If the system is already installed on the computer, the window will display the sections hard drive. You can delete all partitions and install the system in an unallocated area, (be careful, after deleting a partition or formatting it, you will lose all data) or select an existing system partition for installation.
We will install Windows XP in an unallocated area. In the unallocated area, if necessary, you can create an additional non-system disk partition (partition D for data storage).
On our computer, an unallocated area is selected. To start Windows installation, click on “ Enter». 
- Format partition to NTFS system(Quick).
- Format the partition in the NTFS system.
This window may prompt you to format in file system FAT, don't consider this option.
You can choose any of these formatting options in NTFS. In the first case, formatting the partition will be faster.

The system partition is being formatted.

The system copies the files to the Windows installation folders.

Upon completion, the computer will restart.
Next, a window will appear with the inscription “Press any key to boot from CD”, in This time we don't press anything!  The installation program window displays information about the functions of the operating system. Windows XP will take some time to install, and the estimated time until installation is complete is displayed in the Windows Setup window.

On top of the System Installation Wizard window, windows open for configuring certain parameters.
In the window " language and regional standards» select the language, click on the « Further" In the Russified version of Windows XP, Russian is selected by default.

In the next window, be sure to enter “ Name account", for example Alexander.
You can enter anything you want. This name will appear in the system as the computer username.
If you regular user, « Name of the organization» do not enter. 
In the Product Key window, enter the key for your copy of Windows. (this window may not appear - depending on the build of Windows XP ). You can skip this step; the system can be activated later, after installation on your computer is complete.

If you did not enter the key in the previous window, in the " Error» click on the button « No».
In the next window, enter " Computer name", such as Dell, and administrator password. If you do not use a password, leave the corresponding fields blank, and then click on the " Further" If necessary, you can set the administrator password later. 
In the window " Setting the time and date» — select time, date and time zone.

The Windows XP Setup window will open again.

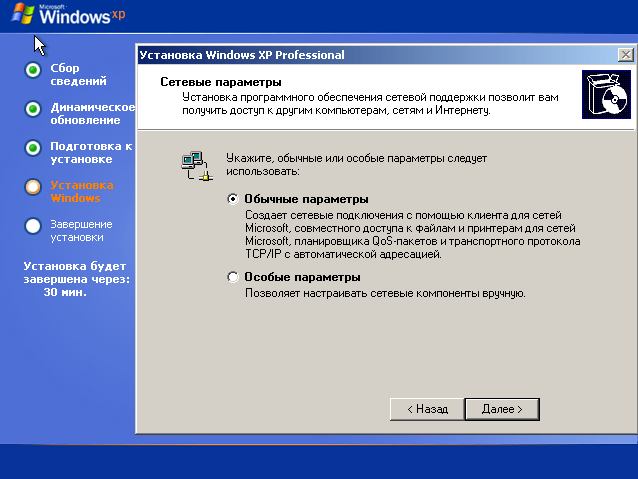
In the next window " Network settings» select « Regular Options».

In the window " Workgroup or domain» click on the button « Further", without changing anything.  The Windows XP installation window will open again.

The installation of the operating system continues for some time. After installation is complete, the computer will restart.

A welcome window opens and then Windows XP starts. 
Windows XP installation complete.
Enter BIOS, select as first boot device again HDD(HDD) computer. Next, install the necessary drivers on your PC. You may have the drivers on the disk that came with your computer, or you can go to the official website of the equipment manufacturer and download the necessary drivers from there. More details about this in the article: “. This article contains links to the official websites of motherboard and video adapter manufacturers.
In contact with
Detailed description of reinstalling Windows Xp on a computer or laptop
Perhaps you were looking for:
How to install/reinstall Windows Xp without a disk (from a flash drive)
Step #1. Burning a disc
If you have a disk with Windows XP, then you can safely skip this step and go to [step No. 2] since here we will talk about what to do if you do not have a disk with Windows, but have a key (for example, you bought a laptop with on which the OS was installed, there is a piece of paper pasted on the back or side of it, on which is the key that we need, or another situation, but as a result you should have a key to Windows). We copy the key number onto a piece of paper so that it is at hand, and move on. Select one of the versions of Windows Xp. Both versions are time-tested
or 
Now search the Internet Windows Xp Sp2 Professional license disc. Since distribution is illegal, we have no right to provide a link to Windows. But I will give you a link to the ORIGINAL VERSION of Windows xp sp3 proffessional - By the way, if you want a pirated version, I will give you a link, but considering, again, that I do not have the right to post files on my resource, I will give you a link to a torrent with Windows Xp sp3 Simplix Edition
Original version of Windows Xp Sp3
Download Windows Xp Simplix Edition
After you have downloaded Windows image Xp, download the program to burn our image to disk
To do this, download a program to burn our image to disk
Download Portable ImgBurn
After the Windows image and our ImgBurn program have loaded:

Step #2. The disk is ready. We set First boot device CD-Rom in BIOS
So, after Step #1 we have a disk with Windows Xp. At this stage our
the task is to get into the BIOS and set it to initially boot the disk with
installed Windows XP. To do this: Reboot or turn on
computer and press the delete key (there are other options, for example
F1,F2,F8,Ins. 
The initial splash screen should usually show you which key to press to enter the BIOS 
As a result, we must get to blue screen BIOS, in our case it looks like this 
We set the first boot from the Disk; for this we go (with the usual arrows) to Advanced Bios Features -> First Boot Device select CD-Rom, press enter, then esc, go to save&exit setup, press enter, then Y and enter again. 


Note: if you have a different BIOS, the essence does not change. The main thing is to find the First Boot Device and select CD-Rom. After step 2, the computer reboots itself and if you did everything correctly, then when you reboot, the message Boot from Cd/Dvd will appear on a black background: 
And after a while Press any key to boot from Cd.. 
(press any key on the keyboard to boot from the disk), press the key. If a blue screen appears with the Windows installation at the top, then at this stage you have done everything correctly. If the keyboard cannot be pressed, you need to go into the BIOS and set SUPPORT USB: YES 
Step #3 Formatting the partition. Installing XP or answering the question: " How to install Windows Xp for a teapot«
Now we wait (2-5 minutes) until a blue window appears with the inscription “Welcome to the installation program” 
Press Enter, then read the agreement and then press the key F8
A) If you already have a partition where we will install Windows Xp formatted and created (if not, read point b) -> select the partition 


If you see the message “The installation program is copying files,” everything is done correctly! Let's move on to point c 
B) If the disk is not formatted 
Select it and click on D
Attention: with this action we delete all data that is on the disk C:
Click L
Next, click “Unallocated area” WITH to create a new partition 
Enter the size of our partition in megabytes 
Select it from the list 
Format in NTFS system (fast)
If the message “The installation program is copying files” appears, everything has been done correctly and you can now continue starting from point in
C) When the installation load reaches 100%, the computer will reboot itself. (When the reboot is in progress, we DO NOT PRESS ANYTHING, we just wait) 
At the 33rd minute, fill in the language parameters 
Enter Name and Organization 
Product Key 
After you have entered the key, the installation will continue and Windows will be installed for at least 10-15 minutes and we will not take part in this. When Windows is installed, the computer will reboot again and we will only have to fill in the account name, which Internet you use, etc. 

Congratulations, Windows XP has been successfully installed!
This article discusses the procedure for installing Windows XP on a computer that already has Windows 7 installed and the sequence of steps required to create a dual-boot configuration where, when you turn on the computer, a menu is available to select the operating system to boot.
Introduction
It is generally accepted that the more correct Windows installation sequence is to install the minor version before the older one. In this case, it is possible to download more old system, and after installing a newer OS, a menu for selecting the boot system appears.
However, the sequence does not matter if you know the principles of loading operating systems. Let's consider a situation where Windows 7 is already installed, but you need to install Windows XP on your computer. The article is intended to help avoid pitfalls for those who plan to install Windows XP after Windows 7.
Initial data
Installing Windows XP
About Windows installation A lot of articles have been written about XP, so there is no point in dwelling on this issue in detail within the framework of this article. The only thing is to install Windows XP when already installed Windows 7 you can only boot from the installation Windows disk XP. During installation, you must specify a disk partition that was prepared in advance.
Figure 2 - Selecting a partition for installing Windows XP
Already in this figure you can see that the partition that does not have a letter in Windows 7 is assigned the letter C, and the partition with Windows 7 is assigned the letter D.
This is how the “disk management” picture looks after installing Windows XP
Figure 3 - Disk Management in Windows XP
After installing Windows XP, there will be neither a choice of operating systems at boot, nor, accordingly, the ability to boot Windows 7.
Pay attention to the changes that have occurred with the hidden “System Reserved” section: it has become visible (it is assigned the letter C). Let's see what's on active section(C). To do this, you need to disable hiding in the folder properties. system files and allow them to be displayed:

Figure 4 - Enabling the display of hidden and system files
So, on partition C we see Windows 7 boot files: bootloader - bootmgr and folder Boot, in which the boot menu interface files are located, the boot data storage file - bcd, memory test program files - memtest.exe. In addition, it now contains the Windows XP boot files: ntldr, ntdetect.com, boot.ini.
Figure 5 - Boot files for Windows 7 and XP operating systems
Restoring the Windows 7 boot loader in Windows XP
To restore Windows 7 boot, you need to use the Windows 7 installation disc.
Insert the Windows 7 installation disk, find the file on it bootsect.exe in folder BOOT. Please note: the path to the bootsect.exe file is F:\boot\bootsect.exe. In your case, instead of F there will be a letter belonging to the CD - DVD drive

Figure 6 - Contents of the BOOT folder of the Windows 7 installation disk
Launch command prompt: click Start - Execute, enter in the field cmd. Once prompted, enter the following command
Figure 7 - Flow of the bootsect command
The result of executing the command will be the restoration of the main boot entry Windows 7 system and boot code that passes control to the Windows 7 Boot Manager.
Creating a Dual Boot Configuration on Windows XP
As you know, there is no utility for changing configuration data in XP, but it is in the folder with Windows 7 installed. To apply it correctly in XP, you need to enter the System32 directory of the Windows 7 operating system at the command line. After the transition, run the following commands in sequence:
Bcdedit /create (ntldr) /d "Microsoft Windows XP"
This command creates a Windows XP download store in the Windows 7 download store. Running this command may fail because the repository is already created by default, so you just need to rename it:
Bcdedit /set (ntldr) description "Microsoft Windows XP"
The following command will tell the Windows 7 boot loader the device location of the XP boot files:
The following command will point the Windows 7 bootloader to the Windows XP bootloader:
Bcdedit /set (ntldr) path \ntldr
The following command will add a line about selecting Windows XP in the boot menu and place it under the rest:
Bcdedit /displayorder (ntldr) /addlast
Figure 8 - Complete list of commands for creating a boot menu in Windows XP
You can check whether the commands are executed correctly and the presence of the boot menu by running in the window command line team bcdedit or by analyzing the bootcfg file obtained by running the bcdedit >c:\bootcfg.txt command. The file will be located in the root directory of drive C.
Figure 9 - Checking for the presence of a Windows XP boot entry and boot menu
After running these commands, when you boot your computer, you will be given the option to select the OS to boot.
Figure 10 - Selecting OS to boot
It may be more convenient for many to reduce the OS boot selection timeout, which by default is 30 seconds. To configure this parameter, use the command
Bcdedit /timeout XX
Where XX is the timeout time in seconds.
Features of creating a dual boot configuration in Windows 7
If you are just going to install Windows XP, then you can create a dual boot configuration in advance, even under Windows control 7. The same recommendations will help when you restored the Windows 7 bootloader while in Windows XP, and decided to create a dual-boot configuration later.
In this case, some features should be taken into account.
Commands, just like in Windows XP, are executed on the command line. IN Windows system 7 These commands must be run from an elevated command prompt. To do this, click the button Start, select item Standard, right-click the Command Prompt shortcut and select , or like this:
Click Start and in the search field enter cmd
On the found file, right-click and select context menu paragraph Run as administrator.

Figure 11 - Running command prompt with elevated rights (as administrator)
The order of execution of the commands is the same, with the exception of one. As you know, the Windows 7 and Windows XP boot files are located on a hidden partition that does not have the letter . Therefore, instead of the command
Bcdedit /set (ntldr) device partition=C:
Need to do
Bcdedit /set (ntldr) device partition=\Device\HarddiskVolume1
This note does not make sense if for some reason (for example, if your hard drive was partitioned before installation), the hidden boot partition was not created and the system boot files are on the same one as Windows 7 section.
Conclusion
Even if the installation sequence of operating systems is not entirely correct, it is not difficult to organize their correct loading without resorting to complex manipulations or third party programs. Using the Windows 7 installation disc, you can restore the ability to boot into this operating system, and using the utility bcdedit configure the loading of two operating systems.
Preparing a disk with a distribution kit is the first stage of installing Windows XP. If you already have such a disk in your hands, you can skip this point, but if you downloaded a system image in ISO format from the Internet, you will need to use special programs(Nero Burning ROM, UltraISO and analogues) burn it to CD or DVD.
The Windows XP boot ISO file is a ready-made system image containing a complete set of installation data. It doesn't require any preliminary preparation, but is transferred to the CD unchanged.
Let's look at the process of burning a Windows distribution to DVD using UltraISO as an example.
- Launch the application.
- Press the key combination “Ctrl” + “O” and open Windows ISO image, which you have prepared to transfer to disk.
- Click on the “Burn CD image” icon in the toolbar at the top or press the F7 key.

- Place a blank or rewritable DVD in the optical drive.
- Make sure that the distribution you need is selected in the “Burn Image” window. Check the “Check” option if you want the disc quality to be checked after burning. Select the appropriate recording speed. Even if your laser drive can write on maximum speed, we recommend choosing medium or low. This will ensure good readability of your disk by any drive, including old ones.
- A rewritable disc must first be erased by clicking on the button of the same name, and you can immediately start writing to a blank disc by clicking “Record”.

After 20 - 30 minutes, depending on the speed of the drive, the preparation of the installation disk will be completed. You can move on to the next stage.
How to install Windows XP from a disc the traditional way
Traditional installation is a conventional system installation process that requires active user participation. Most often, Windows XP is installed in the traditional way.
At this stage, we have already prepared everything we need. In order to install Windows from a disk, we only need the disk itself and a computer with optical drive, on which the system will be installed. If you don’t have a drive, you can use an external one that connects to a USB port.

BIOS setup
To boot your computer from a CD or DVD, you need to BIOS settings Setup to assign the CD drive as the first boot device. To do this, enter the settings menu by pressing the designated key (Del, F2 - F12, etc.) immediately after starting the computer. Which one you can read at the bottom of the splash screen motherboard(displayed on the screen almost immediately after turning on the PC).
Once in the settings, go to the “Boot” or “Advanced BIOS Features” tab - in older versions Award BIOS. Use the arrow keys to navigate to select the laser drive from the list of devices. In our example it is listed as CD-ROM Drive, but sometimes this list only lists hardware models.

After selection desired device press F10 (exit option BIOS menu with saving settings).
Booting from disk and the Windows XP installation process
- Place laser disc into the drive and restart the PC. System installation begins with boot Windows files XP in computer RAM.

- Next, Windows will greet you and offer you the option to continue the installation, exit the program, or restore itself using the recovery console. The second and third points do not suit us.
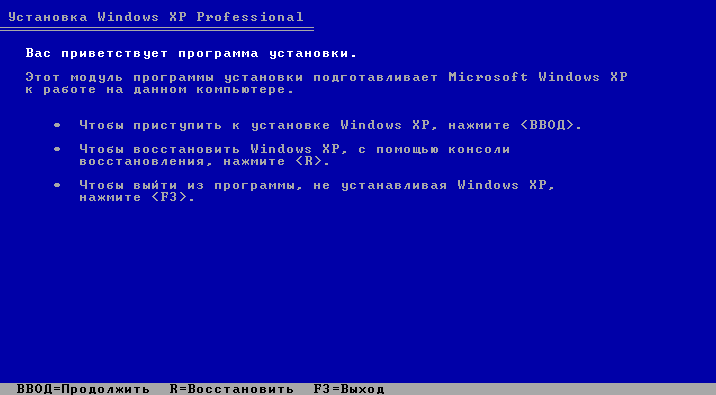
- By pressing Enter you will continue the installation. The next step will ask you to accept the Microsoft license agreement for using Windows XP.

- Next, select a location on the hard drive for the system partition. Click “C”, which means “Create partition”.

- Let's determine the size of the future drive C. In our example, it is maximum, but you can set anything, preferably at least 10 Gb.

- Now let's look at the list of hard drive partitions and agree to install Windows in one of them by pressing Enter.

- Let's format the new partition in NTFS (quick formatting will suit us just fine).

- And wait until the installer copies the distribution files to the disk.

- Once the copying is complete, the computer will restart.

- Next Windows boot XP will no longer be run from a CD or DVD, but from a hard drive. This means that the system bootloader has been successfully created and is working correctly.

- From now on, our participation will be required again. Here we will have to specify the default system language, our location and additional languages if needed (although language packs can be installed later).

- Next – your name and organization. The name is required; the organization can be skipped.

- Entering the serial number of the Windows distribution during the installation process is voluntary. You can always enter it later.

- The computer name and administrator password must also be specified now. The name will be suggested by default, but you can change it. The password can be left blank.

- The date, time and time zone are also set at this stage.

- Special network parameters we will not appoint, let them remain with us by default.
- Name working group let it remain as it is. You can always change it after installation.

- The installation is almost complete. Next, the screen will be configured and one or more user accounts will be created, the first of which will be designated as the computer administrator. You will also be prompted to activate Windows XP right now.
But now it’s really almost everything. There are a minimum of settings left - and the system is ready to work.
Automatic installation of Windows XP
Creating an answer file using Windows tools
Agree, installing the system for about an hour without leaving the computer and constantly clicking “Next” will get boring for anyone. To simplify this work for those who have to do this often and for a long time, they came up with a way Windows installations without user intervention. To do this, a script is created in advance - a response file, which contains all the information necessary for the installer program.
The time has come for you and me to figure out how to create such scenarios. Part Windows distribution XP included utility Setupmgr.exe, which is in the archive deploy.cab, stored in the SUPPORTTOOLS folder on installation disk. Let's extract this utility from the disk and run it.
- The “Installation Manager” wizard will help us create the answer file. With its help, we can either create a new or change an existing script. Since we don’t have any preparations, we’ll select “Create”.

- We will leave the installation type as default – “ automatic installation”.

- Product version – Windows XP Professional.

- User experience – “Fully silent installation” (if we do not plan to change the parameters in the answer file).

- Next, select “Install from CD”.

- Let's accept the license agreement and proceed to filling out the same forms and fields that we filled out when installing Windows from disk. First window: “Name and Organization”.

- Screen options. They can be left as default (use Windows defaults).
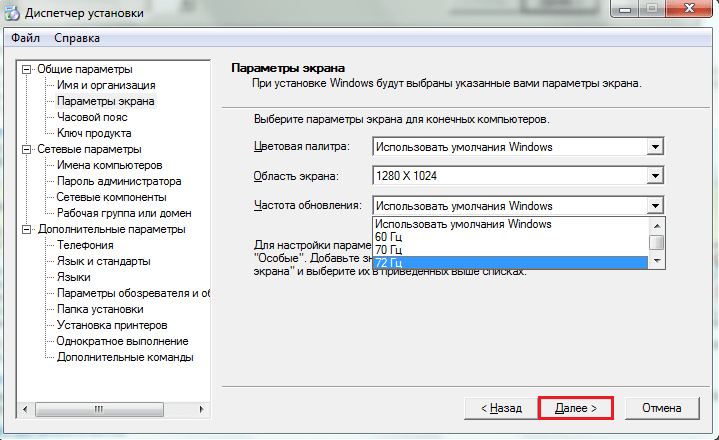
- Timezone.

- Serial number (required!). Without entering serial number here, you will not be able to continue creating the answer file and installing the system.

- The names of the computers on which Windows XP will be automatically installed using this scenario.

- And also: administrator password, network components, name of the workgroup or domain where this PC will belong, telephone code countries and cities, locale standards, language support, initial settings Internet Explorer, Windows installation folder, printers and a number of other settings - in separate program windows.
Upon completion of the wizard, a file will be created unattend.txt- this is our script, thanks to which we can install Windows XP completely automatically.
If you install the system from a CD, you need to rename unattend.txt to winnt.sif.
Once you've created your answer file, you can add your own commands to it, which you can learn about in this article.
That's probably all. As you can see, there is nothing difficult about installing Windows XP according to a script without your own active participation. All that remains is to save the resulting file in the i386 folder of the distribution disk - in the same place where winnt32.exe - the Windows installer - is located.
If your PC has a floppy drive, you can place the answer file in the root directory of a floppy disk and insert it into the computer during system installation. In this case, the installer will prioritize executing the script from the floppy disk, even if there is another one on the CD, in the i386 folder.
Automation of installation by alternative means
Windows' own tools are not the only tool that allows you to install it “in one click.” There are apps for this too third party developers, For example, Advanced Windows Unattended Installer. Create scripts with this simple and free program much faster and easier than using Windows. The only drawback of Advanced Windows Unattended Installer is the lack of a Russian-language interface.
To use this tool to create a disk that allows you to automatically install on Windows computer XP, you only need to do three steps:
- Copy the contents of the Windows distribution to a separate folder or mount its ISO image into a virtual drive.