Custom recovery android 4.4 2. Installing CWM Recovery on Android: ways for every taste. Partitions CWM recovery version of Touch
Any device with Android OS starts in Recovery mode. This is a standard feature. However, with the factory option, you can perform too narrow a range of tasks. So, this is resetting the phone to initial settings, clearing the cache, and updating the system from the update.zip file. Obviously, users who are expanding their knowledge in the IT field are very unhappy with such a meager list. This is where specially designed recovery mode s. CWM Recovery is a popular tool among Android users and a worthy factory replacement.
Why do I need CWM Recovery mode
Clockworkmod Recovery (CWM) is a famous factory recovery alternative developed by Koushik Dutta. You can install it on most Android devices. CWM Recovery helps even in situations that sometimes seem hopeless to an ordinary owner. That is why it is necessary to know about its existence, as well as be able to use it.
 CWM mode has many options
What exactly does the utility do:
CWM: installation instructions
ClockworkMod is sewn into the internal memory of the device in place of the factory mode. In some cases, work is carried out on the gadget itself with access to Root-right, and in others - on a PC.
The article covers such basic methods as Rom Manager, FastBoot, Rashr and Odin. For many devices, the companies themselves produce separate utilities, such as Acer Recovery Installer for Acer devices. CWM is embedded in the device memory on these devices also through the ADB software, which is suitable for devices with the HTC manufacturer.
Rom Manager: Root rights and sewing
Rom Manager is a utility created by CWM developers. It is available for download at Google Play market. Allows you to install CWM Recovery on the device itself without using a computer and a USB cable. Before using it, you need to root the device, that is, get administrator rights.
Getting Root rights
The procedure is straightforward and is easily carried out using special software. Take Framaroot as an example. With its simple and intuitive interface, everyone can handle it even without instructions.
 Click on the dropdown box
Choose a method for obtaining Root rights. Follow the advice - restart the device for the changes to take effect.
 For the changes to take effect, restart the device
Launch Rom Manager
Now is the time to use the program:
 Select Recovery Setup
 Click on ClockworkMod Recovery to install
Video: how to flash Recovery with Rom Manager
Although the method is easy, there is a drawback in it: it is not suitable for all devices, as already indicated earlier. Before you start using this method, it would be logical to first determine that this program is compatible with the gadget. The list is available on the official Rom Manager website.
FastBoot Mode: The Complicated Method
The method of installing CWM using FastBoot will require skill from the user, as it is much more complicated than the previous one. It does not run on the device, but on the computer. It is recommended to use it only if you already have skills in such operations. Before the installation itself, you need to download certain files to your computer or laptop. This list also includes android platform SDK available for Windows, Mac and Linux.
Preparatory stage
What you need to have before installing CWM using FastBoot mode:
The Android SDK utility will help you install the required Android SDK Tools and Android SDK Platform tools:
 Download the Anroid SDK for Windows zip archive from the official website
 Find android file in the unzipped folder and open
Check the box to the left of Android SDK Platform-tools and click on Install 1 package.
 Select Android SDK Platform-tools and click Install package
 Accept the license agreement
 The fastboot and adb files are located in the tools_version-windows folder after installing the Android SDK Platform-tools
What else needs to be done before starting the firmware itself? Judging by the list above, you need a recovery-clockwork.img file. This is one of key instruments for further work. Downloading it is not difficult, but this is not the end of the matter. It is important to place this file in the platform-tools folder. For further convenience in the firmware, you need to rename it to recovery.img.
 Place the file in the platform-tools folder
Straight to the point!
Now everything is ready for the CWM firmware itself, so you can safely get to work. Given below detailed description action, in which it is quite difficult to get lost.
 Start your device in Fastboot mode
 To open command line, go to "Start" and type cmd
 Type cd / and press Enter
 Enter the command with the path to the folder
 The adb devices command will help determine if the PC sees the device
The level of complexity, as you can see, is high, therefore, before the procedure, it is strongly recommended to check that this method is suitable for the device, since it may not work in all gadgets. In practice, this method is good if the manufacturer of the device is HTC.
Rashr app
The installation method using Rashr is convenient and easy to perform, it is recommended for beginners. However, ironically, it also requires administrator rights. You can get them in a few steps. detailed instructions was given earlier in the Rom Manager section.
How to work with Rashr
First you need to download the application itself. It is available for free at Play market(Rashr- Flash Tool). You can also watch the program on a third-party site, but you must beware of suspicious web pages so as not to catch a virus.
When the program is already on the phone, you need to open it and provide it with previously received Root rights upon request. Further, everything is simple:
 Click CWM Recovery
 Select Recovery from the list available for the device
 Click Yes to confirm the download
 To go to Recovery, click Yes
Video: CWM and Rashr
Odin: solution for Samsung
The previous three methods are suitable for different device models. The same method is effective for Samsung devices. This is a proprietary utility, so it cannot be used for devices from other manufacturers. There are many versions of this application. The last one is Odin 3.09.
Here, the standard factory version of Recovery is changed to a modified one using a PC, as with FastBoot:
 Download Odin on PC
- power / lock button and volume down (on older devices released before mid-2011);
- power / lock button, Home and volume down (all other devices).
 Press the Start button and wait for the firmware to finish
How to enable CWM Recovery mode after flashing
After the CWM mode has been set using one of the above methods, you need to check if it works. You can launch ClockworkMod Recovery:
Possible difficulties
During the installation of an alternative Recovery Mode, in particular, CWM, various difficulties and errors may occur. Which of them are the most common and how to solve them?
CWM Recovery does not recognize the memory card
CWM makes it possible to update the phone using the archive. When opening Recovery, the user sees a message that the flash card cannot be mounted. After installing another card, even with less memory, the problem disappears. The reason lies in the Windows system. The fact is that it diverges from the standards for formatting the card. For formatting to be performed according to the specifications of SD/SDHC/SDXC flash cards, not just standard form, it is recommended to use specialized software such as SD Formatter.
 The SD Formatter program allows you to correctly format the SD card
 CWM does not see the internal memory of the device: a solution to the problem
When files to recover are on internal memory, and therefore can only be restored from there, a problem may arise. When you connect the USB cable to the PC and turn on USB Debugging, the program reports that the Android device is not detected and you need to turn on USB Debugging.
To solve this problem:
Recovery menu not working
If, when starting an alternative recovery mode (volume + Home button or power), a picture with a lying robot appears, then the recovery was flashed, but when the device was restarted, it was overwritten by the stock Recovery.
The problem is solved in the following way.
Flashing a new Recovery mode means getting new functionality. The firmware methods differ in their complexity, but ironically, the simplest of them require Root access, that is, device administrator rights. When choosing a firmware method, you need to be guided by the phone model in the first place. Rom Manager is not suitable for all devices. For HTC, the FastBoot method is more suitable, and for Samsung it would be more correct to choose Odin.
Since the topic of firmware for Android devices is very relevant, I decided to write about installing CWM Recovery on android smartphone or a tablet. There are several ways to do this at once: for some, all actions are performed on the device itself, but this requires root rights, while for others, a computer is used when installing custom recovery. Whatever seems easier or more convenient to you, use it.
Method 1. Installing CWM Recovery via ROM Manager
The first way to flash Recovery is to use the ROM Manager program, which we already talked about in the article:. This application has a separate item that allows you to install ClockWorkMod Recovery in a couple of minutes.
I want to note right away that root rights are required for the ROM Manager to work. How to get them you can read and.
After that, go to the official page https://clockworkmod.com/rommanager and see if your device is on the list of supported ones.
1. Now open the ROM Manager and select the first item "Recovery Setup".

2. In the next window, in the "Install or update Recovery" section, select "ClockworkMod Recovery".


4. At the bottom, click on "Install ClockworkMod".

5. The download process will begin. At good internet connection, it lasts a couple of seconds.

6. At the end of the download, you will be prompted to grant root access to the application. Select Grant.

7. That's it! You will see the notification "Successfully flashed ClockworkMod recovery!". Just click OK.

That's how easy it is to flash the CWM Recovery through the ROM Manager. Now you can open it and find new items in it that were not in the standard one.
Method 2. Install custom Recovery on Android using the FastBoot utility
All the steps below are the same as installing TWRP Recovery: .

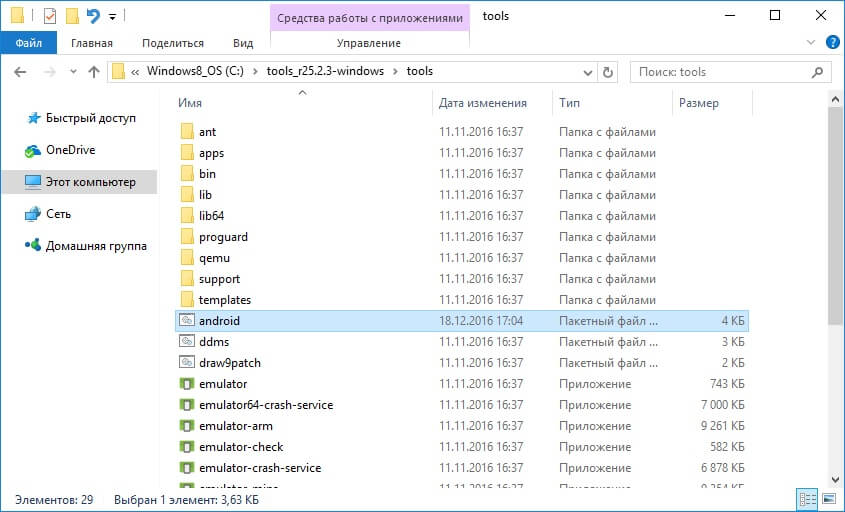
Unzip the folder to the "C:" drive - inside there will be "tools", and in it the "android" file. Run it.
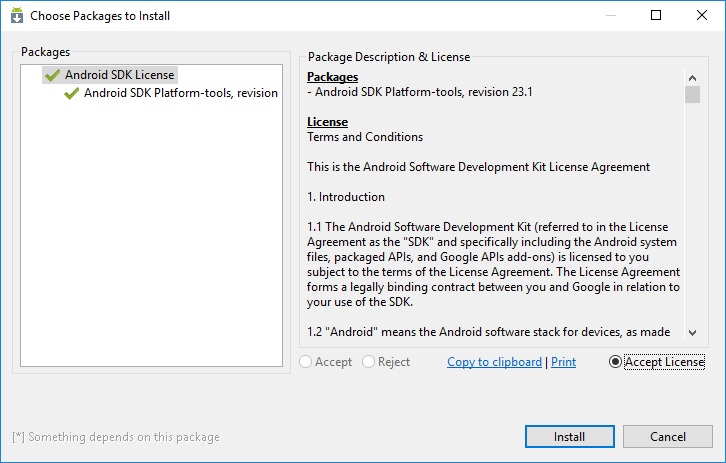
Select "Android SDK Platform-tools" and click "Install package".

Check the box "Accept License" and then click "Install".
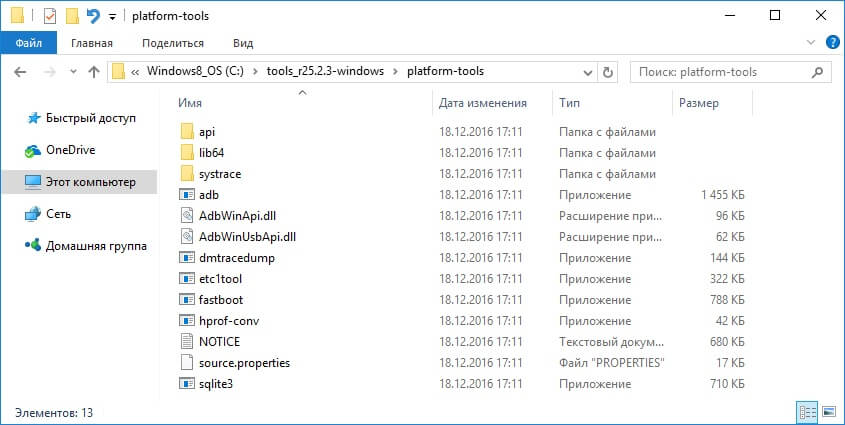
After the installation is completed, in the "tools_ version-windows" will show "platform-tools" and it has "fastboot" and "adb". They will come in handy for us.
UPD: The "platform-tools" folder on my computer is in a different directory than yours. The fact is that this article was written back when there was an installer for the Android SDK. Starting from the 25th version, installation is carried out only from a ZIP archive: because of this, part of the instructions had to be edited. Therefore, the path to ADB and Fastboot is different from mine, everything else remains unchanged.
If you have Sony device, HTC, Nexus, Huawei or LG (some models), the Bootloader is blocked. How to unlock it is described on our website:
- For HTC: ,
Let's start the Recovery firmware:
1. First of all, go to this page and download the version of the "recovery-clockwork.img" file for your device. Note that most devices have both touch and classic versions. Download the one you like best.
2. Now place the CWM recovery file in the "platform-tools" folder. I also renamed it "recovery.img" (you'll see why later). I recommend that you do the same.

3. Connect your tablet or smartphone to your computer using USB.
In this case, the device must be loaded into fastboot mode. Usually, to do this, on the switched off device, you need to hold the key combination: Power + Volume down. But this combination may differ depending on the manufacturer of the device.

UPD: it is much easier to switch to fastboot mode as follows: turn it on on the device, go to the command line (point 4 below tells how to get into it) and enter the commands in sequence, while pressing "Enter" after each.
cd path to "platform-tools"
I got it like this:
Your path will look different. If you acted exactly according to the instructions, it will come out (in any case, see the path in the corresponding line of Explorer):
cd\tools_r25.2.3-windows\platform-tools
On the screenshot you can see how I entered the same commands. As a result, the device will boot into fastboot mode.

4. Now open the command line (or skip this item and continue to work with it if you just transferred Android to fastboot mode through it). The easiest way to get there is to press the key combination "Win" + "R" and enter:
After that, click "OK".

5. You will be taken to the command line.

6. Now you need to specify the path to the firmware folder. Enter the following command to navigate to the back folder.
Press "Enter".

7. My path to the recovery folder is: "C:\Program Files (x86)\Android\android-sdk\platform-tools". So I enter (you write your own):
cd Program Files (x86)\Android\android-sdk\platform-tools
And press "Enter" again.

8. It remains to enter:
recovery.img"recovery.img" is the name of the file being flashed. Remember I advised you to rename the file from the recovery? We did this for convenience, so as not to enter something like "recovery-clockwork-6.0.4.7-flo.img".
After entering this command, press "Enter" again.
9. As a result, we get the following message.
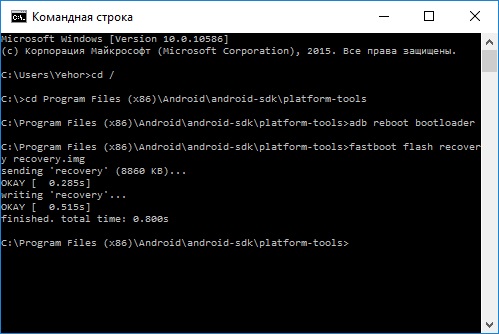
Congratulations! You have successfully installed custom recovery (CWM) using the Fastboot utility!
Method 3. We flash Recovery through the Rashr application
This method is also incredibly simple and convenient, but requires root rights. Their receipt is written at the beginning of the article in "Method 1".
1. Install the Rashr - Flash Tool app from Google Play, open it and grant Root rights.

2. In the list of options, select "CWM Recovery".

3. Then the program will display a list of available Recovery for your device. In my case, Rashr showed 2 options: ClockworkMod with support for taps on the screen and the classic version (controlled by the volume and power buttons).

4. When you see the download prompt, click Yes.

5. Then the download of CWM Recovery for your Android smartphone or tablet will begin.
6. At the end, a notification will appear that the firmware was successful and now you have a modified recovery installed. You can reboot into it and try out its work. To do this, click "Yes".
Perhaps this installation method can be called the easiest. The only thing it needs is the presence of root rights.
Method 4. Install Recovery on Samsung in Odin
If you have a Samsung device, you can install ClockWorkMod Recovery on Android using the proprietary Odin utility. Here I will briefly explain what to do. I recommend reading our article:. In her detailed information about using Odin.
One of the most popular alternative recovery versions is ClockWorkMod (CWD), it significantly expands the functionality of the custom version and will be useful to many amateurs who like to experiment with their device and service engineers.
What is ClockWorkMod Recovery
A special modified menu system recovery application for Android, which supports many devices and has significantly expanded functionality, from the main functions:
Installation of various, including unofficial firmware;
Installing add-ons, patches and graphic changes to the current firmware;
Restore from previously made backups;
Full reset to factory settings.
How to install and download ClockWorkMod Recovery
In total, there are three main methods by which you can do this, we will consider each of them.
Firmware with CWR
Find the correct firmware version for your model with ClockWorkMod Recovery already "sewn in". Using this method, you will be sure. That the device will be operational and have current version CWR without "glitches". The only disadvantage of this method is that not for every model you can find the necessary one.
Program methods
Officially CWR was developed by the team of the same name, and there is an official Rom Manager application, you just need to install it. Select the first setup item, then the model of your device and that's it.
Important! If you have a smartphone or tablet from Samsung with Android system recover 3e, you should not do the procedure.
Also remember that 1 out of 10 this method can turn the device into a "brick".
There is another program, it is easier to use, but often just does not put ClockWorkMod Recovery on your Android.
Installing recovery via fastboot
This is the most reliable and proven method, but many users usually have a problem with it. Of the difficulties, each model needs its own img files, the bootloader must be unlocked and there must be a recovery partition.
The recovery itself is easy to sew, download and run ADB (Android Debug Bridge) in the command line and enter the command
fastboot flash recovery imya-recovery-obraza.img

Wherein:
Wipe cache partition - deleting information in the / cache partition;
Install zip from sdcard - install from zip file on a memory card;
Chooze zip - select an archive to install;
- toggle signature veritification – enable or disable archive signature verification;
- toggle script assert - enable or disable assertion script
Backup and restore - create or restore from a backup
Backup - create a complete copy;
- Advanced Backup - create a copy with partitions specified;
- Restore - restore from the necessary copy;
- Advanced Restore - restore a specific partition from a copy.
Mounts and storage - work with drives
Connecting a system folder;
- disable the data folder
- disable cache folder;
- enable memory card
- if there is a Linux partition on the map, it will connect;
- formatting the boot sector;
- formatting the system folder;
- formatting the data folder;
- formatting the cache folder;
- deleting all information on the memory card;
- if there is a Linux partition, it will be cleared;
- connect to the computer as a drive.
Advanced - advanced settings
Go Back+++ - return to the previous menu.
Outcome
ClockWorkMod Recovery for Android is a very useful utility that will help you make a backup copy, restore your device in case of a breakdown, and install various add-ons. It will be useful for service workers and experienced users.
In this instruction - step by step on how to install custom recovery on Android using the currently popular TWRP or Team Win Recovery Project as an example. Installing other custom recovery in most cases is done in the same way. But first, about what it is and why it may be required.
All Android devices, including your phone or tablet, have a pre-installed recovery (recovery environment, recovery environment) designed to reset the phone to factory settings, update the firmware, and do some diagnostic tasks. To start the recovery, you usually use some combination of physical buttons on the switched off device (may differ for different devices) or ADB from the Android SDK.
However, the pre-installed recovery is limited in its capabilities, and therefore many Android users have the task of installing a custom recovery (i.e. a third-party recovery environment) with advanced features. For example, the TRWP discussed in this manual allows you to make full backups of an Android device, install firmware, or get root access to the device.
Attention: you perform all the actions described in the instructions at your own peril and risk: in theory, they can lead to data loss, to the fact that your device will stop turning on or work incorrectly. Before following these steps, save your important data somewhere other than your Android device.
Preparing to flash custom TWRP recovery
Before proceeding with the direct installation of third-party recovery, you will need to unlock the bootloader on your Android device and enable USB debugging. Details about all these actions are written in a separate instruction (opens in a new tab).
The same instructions also describe the installation of the Android SDK Platform Tools - the components that will be required to flash the recovery environment.
After all these operations have been completed, download a custom recovery suitable for your phone or tablet. You can download TWRP from the official page https://twrp.me/Devices/ (I recommend using the first of the two options in the Download Links section after choosing a device).

You can save this downloaded file anywhere on your computer, but for convenience I put it in the Platform-tools folder with the Android SDK (so as not to specify paths when executing the commands that will be used later).
Navigation
Many users, even the most experienced, have difficulties in which they cannot install a modified recovery or just CWM Recovery.
At the same time, it is worth noting that today there are only two modified recovery - these are TWRP and CWM Recovery, but since we will talk about CWM Recovery today, we will not touch on TWRP Recovery.
Well, let's move on to the very process of installing a modified recovery.
- First of all, you need to go to the official website of the ROM Manager program in order to check if your Android device is in the displayed list of devices.
- Now you actually need to launch the ROM Manager program, and then in the initial window select the item called "Recovery Setup".

- After that, you will go to another section, where you need to find a subsection "Install or Update Recovery", and at the bottom of it, click on the item ClockworkMod Recovery.

- The program will then scan your device so that you can see the name of your Android device. In our case, this is a Google Nexus 7 (2013) device. You also need to click on your device.

- When you tap on your Android device, you will go to the next step where you need to tap on the section "Install ClockworkMod".

- Well, after that you will notice that the download of something has begun, namely Download ClockworkMod.

- After everything is downloaded, you will receive, which actually need to be provided to this application.

- Now after some time you should receive a special notification "Successfully flashed ClockworkMod recovery!". Therefore, as soon as you receive it, immediately click on the button OK.

- Ready! You have installed a modified recovery from CWM on your smartphone, but for it to function, you just need to restart your Android device.
Method 2. Install CWM Recovery using Fastboot
So, now we will consider installing this recovery using the most popular method, for which the Fastboot program is useful.
- First of all, you need to download fastboot program for which you have to go to link, and then go down to the section "Get just the command line tools" and select the necessary boot distribution kit for this program, depending on which operating system is installed on your computer / laptop.

- After the bootable distribution is downloaded from the site, you need to run it, as a result you will get this window with the inscription "Welcome to the Android SDK Tools Setup Wizard". You just need to press the button Next >, to be redirected to the next installation step.

- Now the installation window will automatically check for the presence of the required Java SE component, if it is not there, the installation program will automatically direct you to download what is needed for further installation. If directions and openings of new tabs in the browser were not detected, then you just need to click on the button Next >.

- Here you need to select "Install for anyone using this computer", which means "Install for other users of this computer" and then click on the button Next>.

- Now you will proceed to the stage of choosing the path, that is, the place where this program will be installed. If you are an inexperienced user, then we do not advise you to change anything here, just click on the button Next>.

- Ready! Android SDK Tools installed, if you want to run the program now, then check the box. But right now we don't need it.

- After that you need to navigate to the folder "android sdk" and then run the executable SDK Manager.

- In the window that opens, you will be offered a list of parameters and settings, as well as the ability to check boxes, but we only need to check one box, and this is opposite the item "Android SDK Platform-tools" and then click on the button Install Packages.

- Now you need to confirm your consent, for which select the item "Accept License" and then click on the button Install.

- Now that you've completed all of these steps down to one, you'll notice a new folder has appeared. "platform-tools", which will contain the necessary programs for us, such as adb and fastboot.
CWM Recovery installation process
- First of all, you need to download the version of the file "recovery-clockwork.imd", and this can be done by link. In this case, you need to choose exactly the version that your Android device supports.
- After the file "recovery-clockwork.img" downloaded, you will need to move it to a folder "platform-tools". By the way, for more convenience, you'd better rename the file "recovery-clockwork.img" in the title recovery.img, believe me, it's much easier, as when working with the command line, and this will be in the future, and in entering the file name itself.

- Turn on the feature on your phone "USB Debugging", for which you must first connect it to a computer via a USB interface

- Then run command prompt (cmd), via keyboard shortcut Win+R where just enter the command cmd, then click the button Enter.

- After that, the command line will open, in which you need to sequentially enter the command data, and after entering each press the button Enter.

cd path to "platform-tools" folder
- In our case, we received such a command, that is, we supplemented it by specifying the path to the files.
- So, if you did everything correctly, that is, as it should be according to our instructions, then you will receive the following

- Now you need to use the command "cd/" in order to navigate back along the path to a particular folder. If you need to go to the previous section of the folder, just write the command in the command line "cd/", and then click on the button "Enter", and in the end we will move from one path to another.

- Now we need to go to the folder itself "platform-tools", for which just write on the command line, and click the button Enter.
cd Program Files (x86)\Android\android-sdk\platform-tools

- After that, you need to enter a command that can be said to produce automatic installation CWM recovery. The command to be entered on the command line "fastboot flash recovery recovery.img".
- If you did everything correctly, that is, as we described, then you will receive a message on the command line, which will be inquired by such an inscription "finished, total time: 0.800s"- this means that the recovery firmware was completed successfully.

- Ready! Now your smartphone has a modified CWM Recovery installed instead of the base one, which is pre-installed at the factory.
Method 3. Install CWM Recovery using Rashr
It is worth noting, that the Rashr program is a very convenient and easy-to-use application that will allow you to perform actions that are inaccessible to the eyes of an ordinary user.
- First of all, you need to download the Rashr application, and you can do this on the official service play market.
- Now that the application has automatically installed, you need to launch it. When you first launch the Rashr app, you will receive request for superuser rights, which must be provided for further work with the program.

- Here you need to choose necessary program, to which we will grant Superuser rights, and you need to select the program CWM Recovery.

- After that, all versions of the CWM Recovery program will be opened. In our case, we got 2 versions ClockworkMod.

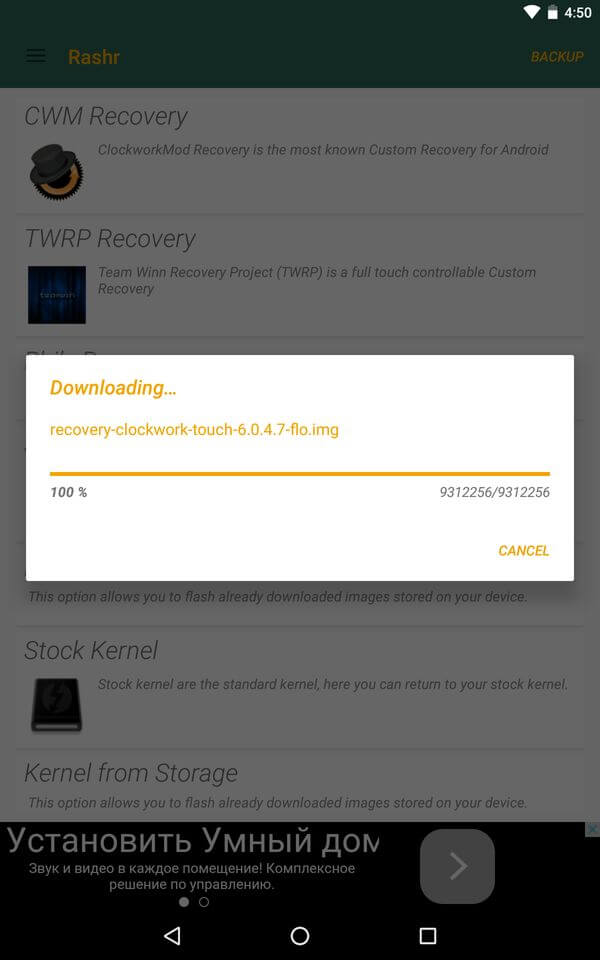
- You will then be prompted to upload a file called the same "recovery-clockwork-touch-6.0.4.7-flo.img", you just need to click on the button Yes.

- Now the download of the Recovery boot file and the version that you have selected in the available list of versions will begin.

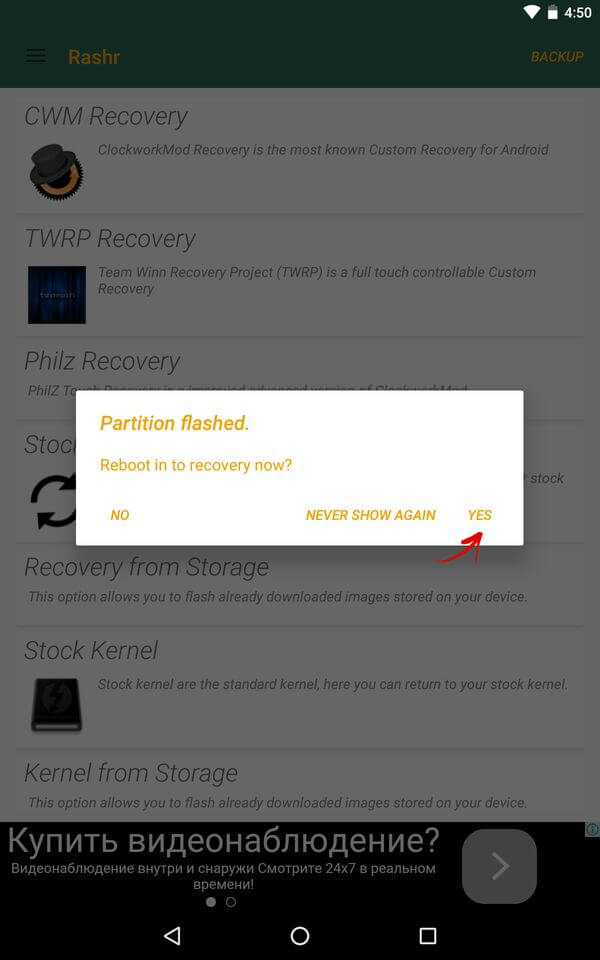
- When the download is over, you will receive a message informing you of the successful installation of the CWM Recovery firmware by clicking on the button Yes, you will allow the smartphone to reboot with the already modified recovery.

- Ready! Now you have CWM Recovery on your Android device.
Method 4. Install CWM Recovery on Samsung devices using Odin
It is worth noting that the owners of smartphones and tablets from Samsung are very lucky, because they can install CWM Recovery using the Odin program.
- First of all, you need to download CWM for your device from Samsung.
- After that, you need to connect your device to your computer / laptop, which can be either a tablet or a smartphone, and you need to connect via a USB interface.
- Now you must open program Odin3 v3.10, in order to in the field "AP" add file from recovery.

- After that, you need to click on the button Start, and then the installation process of the modified recovery will begin.
- When the installation process is over, you just need to reboot your device.
- Ready! Now CWM Recovery is installed on your smartphone!
Well, as you can see, the process of installing a modified CWM Recovery recovery is not so complicated. Therefore, if you decide to once again experiment with your device, or even turn it into some kind of non-standard smartphone, then use the CWM recovery.
Video: Installing CWM Recovery on an Android device
What is CWM and TWRP Recovery?
For those who don't know yet what is CWM or TWRP can read the detailed instructions for using custom Recovery:
- How to enter the recovery menu
Why do you need a custom Recovery?
If you want to get Root rights, or create a Backup current state Android or restore or change the interface of a smartphone or tablet, custom recovery will help you!
Where to Download CWM or TWRP Recovery?
- Download TWRP - twrp.me/Devices/
- Download Philz Recovery(based on CWM) - philz_touch
Download CWM Recovery from the official site won't work anymore , so the project was closed, but you can search for it in Google on various forums for your device, or download philz recovery, which is completely identical CWM.
Depending on which manufacturer released your smartphone or tablet, in the future there will be envy on how to install custom recovery. In other words, the whole point is that there is no one specific way to install TWRP or CWM!
 Installing CWM or TWRP Recovery on Samsung
For devices, installation takes place using firmware via Odin (if recovery has an IMG extension, then it is needed).
How is Recovery installed?

 Installing Recovery on HTC, Sony, Google Pixel, Nexus and more
For most models manufacturers such as:
- Google Nexus
- Xiaomi
- Huawei
The procedure for installing Recovery is the same and it can be done using a utility called.
But in front of most of you, there will be an obstacle in front of you in the form of a closed bootloader.
Open Bootloader
In some smartphone brands such as HTC, Huawei, Nexus, Sony, you must first unlock the Bootloader before installing CWM or TWRP Recovery. This is necessary because with the closed Bootloader the device is closed for recording and it will not be possible to make any changes!
- For HTC
- For Huawei Bootloader needs to be unlocked first
- For Nexus Bootloader needs to be unlocked first
- For Sony Bootloader needs to be unlocked first
- For Xiaomi necessary initially
- For Motorola Bootloader needs to be unlocked first
Flashing TWRP or CWM recovery
After you unlock the device, go to the final stage (there is a video example below)!
Moving the downloaded file recovery to a folder Adb and flash it with fastboot utilities:
(where Imja_file.img- the name of the file to be flashed):

Or you can use the proprietary utility ADB RUN with which you can very easily install Recovery:

Video example of installing Recovery on Sony, HTC, Nexus
Below is a video where you can see the Recovery installation process using the proprietary ADB RUN program. The process is written for HTC, but the differences from other manufacturers are only in the method of unlocking the Bootloader, all other actions are completely identical!
 Installing Recovery for devices based on Mediatek chips (Lenovo, "Chinese")
On most devices, chips from Mediatek are installed for a small price, such devices are often called Chinese, and I also install these chips on inexpensive Lenovo, Miezu, Xiaomi models.
- A computer;
- Smartphone or tablet on a Mediatek (MTK) chip;
- Firmware program
For those who still do not know what CWM or TWRP Recovery is, they can find out on the pages below:
Download CWM or TWRP Recovery and Create
Download CWM for your Android - clockworkmod.com/rommanager
Personally create CWM for your Android - builder.clockworkmod.com
Download TWRP(alternative recovery) - teamw.in/twrp_view_all_devices
Download Philz Recovery(based on CWM) - philz_touch/CWM_Advanced_Edition
Installing CWM or TWRP Recovery
After we downloaded or created CWM or TWRP recovery, we proceed to the flying stage - we install custom Recovery.
Installing CWM or TWRP Recovery on Samsung
For manufacturer's devices Samsung installation happens using firmware via Odin (if recovery has an IMG extension, then it is needed).
For Huawei Bootloader needs to be unlocked first
For Nexus Bootloader needs to be unlocked first
For Sony Bootloader needs to be unlocked first
For Motorola Bootloader needs to be unlocked first
Then put the downloaded file recovery to the Adb folder and flash it using the fastboot utility
fastboot flash recovery Imja_file.img(where Imja_file.img is the name of the file being flashed):

Or you can use the ADB RUN utility with which you can install Recovery very simply:

Installing Recovery on Mediatek chips
1. Computer (OS Winwods XP/Vista/7 - preferred; 8/8.1 - problematic)
5. Intact MicroUSB cable
6. The Recovery file that you personally found on the Internet for your Android device
7. Scatter file previously prepared (taken from the firmware) or created by you manually
How to flash Recovery on Android with MTK chips
1. Unpack the SP Flash Tool and go to the folder with the program
2. Run the SP Flash Tool through the file Flash_tool.exe


4. Put a tick at the top opposite DA DL All With Check Sum

5. In the list that appears below, click on Recovery

6. Select the Recovery file

7. Press the Download button and agree with the error

8. Android device turn off
9. Plug in off android state, after which the firmware will start at the end of the device will boot, and a window with a green circle with the signature Download OK will appear in the SP Flash Tool

Installing CWM or TWRP - Recovery X project
All you need to install Recovery on your Android smartphone or tablet is:
- Installed Root rights
- Unlocked Bootloader ( HTC, Huawei, Nexus, Sony)
- Install from Google Play app store -
Tired of the preset recovery mode? Want to learn how to reset individual folders? Love to experiment with a portable device? Then you need to download ClockworkMod Recovery for Android. How to install the utility for free on a device is described in the article.
Description
The CWM Recovery app was developed by Koushik Dutta and is a popular custom recovery alternative. The program provides the ability to install firmware on the phone, create a backup copy of the system running Android, restore firmware from earlier backups. Thanks to the functions of the utility, you can bring a broken device back to life, download interesting additions to the smartphone menu, and experiment with settings.
You can install the utility in several ways:
- using the recovery constructor;
- using ROM Manager;
- through a computer.
Going to the designer, you need to select the phone model, find and download the firmware file for the specified model. The first tab translates to a new device, on the second page you can find a list of available devices. This option is not suitable for all phones, only for popular manufacturers.
ROM Manager program will allow you to install CWM Recovery on your device in a few seconds, regardless of the brand, model and manufacturer of phones. You must have administrator rights to run the program.
Having entered the program, a window opens asking for permission to access the phone menu. After the agreement, open the Recovery Setup tab. Several tabs will appear in the window, you need to select the installation of CWM Recovery. The program automatically detects the device model, to confirm you need to click on the phone name.
After confirmation, it will be possible to install the program, clicking on the "install CWM" tab will begin the process of downloading the application files. Documents will be installed automatically almost to the end, before the installation is completed, you will need to provide root rights. At the end of the process, the message “Successfully flashed ClockworkMod recovery!” will appear.
Downloading CWM Recovery via a computer is complicated, this method is used in cases where the phone model is not in the ROM Manager list. On the website of the developers of the Android environment, you need to download android manager SDK by going to the end of the page, click on the file "tools_25.2.3 -windows.zip". After unzipping the downloaded folder to the root of the "C" drive, go along the path: tools / android / Android SDK / Platform-tools / Install package.
Next, you need to confirm the license agreement and start the installation. After installation, you need to download recovery-clockwork. img for your phone model, rename the downloaded file, removing "clockwork" from the name. recovery. img move to the platform-tools folder.
Put the phone into fastboot mode so that the device can accept commands from the computer. The transition to fastboot is carried out by simultaneously pressing the power button and volume down. Some phones may have different keys.
Going to fastboot, connect your device to your computer via a USB cable. Then, you need to go to the command line, enter cmd in it, then write the command “cd /” and press Enter, in the window enter the path to the platform-tools folder, confirm again with the Enter button. Next, enter the fastboot flash recovery command. img, confirm the action, at the end a message should appear stating that everything was successful.
Transition and description of CWM
The transition to the ClockworkMod Recovery menu is carried out when the device is turned off. The menu is entered using key combinations:
- Samsung - press volume up + center key + turn off the phone.
- Nexus - volume down button + power off button.
- SONY - turn off the phone, then turn it on, while loading, click on the logo.
For other models, there are universal ways to go to the CWM menu. You can use the command line of your computer, or you can download a free terminal on your phone, after starting, enter the commands: su / reboot recovery. The transition will start automatically, after a few seconds the phone will open the CWM program menu.
Several items can be seen in the program window. The first item reboots the phone system. Install zip sd card - the item allows you to install files from the drive by clicking on the tab, a submenu opens in which you can disable file signature verification, enable the confirmation script, specify the firmware installation paths.
The wipe data item is needed in order to return the portable device to its original state, all data from the internal memory is deleted. Temporary files are deleted after clicking on wipe cache partition. To create backups and further restore the backup, you need to go to the item " backup and restore".
The “mounts and storage” item is used to mount the SD drive and the system partition, unmount the partition with data and cache. You can format all sections that are written in the title of the items. To go to the advanced CWM options, click advanced.
Advanced has an additional submenu. Restarting the recovery - Reboot Recovery, to reset the battery statistics, click on Wipe Battery Stat, to clear the cache in the Dalvik environment, click on the Dalvik Cache item. You can create a report on the SD card by going to the “Report Error” item, to restart the ADB terminal, you need to press the “Restart adb” key.
Advantages and disadvantages
Advantages:
- many functions;
- convenient management;
- several installation options.
Uninformed users of portable devices should not enter the ClockworkMod utility menu, so as not to break the smartphone.
For those who still do not know what CWM or TWRP Recovery is, they can find out on the pages below:
Download CWM or TWRP Recovery and Create
Download CWM for your Android - clockworkmod.com/rommanager
Personally create CWM for your Android - builder.clockworkmod.com
Download TWRP(alternative recovery) - twrp.me/Devices/
Download Philz Recovery(based on CWM) - philz_touch
Installing CWM or TWRP Recovery
After we downloaded or created CWM or TWRP recovery, we proceed to the flying stage - we install custom Recovery.
Installing CWM or TWRP Recovery on Samsung
For devices manufactured by Samsung, installation takes place using firmware via Odin (if recovery has an IMG extension, then it is necessary).
For Huawei Bootloader needs to be unlocked first
For Nexus Bootloader needs to be unlocked first
For Sony Bootloader needs to be unlocked first
For Motorola Bootloader needs to be unlocked first
Then put the downloaded file recovery to the Adb folder and flash it using the fastboot utility
fastboot flash recovery Imja_file.img(where Imja_file.img is the name of the file being flashed):

Or you can use the ADB RUN utility with which you can install Recovery very simply:

Installing Recovery on Mediatek chips
1. Computer (OS Winwods XP/Vista/7 - preferred; 8/8.1 - problematic)
5. Intact MicroUSB cable
6. The Recovery file that you personally found on the Internet for your Android device
7. Scatter file previously prepared (taken from the firmware) or created by you manually
How to flash Recovery on Android with MTK chips
1. Unpack the SP Flash Tool and go to the folder with the program
2. Run the SP Flash Tool through the file Flash_tool.exe


4. Put a tick at the top opposite DA DL All With Check Sum

5. In the list that appears below, click on Recovery

6. Select the Recovery file

7. Press the Download button and agree with the error

8. Android device switch off
9. Connect Android in the off state, after which the firmware will start at the end of the device will boot, and a window with a green circle with the signature Download OK will appear in the SP Flash Tool

Installing CWM or TWRP - Recovery X project
- Installed Root rights
- Unlocked Bootloader ( HTC, Huawei, Nexus, Sony)
- Install from the store Google Apps play- Recovery X
- Run the application, select your model and click the button to install Recovery
Installing CWM and TWRP - Recovery Tools
For this method it is necessary that the Android smartphone or tablet has Root rights and an unlocked Bootloader.
Open the Recovery Tools - Flasher application and select the required installation menu for installation (TWRP or CWM)


Installing TWRP - TWRP Manager project
All you need to install Recovery on your Android smartphone or tablet is:
- Installed Root rights
- Unlocked Bootloader (