DIY antenna made from coaxial cable. The antenna is decimeter. Antennas for television. UHF indoor antenna. Do-it-yourself decimeter antenna. Now video version
Despite the huge number of television antennas presented on the consumer market, which can be easily purchased at any electronics store, interest in how to make an antenna for a TV with your own hands does not disappear. This interest can be explained by a reluctance to spend money on buying an antenna, being away from retail outlets (if you are in the outback or at the dacha) or the failure of the purchased one.
Antennas for a television receiver can be divided into several types.
- All-wave antenna– the design is easy to manufacture; it can be made from simple available materials. It picks up a digital signal quite well outside the city, where there is not much interference. When located near a broadcast tower, it can receive analog television.
- Log-periodic band antenna also easy to make. It has perfect consistency with the feeder across all ranges, without changing its parameters. Since this design has average technical parameters, it can be used in the country, or as an indoor antenna in the city.
- UHF antenna . A simplified modification of the Z-antenna is often used; it works well, regardless of the signal reception conditions.
All-wave antenna
All-wave TV signal catchers are also called frequency independent (FIN). Their designs can be different.
Of two petals
The figure shows an all-wave antenna made from two metal plates triangular in shape and two wooden slats on which copper wire is stretched in the shape of a fan.
Copper wire can be taken of any diameter, it does not play a special role. The ends of the wire are attached at a distance of 20 to 30 mm from each other. The plates with the other ends of the wire soldered together should be located at a distance of 10 mm from each other.
The metal plate can be replaced with a square piece of fiberglass, which has copper foil on one side.
Since the design of the homemade antenna is square in shape, its height will be equal to its width, and the angle between the panels will be 90 degrees. Zero potential point marked in yellow in the figure. There is no need to solder the cable braid in this place - tying it tightly will be enough.
A television signal receiver assembled in this way in the form of two lobes is capable of receiving both all decimeter channels and meter ones. Moreover, it picks up signals well in all directions. But if you install the CNA in an area of poor signal reception from a TV tower, it will only work normally with amplifier. Others can also be used.
Butterfly shaped
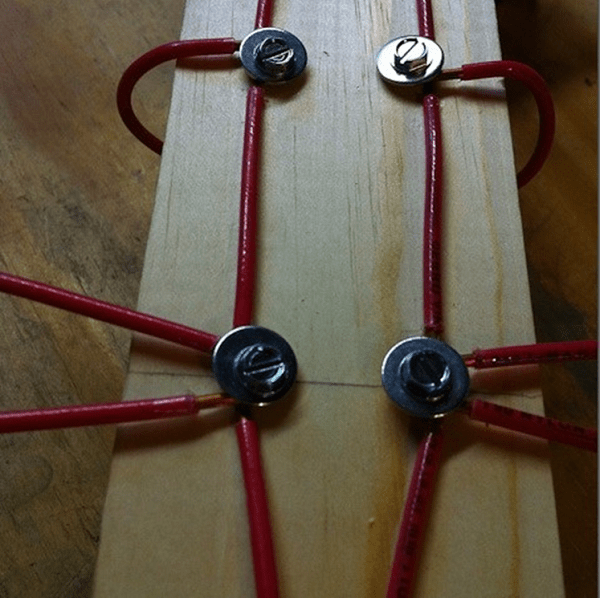
You can make a television antenna in the shape of a butterfly with your own hands. To make this yourself it is enough powerful antenna, you need to prepare a board or plywood with dimensions of 550 x 70 x 5 mm, a wire with a copper core with a cross-section of 4 mm, and, accordingly, a PK75 cable.
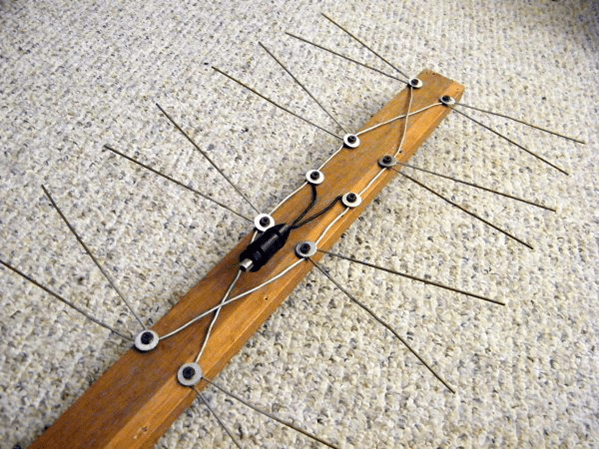
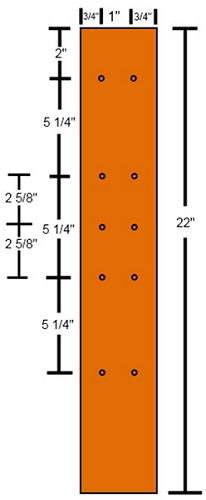
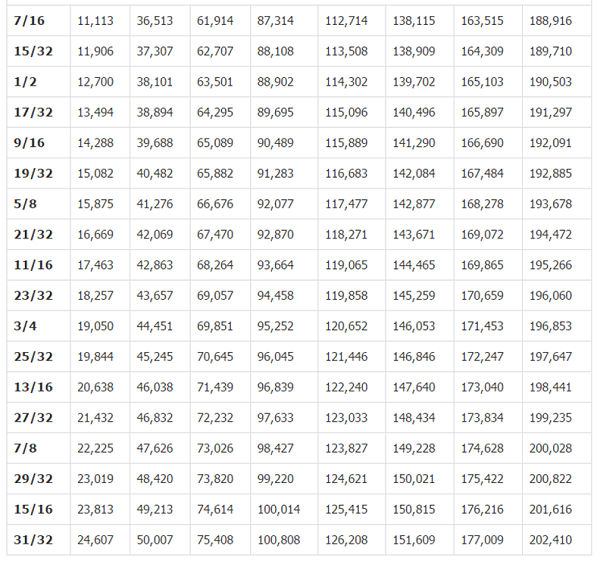
- Mark the holes on the plywood and drill them. Dimensions in the picture are in inches. Below the figure is a table for converting inches to mm.

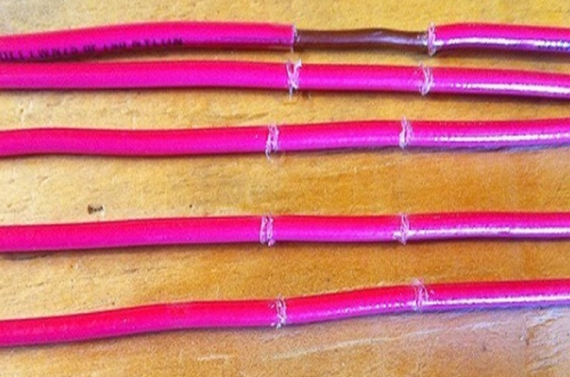
- From copper wire you need to cut 8 pieces of the same length, 37.5 cm each.
- In the center of each wire, clear sections of insulation (2 cm each), as in the figure.
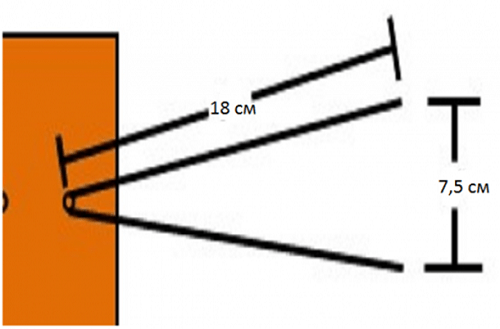
- After this, you should cut off 2 more pieces of wire, already 22 centimeters each, divide them into 3 equal parts and remove the insulation at the separation points.
- Give the segments V-shape. You should be careful to maintain a distance of 7.5 cm between the ends of the wire. This is the optimal distance to receive a clear signal.
- Connect all the elements according to the figure below.

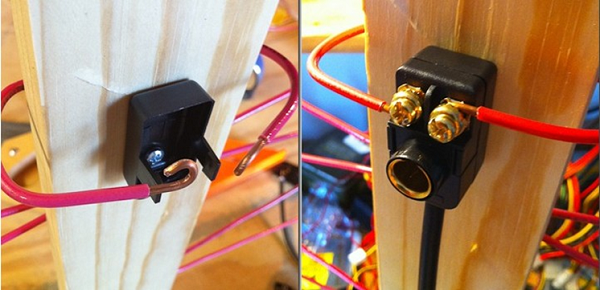
- Next, you need to purchase a socket to connect the plug to it.
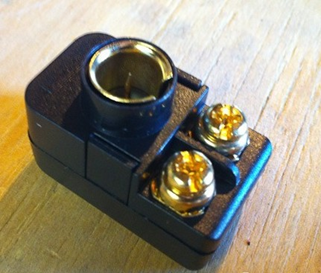
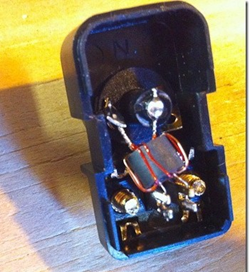
- The cable must be soldered to the coil contacts, as in the figure.

- Make 2 more pieces of wire of the required length to connect the antennae to the socket.

- Screw the socket onto the board and connect all the elements.
That's all - you have made an antenna for your TV with your own hands.
From beer cans
To make such an original ChNA you will need 2 cans (0.5 l or 0.75) of beer or other drink. But before you make a television antenna, you need to consider some material requirements. Namely, it is recommended to purchase a high-quality television cable with a resistance of 75 ohms per meter. Which is correct? Make sure that the central core is strong and that the braid is double and continuous.
Don’t forget, the longer the cable, the stronger the signal attenuation will be, which is especially important for receiving meter waves, in contrast to UHF, for which the length of the wire also matters, but not so much.
It will also be necessary to prepare the usual wooden trempel, a couple of self-tapping screws, electrical tape or tape and, if possible, a soldering iron with tin.
An antenna made from beer cans can receive both the UHF and meter wavelengths.
To illustrate the entire process, you can watch the video.
Log-periodic antenna
A log-periodic antenna (LPA) can be used to receive radio waves in both the meter and decimeter ranges. To make such a signal receiver, you can use an aluminum tube with a diameter of 10 mm and metal rods (studs) as a stand, which can be purchased at a store that sells fasteners. Ideally, instead of threaded rods, it is better to use smooth tubes or rods. A plastic U-shaped box is used as a base.
When the soldering is completed, the manufacture of the device can be considered complete and you can begin testing your creation.
UHF antenna
Homemade decimeter signal catchers can have different shapes and designs, from the simplest to manufacture to more complex devices.
Ring-shaped
Most simple design for receiving UHF can be done in a short time with your own hands from scrap materials. All you need is a coaxial cable and a piece of plywood of the appropriate size.

Now all this needs to be assembled:
- prepare a piece of coaxial cable (RK75) 530 mm long (a ring will be made from it);
- also cut another piece of cable 175 mm long - this will be a loop;
- make a ring (1), solder a loop (2) and a cable (3) to it, which connects to the TV;
- secure it all to a plywood sheet and point the completed TV signal receiver towards the TV tower.
If your TV receiver uses such an antenna, try making a more complex device.
Figure 8
You can make your own home UHF antenna from wire in the shape of the number 8. To make such a receiver, you can use copper or aluminum wire with a diameter of 3 to 5 mm, as well as PK75 cable. During the manufacturing process you will also need glue gun

Manufacturing progress.
- Using wire cutters, you need to cut 2 pieces of wire 56 cm each.
- At the ends of each segment, make a loop, which should take 1 cm.
- Bend the wire squares and connect the loops. Solder the cable to the squares as shown in the picture. The central core is soldered to one square, and the braid to the other. The distance between the elements should be 2 cm. The entire structure can be secured in the lid of a 20 liter water bottle, filled with glue.


Such a UHF receiver can be placed anywhere, and it does not require an amplifier. Perhaps an amplifier may be needed if the device is outdoors and the cable length is significant. In this case, to compensate for signal losses, its installation will be required.
From a metal-plastic pipe
You can make a television antenna with your own hands from an ordinary metal-plastic pipe. This will result in a device for receiving UHF with a possible range from 480 MHz to 1000 MHz. This “model” uses a pipe with a diameter of 16 mm and a cable of 5.5 m. The ring will require 55 cm of pipe, and the stand will require 14 cm, which is equal to a quarter of the wavelength. This serves to better match the outer braiding of the cable and reduces high frequency currents.
The cable exit in this design is made through a hole in the pipe. The cable braid should be attached with a clamp to the stripped part of the pipe. The central core of the cable is attached to the ring (you can use a screw with a washer and a nut). This homemade product works well as an indoor antenna in apartments with reinforced concrete walls that do not transmit television waves well. Thanks to the extended cable, you can take it out onto the balcony or place it on the windowsill - the quality of reception will only improve.
In the form of a frame
Another UHF antenna design is assembled in the form of a frame. It will be made from aluminum plates(stripes).

Thus, home-made antennas will help you save money on purchasing them, and in some cases get out of the situation where you have a TV, but the standard antenna is out of order, or it doesn’t exist at all. Moreover, the quality of reception of homemade products is no worse than their factory counterparts. If you do not want to make the device yourself, then the information in the store will be useful to you.
In the days of huge tube TVs, a good antenna for high-quality analogue television reception was in short supply. Those that could be bought in stores were not of high quality. Therefore, people made UHF television antennas with their own hands. Today, many are interested in homemade devices. And even when digital technologies are everywhere, this interest does not fade.
Digital era
This era also affected television. Today T2 broadcasting is developing especially widely. It has its own characteristics. In those places where the signal level is slightly higher than the interference, fairly high-quality reception is obtained. There is simply no further signal. A digital signal does not care about interference, however, in a situation where there is a cable mismatch or various phase distortions almost anywhere in the transmitting or receiving path, the picture can appear in squares even with a strong signal level.
There have been other changes in modern television. Thus, all broadcasting is carried out in the UHF range, the transmitters have good coverage. The conditions under which radio waves travel through cities have changed greatly.
Antenna parameters
Before starting manufacturing, you need to determine some parameters of these structures. They, of course, require in-depth knowledge in various fields of mathematics, as well as the laws of electrodynamics.
So, the gain is the ratio of the power at the input of the reference system to the power at the input of the antenna used. All this will work if each of the antennas creates values of intensity and flux density with the same parameters. The value of this coefficient is dimensionless.
Directional coefficient is the ratio of the field strength created by the antenna to the field strength in any direction.

It is necessary to remember that parameters such as KU and LPC are not interrelated. Exists UHF antenna for digital TV, which has very high directivity. However, its gain is small. These structures are directed into the distance. Highly directional designs also exist. Here it comes in combination with a very powerful gain level.
Today you don’t have to look for formulas, but use special programs. They already take into account all the necessary parameters. All you have to do is enter some conditions - and you will receive a complete calculation of the UHF antenna, so that you can then assemble it.
Manufacturing nuances
Any structural element in which signal currents flow must be connected using a soldering iron or welding machine. Such a node, if it is located in the open air, suffers from contact failure. As a result, various antenna parameters and reception levels can become significantly worse.
This is especially true for points with zero potentials. According to experts, voltage can be observed in them, as well as current antinodes. To be more precise, this is maximum value current Is it available at zero voltages? No wonder.
Such places are best made of solid metal. Creeping currents are unlikely to affect the picture if the connections are made by welding. However, due to their presence, the signal may disappear.
How and what to solder with?
It is not very easy to make a UHF antenna with your own hands. This involves working with a soldering iron. Modern television cable manufacturers no longer make it copper. Now there is an inexpensive alloy that is resistant to corrosion. These materials are difficult to solder. And if you heat them long enough, there is a risk of burning out the cable.

Experts recommend using low-power soldering irons, low-melting solders, and fluxes. Don't skimp on paste when soldering. Solder will lie correctly only if it is under a layer of boiling flux.
Catching T2
In order to enjoy digital television, it is enough to purchase a special tuner. But it does not have a built-in antenna. And those that are offered as digital specials are too expensive and pointless.
Now we will learn how to catch T2 on a completely homemade design. A homemade UHF antenna is simple, cheap, and of high quality. Try it yourself.
The simplest antenna
To assemble this structure, you don’t even need to go to the store. To make it, a regular antenna cable is enough. You need 530 mm of wire for the ring and 175 mm from which the loop will be made.

The TV antenna itself is a ring of cable. The ends need to be stripped and then connected to the loop. And to the latter you need to solder a cable that connects to the T2 tuner. So, on the ring, the screen and the central core are connected to the loop screens. At the latter, the central cores are also connected. And the cable to the tuner is soldered as standard to the screen and central core.
So we got a UHF antenna, made with our own hands. Its design turned out to be very cheap and practical. And it works no worse than expensive store-bought options. It needs to be fixed to plywood or plexiglass. Construction clamps are perfect for this.
"People's" antenna
This design is a disk made of aluminum. The outer diameter of the element should be 365 mm, and the inner diameter should be 170 mm. The disc should have a thickness of 1 mm. First you need to make a cut in the disk (10 mm wide). In the place where the cut was made, a printed circuit board made of PCB should be installed. It should be 1 mm thick.

The board must have holes for M3 screws. The board must be glued to the disk. Then you need to solder the cable leads to it. The central core should be soldered to one side of the disk, the screen to the other. As for quality, such a TV antenna will receive better with two disks, especially if it is located far from the television repeater.
Universal antenna
Nothing supernatural will be used to make this design. We will make it from various available materials. However, even though it is homemade, it will work perfectly in the entire decimeter range. So, this UHF antenna, quickly made with your own hands, is in no way inferior to store-bought, more expensive designs. It will be completely enough to take T2.

So, to assemble this structure, you will need empty cans of canned food or beer. You need 2 jars with a diameter of 7.5 cm. The length of each is 9.5 cm. You also need to stock up on strips of textolite or getinax, always with foil.
Our cans need to be connected to PCB strips using a soldering iron. The plate of this material that will connect the containers at the top should have a continuous coating of copper foil. The foil on the bottom plate should be cut. This is done for convenient cable connection.
It is necessary to assemble the structure in such a way that the total length is not less than 25 cm. This antenna (UHF range) is a broadband symmetrical vibrator. Due to its surface area, it has large gain factors.
If suddenly you cannot find suitable jars, then you can use containers with a smaller diameter. However, then the foil will have to be cut on the upper connecting plate as well.
"Beer" antenna
Do you like to drink beer? Don't throw away cans. You can make a good antenna out of them. To do this, you need to attach two beer cans to any dielectric material.
First you need to choose a suitable cable, and then bring it to mind. To do this, the cable must be stripped. You will see shielding foil. There will be a protective layer underneath. But under it you can directly observe the cable.
For our antenna, you need to strip the top layer of this wire by about 10 cm. The foil needs to be carefully twisted so that you end up with a branch. The protective layer for the central core needs to be stripped to 1 cm.
On the other side, you need to solder a plug for the TV onto the cable. If you were a cable network subscriber, then you don’t even have to purchase this part and cable separately.
Now about the cans. It is advisable to use 1 liter beer containers. However, good German beer in such cans is expensive, and domestic beer is not sold.

Banks must be uncorked very carefully. Then you need to empty the container of its contents, and then dry it well. Next, use a self-tapping screw to connect our screen on the cable and the can. You need to screw the central core to the second one.
For more High Quality image, it is better to connect the containers and cable using a jumper.
The cans must be secured to some kind of dielectric material. It is necessary to take into account that they should be located on the same straight line. The distance between them depends on the capacity. All this can only be determined empirically.
Zigzag
The UHF zigzag antenna has the simplest possible design. The part itself is broadband. Its design allows for various deviations from the original design parameters. In this case, its electrical parameters will be almost unchanged.
Its input impedance is certain range depends on the size of the conductors that will form the basis of the canvas. There is a dependency here. The greater the width or thickness of the conductors, the better the antenna will be matched with the feeder. In general, any conductors can be used to make the fabric. Plates, tubes, corners, and much more are suitable for this.

In order to increase the directivity of such an antenna, it is permissible to use a flat screen that will act as a reflector. The latter will reflect high-frequency energy toward the antenna. Such screens are often quite large, and the phase depends mainly on the distance.
On the practical side, only in rare cases is a reflector made from a single sheet of metal. More often it is made in the form of conductors that are connected in the same plane. For design reasons, you should not make the screen too dense. The conductors from which the screen itself will be made are connected by welding or soldering to a metal frame.

This design is very simple to make. It works well in the UHF range. In the USSR it was a real folk and irreplaceable model. She has small in size, therefore it can be used as an indoor UHF antenna.
The material will be copper tubes or aluminum sheet. The side parts can be made of solid metal. They are often covered with a net or covered with a tin. If one of the the above methods, in this case the structure must be soldered along the contour.
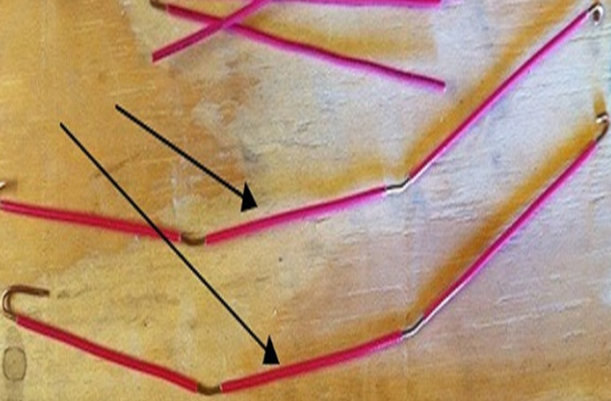
The cable must not be bent sharply. You can see how to carry out this element in the presented pictures.
It must be guided in such a way that it reaches the side corner, but does not go beyond the antenna or side square.
UHF indoor antenna
This design is designed for easy and reliable signal reception digital television. It can be made easily and very quickly. To do this you will need an aluminum or copper rod. Its length should be up to 1800 mm. This antenna can also be used as an outdoor antenna.

The design is a diamond-shaped frame. There should be two of them. One acts as a vibrator, the second works as a reflector. To receive T2, we need the side of our rhombus to be approximately 140 mm, and the distance between them to be 100 mm.

After the frame is made and the structure becomes rigid, a dielectric is mounted between the two ends of our rod. It could be anything. The shape and size are completely unimportant. The distance between two points of the bars should be approximately 20 mm. The upper parts of our diamonds need to be connected.

The feeder can be made from cable. It must be connected to brass or copper petals, which should already be attached to the antenna terminal.
If the resulting design does not meet your expectations, for example, the reception quality is poor or the repeater is located far away, you can equip the antenna with an amplifier, and the result will be an active UHF antenna. It is used both in the city and in the country.
The simplest UHF loop antenna
This design resembles the number "zero". By the way, this is its gain factor. It is ideal for taking T2. This part can work better than the products offered in stores.
It is also called digital because it can be used to perfectly catch digital broadcasts. It is narrowband, which is a significant advantage. It operates on the principle of a selective valve, which means reliable protection against interference.

For assembly you will need a regular coaxial cable with a resistance of 75 Ohms, as well as a regular TV plug. Of all the options, it is better to choose a cable with a larger diameter. You can use a cardboard box or anything else as a stand.
We determine how long the frame will be using programs for calculating antenna parameters. The material for making the frame can be used the same as for the cable. By the way, for calculations you need to know the frequencies digital broadcasting In your city.

The central core of the cable is not needed in the frame design. The stripped wire is twisted together with the core and braid of the frame. Then this connection needs to be soldered.
The structure must be placed on a dielectric base. It's best to keep it away from your tuner. It is important that there is no voltage at the antenna input.
So, we found out how to make a UHF antenna with your own hands. As you can see, this is not such a difficult task. But now you can watch your favorite TV shows in digital quality. And this design is installed in the same way as a regular store one - on the roof. You can use screws or a bolted connection. It should be installed in a safe place so that during gusts of wind it does not fly off along with a piece of slate. It is advisable that the antenna be mounted at the highest possible height. This way you will avoid interference when showing cable or digital television.
How to make an antenna for a TV for reception in the UHF range with your own hands? This question is asked by those who like to do everything with their own hands. Both at home and in the country, the antenna will allow you to watch digital TV without having to buy a factory-made antenna.
Antenna for digital TV
Digital terrestrial television is a transmission TV signal using digital encoding, which ensures its delivery to the receiving device with minimal losses. Accordingly, the TV must support a technology called DVB-T2. For reliable reception you need a special antenna, which you can buy or you can make yourself.
There are currently a large number of methods for making antennas with your own hands. Let's look at the simplest and most common ones.
From beer cans
A simple decimeter indoor TV antenna can be made from beer cans.
To manufacture an all-wave homemade antenna of this design, you will need the following materials, components and tools:
- 2 tin cans of 750 or 1000 ml;
- coaxial television cable (RK75);
- antenna plug;
- electrical tape or tape;
- metal screws;
- a polypropylene pipe or wooden stick for attaching cans to it;
- screwdriver;
- wire cutters;
- needle file;
- ruler.

TV antenna made from beer cans
How to make an antenna from beer cans? The manufacturing algorithm is as follows:
- using a screwdriver, make 1 hole in the neck of each can, making sure that it does not become deformed;
- screw the screws into these holes using a screwdriver;
- clean the ends of the cable with a knife, not forgetting to remove the varnish from the copper wire with a file;
- screw the wire and cable braid twisted into a ring to the self-tapping screws (it will be more reliable if it is welded or soldered, but this is only if you have the appropriate tool);
- Securely secure the cans to a pipe or stick using electrical tape or scotch tape for these purposes, maintaining the distance between the cans (it has long been established experimentally, and this size is 7.5 cm);
- Attach a plug to the other end of the cable, which will connect the cable to the receiving device.
- place the antenna in the required place, i.e. where signal reception will be ideal.
The most painstaking work is preparing the RK75 cable. One end must be cleaned from the top shell at a distance of 10-12 cm with a knife without damaging the copper braid. Next, you need to twist this braid into a pigtail and remove the aluminum screen. After this, cut off the polyethylene sheath by 6-7 cm and expose the central core. The resulting copper strand and bare core are then attached to the cans.
The second end of the cable must also be cleaned and a plug consisting of 2 halves must be connected to it. The central core of the cable passes through the hole in one half of the plug, and the braid is connected to the plug body. Both halves are screwed on one another, and you get a reliable device for connecting to the antenna socket of the TV.
If you plan to place an antenna made from tin cans outdoors, then it must be reliably protected from external weather influences. Plastic bottles are suitable; you need to cut off the neck and bottom and place the antenna elements in them. In such conditions, it will reliably carry out the functions assigned to it.
This is the simplest broadband antenna, made from scrap materials without using special tools, it is done quickly. You can make it yourself and install it in 20-30 minutes. You can make sure that your homemade antenna receives most channels satellite television, including TVB-T2. At a minimum, it receives up to 15 channels.
Figure 8
Home satellite antenna may be in the form of a figure eight. It can also be used for outdoor installation. Works without an amplifier.

Figure 8 TV antenna
To make a figure eight antenna you will need:
- copper or aluminum wire Ø 3-5 mm;
- coaxial television cable RK75 (can be replaced with a densely braided cable with a resistance of 50 Ohms);
- antenna F-plug;
- screwdriver;
- knife or scalpel;
- glue gun;
- soldering iron;
- solder;
- flux paste;
- ruler;
- wire cutters;
- pliers;
- needle file;
- a solid base (a plastic lid will do).
The manufacturing procedure is as follows:
- cut 2 pieces of wire, 56 cm each;
- at each end, after exposing the central core, make a loop (approximately 1 cm on each side will be spent on making it);
- bend the wire into a square using pliers, connecting the loops;
- put the antenna plug on one side of the coaxial cable, first carefully twisting the braid and exposing the central core;
- Solder the second side of the cable to 2 squares as follows: the central core to one square, and the braid to the other at a distance of 2 cm;
- place everything in the lid and fill it with glue.
The picture shows how to do this correctly.

Making a figure eight antenna
Such an antenna can be placed anywhere, and this is its main advantage; you just need to choose the right cable dimensions. You need to know that you don't need an amplifier to operate it. It makes sense to install it on the antenna, with a cable that has a significant length to compensate for losses.
From a cardboard box
A simple satellite antenna for TVB-T2 is made using a cardboard box. To make it you will need:
- cardboard box (can be used as a shoe box);
- foil;
- antenna F-plug;
- screwdriver;
- knife or scalpel;
- glue;
- ruler or tape measure;
- wire cutters;
- needle file
Such a simple homemade indoor antenna will provide high-quality TVB-T2 reception.
Butterfly
A DIY all-wave television antenna can be like a butterfly. Such an antenna is no different from a regular decimeter antenna. It is easier to remake a simple array-type antenna, which can be purchased at a low price in trading network, for digital, which will receive satellite (T2) channels. To make it yourself you will need the following materials, components and tools:
- board or plywood measuring 550x70x5 mm;
- copper wire with a central core Ø 4 mm;
- metal screws;
- coaxial television cable RK75;
- antenna F-plug;
- screwdriver;
- knife or scalpel;
- soldering iron;
- solder;
- flux paste;
- ruler or tape measure;
- wire cutters;
- pencil.

TV antenna in the form of a butterfly
Manufacturing stages:
- Mark the board as shown in the figure:

Board for antenna in the shape of a butterfly
To convert measurements in inches to cm, remember that 1 inch equals 2.5 cm.
- cut 8 wires 37.5 cm long;
- strip the middle of each wire by 2 cm;
- bend each wire in a V shape so that the distance between the wires is 7.5 cm;
- cut 2 wires 22 cm long;
- strip these 2 wires where they are attached to the board or plywood;
- assemble all the wires using self-tapping screws, as shown in the figure;
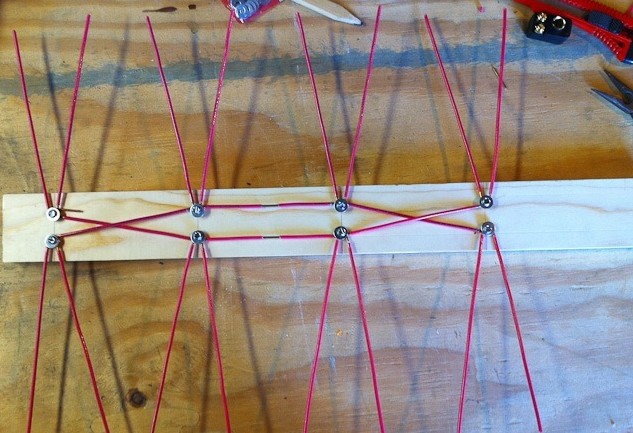
Making a butterfly antenna
- Connect the antenna to the cable using a special plug.

Connecting the antenna plug to the cable
From coaxial cable
There is a DIY UHF antenna made from coaxial cable. To make such a simple antenna you will need:
- coaxial cable RK75;
- plexiglass or plywood;
- matching device;
- antenna plug;
- pliers;
- wire cutters;
- scotch;
- ruler;
- pencil.

TV antenna made from coaxial cable
Manufacturing stages:
- cut a piece of cable 530 mm long;
- strip the pieces of cable from both sides, exposing the central core and connecting the braid into a pigtail;
- twist it into a ring (possibly in the form of a diamond) and secure it to a piece of plexiglass or plywood with tape, leaving a distance between the ends of the cable of approximately 2 cm;
- Make a horseshoe-shaped matching device from a piece of coaxial cable 175 cm long. To do this, you need to strip the ends of the cable in the same way as when making a ring;
- prepare antenna cable. Place the plug on one side and strip the other side until the central core and braid are exposed;
- align the ends of the ring wire with matching device and a cable going to the antenna, which will then be connected to the television receiver using a plug.
Homemade antenna. Video
A visual aid on how to make a homemade antenna for digital TV is presented in this video.
DIY antennas for reception digital signal easy to do. In terms of reception quality, they are no worse than factory antennas with an amplifier, and their cost is much lower. They can be used in apartments, private houses and country houses. Anyone can make them from scrap materials, you just have to delve into the manufacturing technology.
Today, the DVB-T digital standard has been used for broadcasting television signals. To receive broadcasts on analog TVs, you can make an antenna for digital TV with your own hands, which is connected to a special set-top box that converts the signal.
[Hide]
Requirements for a digital packet television antenna
To ensure signal reception and transmission to the amplifier, the antenna must meet the following requirements:
- The collecting elements must be located along the axis of the waves coming from the transmitter.
- Have protection against interference with a frequency close to the television signal. Sources of interference can be other radio signals, interference from operating electric motors and generators.
- The antenna design should minimize signal power loss during transmission.
- The antenna circuit must be oriented according to the type of polarization.
Types of TV antennas
Antennas for receiving television signals are divided into several types, differing in the frequencies of the received signals.
The following types are widespread:
- An all-wave antenna that can receive digital and analog signals. The reception distance of analog signals is not large and does not exceed the line-of-sight range of a television tower.
- Log-periodic antenna capable of receiving meter and decimeter waves.
- A decimeter antenna designed to receive only short waves.
The author of the video, Dmitry, will talk about making a simple antenna for digital TV.
How to find out the initial data for calculating an antenna
The key parameter on which the quality of digital signal reception depends is the wavelength of the radiation. Based on this length, the overall dimensions of the antenna mustache are selected. To determine the wavelength, a calculation is used using the formula λ=300/F, where F equals the frequency transmitted signal in MHz. This option is in open access and can be easily installed through any Internet search engine.
Made from a cardboard box
The simplest version of a home antenna, which you can quickly make yourself using available materials, is a device based on a cardboard shoe box.
For production you will need:
- food grade aluminum foil;
- a piece of standard coaxial cable;
- masking or stationery tape;
- a tube of quick-drying glue, for example, rubber “Moment”.
The manufacture of the antenna is as follows:
- Cut the foil to the shape of the bottom of the box. Lubricate the box with glue and stick the foil, smoothing it evenly along the bottom.
- Cut two pieces of coaxial cable 500 mm long.
- Remove the cable shielding insulation from each end to a distance of no more than 25 mm.
- Move the screen and twist it into a separate core.
- Bend each segment into a circle shape.
- Secure the sections on the outside of the box lid in the shape of a number 8 using tape. The ends of the cable should be directed towards the center of the figure eight and located at a distance of at least 10 mm from each other.
- At a length of about 100 mm, strip the outer insulation of the cable that will connect the antenna to the receiver.
- Twist the screen into a separate core.
- Gradually remove the insulation of the central conductor until a section of bare wire with a length of about 95-100 mm is obtained.
- Pierce the bottom of the box along with the foil and insert the cable inside.
- Lead the wire through the cover and run it along the contour of one of the parts of the “eight” to the central part. Secure the cable.
- Connect three braid strands together. Then fasten the three terminals of the central wire. Re-secure the knot with tape.
- Install the plug on the opposite end of the coaxial cable.
- Place the antenna in the place of best reception, which is determined experimentally.
If everything is done correctly, the antenna will allow you to receive the main television channels in DVB T2 format. The photo below shows the main stages of antenna manufacturing.
Covering the bottom with foil  Laying rings on the lid
  Main cable supply
  Connection of conductors
How to make an all-wave antenna
Those who want to save on purchases can make an antenna for receiving a digital signal themselves by choosing one of the designs described below.
From coaxial cable
The simplest antenna design can be considered a piece of coaxial cable 2-3 m long, which has a plug at one end. The free end is cleared of the outer layer of insulation, the screen is woven into a separate conductor and taken to the side. Then the insulation of the central wire is cut off in small pieces. After this, the wire is placed on a window or windowsill, selecting a suitable location experimentally.
It should be noted that this design is only effective at a range of reliable reception, where the singal is quite powerful. If you are far away from the repeater or the receiver is located in a densely built area, it is necessary to use other antenna designs.
Of two petals
This version of the TV antenna is made from a pair of small metal plates shaped like an isosceles triangle and two wooden or plastic slats. Copper wire with a diameter of 2-4 mm is stretched between these elements.
Lobe antenna circuit
The pitch of fastening the wire on the slats is 25-30 mm. The triangular bases are connected to each other by soldering at a distance of 10 mm from each other, the wire is also soldered to the triangles. To connect to the television receiver, a coaxial cable RK75 is used. The wire screen is connected to the rail (the place is indicated by a yellow dot), and the central wire is connected to the junction of the triangles. In areas of poor reception, it is recommended to use the antenna in conjunction with an amplifier.
Butterfly
For more stable signal reception terrestrial television A butterfly antenna is used. Homemade device A similar design can be used at home and in the country. It will provide good reception quality only with a stable broadcast signal.
To make a receiving device you will need materials and tools from the list:
- a board with a length of at least 600 mm and a width of about 70 mm, the thickness can be any, but preferably 15-20 mm;
- single-core copper wire with a conductor diameter of at least 4 mm;
- wood or metal screws and washers;
- coaxial cable RK75;
- plug connector for antenna;
- roulette;
- side cutters;
- Phillips screwdriver;
- wire stripper;
- soldering iron with a power of 40-60 W;
- solder and flux for soldering.
A do-it-yourself digital TV antenna is assembled as follows:
- Mark the board that will serve as the antenna frame in accordance with the schematic drawing below. The distance between the vertical rows of holes is 25 mm. The holes are located at the same distance from the edges of the board.
- Cut the wire into 8 pieces of 375 mm and two pieces of 220 mm.
- Remove approximately 25mm of insulation from the center of each long piece.
- Bend the cables into a V shape with equal lengths. The distance between the ends should be 75 mm.
- Install the V-shaped sections on the board using self-tapping screws. For tight fixation, washers should be placed under the heads of the screws.
- Before tightening the screws, install additional short connectors. On short wires, it is necessary to remove the insulation at the points of contact with the V-shaped conductors.
- Connect the coaxial cable to the bottom row of screws. The installation diagram is shown below.
Can antenna with protective cover
How to make a log periodic antenna
To make the frame of such a device, the following are used:
- aluminum U-shaped profile with a side height of about 15 mm;
- studs with a suitable diameter and length or smooth tubes and rods are used as antenna whiskers;
- a small piece of aluminum tube with a diameter of 10-15 mm, which is used as a support.
Manufacturing sequence simplest antenna as follows:
- Flatten the tube at both ends and bend it into a U shape. One flattened end should be attached to the U-shaped profile using self-tapping screws.
- Make pairs of antenna whiskers with lengths of 70, 85, 100, 120, 140 and 170 mm. Cut a thread on one side.
- Drill holes in the U-shaped profile to install the mustache. The distances between the holes are indicated in the diagram.
- Screw a nut onto each whisker and install the assembled part into the hole of the U-shaped profile.
- Secure the mustache inside the profile using nuts. Place a connecting terminal under each nut, which can be factory-made or homemade from a copper conductor.
- Solder the mustache outputs in a certain sequence (shown in the diagram).
Ring antenna diagram: 1 - ring, 2 - additional loop, 3 - main cable
In the form of a frame
Another option is a frame structure called a Kharchenko antenna, made of thick copper wire with a diameter of 30-4 mm.
The antenna assembly looks like this:
- Cut the wire 112 cm long.
- Strip and tin the ends of the wire that will be bent into loops.
- Bend it in the form of two rectangles in the following sequence - a fixation loop of 10 mm, then a rib 130 mm long, then two ribs of 140 mm, two of 130, two of 140, the last rib is 130 mm long and ends with a loop that The last 10 mm of wire goes away.
- Connect the loops at the ends and solder the joint.
- Move this angle apart from the opposite one by 20 mm (shown in the photo below). Tin the wire located opposite the joint of the loops.
- Strip the coaxial cable 20 mm for the screen and 10 mm for the central core.
- Solder the leads to the tinned corners on the frame.
- Make a central body from a plastic cap of a suitable size.
- Place the squares of the frame with the cable into the housing and fill it with hot glue. After the glue has hardened, install the antenna in the place of best signal reception.
To calculate the parameters of the Kharchenko antenna, there are specialized online calculators that calculate all the product data.
Amplifier based on the MAX2633 circuit
To make an amplifier, you will need three capacitors with a capacity of 1 nF and a resistance with a nominal value of 1 kOhm. To power such a device, a constant voltage of 3 to 5 V is used. The device does not require adjustment, but the degree of amplification is adjusted by setting a resistance of a different value (to reduce the degree of amplification, it is necessary to increase the resistance). Such an amplifier is not broadband and is applicable only for the shortwave range.
For broadband amplification when receiving signals over long distances, transistor devices are used, circuit diagrams which are given below.
 Amplifier based on the common emitter of the KT368 transistor
  Amplifier based on the common base of the KT315 transistor
  Two-transistor amplifier
In progress self-assembly similar devices need to be manufactured printed circuit boards with paths. When using wires to connect elements, the amount of interference increases, which will reduce the gain of the device.
For an amplifier based on KT368 you will need resistances and capacitors with the following parameters:
- 100 Ohm (R1 and R4);
- 470 Ohm (R2);
- 51 kOhm (R3);
- 1000 pF (C1);
- 33 pF (C2);
- 15 pF (C4 and C3).
The assembled amplifier is installed as close as possible to the receiver and can be used for any type of antenna. It does not need configuration and works from the source direct current with a voltage of 9 V.
To expand the frequency range, amplifiers built on a common transistor base are used. These devices also do not require additional adjustment of operating parameters.
During the assembly process you will need the following components:
- 51 Ohm (R1);
- 10 kOhm (R2);
- 15 kOhm (R3);
- 1 kOhm (R4);
- The capacitors have the same rating as in a common emitter circuit.
The amplifier circuit uses a choke coil, which is wound from 300 turns of 0.1 mm wire (PEV type) on a ferrite ring.
In case of absolutely weak signal It is possible to use multi-stage circuits operating from direct current with a voltage of 12 V and built on two transistors of the GT311D type.
The amplifier circuit for long-range antennas uses:
- 680 Ohm (R1);
- 75 kOhm (R2);
- 1 kOhm (R3);
- 150 kOhm (R4);
- 100 pF (C1, C2, C4);
- 6800 pF (C3);
- 15 pF (C5);
- 3.3 pF (C6);
- 100 µH (L1);
- 25 µH (L2);
- homemade choke made of 25 turns of PEV2 wire with a diameter of 0.8 mm (L3).
A super simple and super quick to make antenna from a coaxial cable for receiving digital television channels can be made with your own hands in about 5 minutes. For this you will need absolutely nothing except the cable itself. And this is the main advantage of this antenna.
You can't live without a TV now.
This design will definitely help you out, for example, when you have just moved into your home and have yet to install a cable or install a stationary antenna. Of course, this is not the only example where this truly simple loop antenna will help.
Now in the comments someone will definitely write that there are even simpler antennas, like a whip one. To make it, it will be enough to simply remove two insulations from the cable and everything will work. Of course, I agree with this, but the loop antenna that I will make from coaxial cable will have much greater gain, due to its directivity and resonant closed circuit.
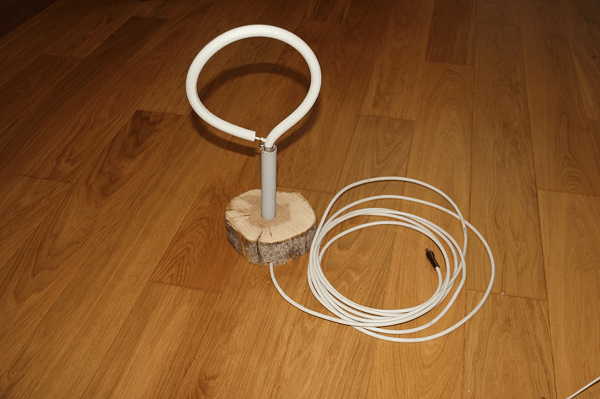
Making an antenna from coaxial cable
This is what the version made from black cable looks like.
Now let's start making the antenna in order. All we need is less than half a meter of coaxial cable of any color. I took the white one.

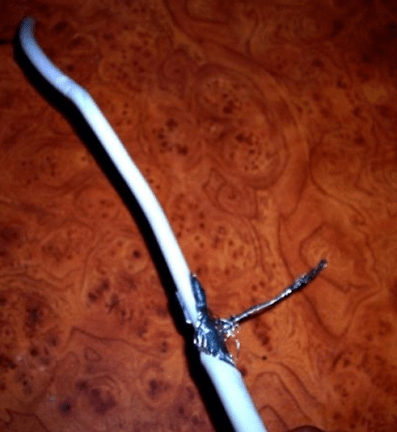
We retreat 5 cm from the edge of the cable and remove the top insulation.

Next, remove the insulation from the central core.

Now we twist everything together neatly and tightly.

Then, from the edge with the insulation removed, we retreat 22 cm and cut out a 2 cm piece of the top insulation and the shielded wire from the hose, without touching the insulation of the central core.

Now we measure another 22 cm from the end of the cut and make a cut 1 cm wide only by removing the top insulation. We do not touch the cable shield.

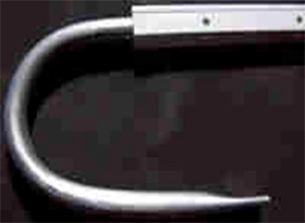
Next, take the end of the cable from which we started. And we wrap it very tightly at the last cut, forming a circle of the antenna.


At this point, our antenna is ready for use. Of course, this is not necessary, but if you hang the antenna outside, it is better to insulate all exposed areas of the cable with electrical tape. You can also add a rigid frame, but this is optional.
Antenna location
We direct the antenna to a repeater or television tower. The direction can also be selected experimentally by rotating the antenna.The best option would be to place it outside the window, since the walls of the house greatly dampen the high-frequency signal.

The test showed excellent results
