Jpg with transparent background. How to make a transparent background for a picture? Some great examples of using the humble PNG
Moreover, being a free format, PNG offers various practical advantages over GIF for the web designer:
- Better Compression: For most images, PNG achieves a smaller file size than GIF
- Greater color depth: PNG offers truecolor up to 48 bits, while in GIF we only have a 256 color palette
- Alpha Channel Transparency: Where GIF only offers binary transparency, PNG allows for virtually unlimited transparency effects by offering an alpha channel for transparency
It's worth noting that PNG doesn't allow for animation like GIF does. But there is a Multiple-image Network Graphics (MNG) standard that allows this, but it is not so widely supported by web browsers and graphics editors.
So why is GIF still so popular?You're probably wondering why PNG isn't such a widely used format on the web if it's as good as advertised. The answer is, for the most part, a misconception about the format and browser support for it.
Because Internet Explorer 6 and earlier do not support the full range of PNG capabilities (including alpha channel transparency), people are left to believe (even though this is not true) that Internet Explorer does not support PNG at all, or at least does not support transparency. In fact, Internet Explorer 5 and 6 support enough PNG specifications to make it functionally equivalent (or better) to non-animated GIF images. All other browsers mentioned, including Firefox, Netscape 6 and above, Mozilla, Opera 6 and above, Safari, and Camino fully support PNG transparency.
Apart from this misconception about browser support, GIF's built-in animation was (and continues to be) the main reason for its success. Although, over the years, the use of GIF has become less and less popular compared to other technologies (for example Flash), which are becoming more suitable for animation.
Transparency is a key characteristic of GIF and PNG and is often the reason a web designer chooses the format to use. Although PNG offers more comprehensive support for transparency, web designers often need to create a GIF version of images to fit older browsers. Using CSS this is possible (and somewhat trivial) by sending GIF images for older browsers and high-quality PNG images to browsers that understand them. But this is double work for a web designer and as a result, people follow the path of least resistance and continue to use GIF images.
So, we've looked at a few reasons why GIF is still so popular, but most of them are based on a misunderstanding of the concepts or using a familiar workflow. Armed with some key knowledge of PNG and how it can be used reliably in browsers, you can take advantage of all the benefits it has to offer.
What about JPEG?JPEG is another ubiquitous web format and in most cases, such as photographs (and the like), it is even better than PNG or GIF. PNG is not intended to compete with JPEG. JPEG compression produces significantly smaller files than PNG when working with photos. On the other hand, PNG produces smaller files when there is text, artistic lines, logos, "flat" colors, etc. inside the images.
Some great examples of using the humble PNGNow let's look at how to use PNG in web design. I've collected all the files for each example into a separate folder, available on friends of ED.
GradientOver the past few years, gradients—a smooth transition between two or more colors—have become web designers' best friend. Particularly popular are subtle, subtle gradient fills that, without being conspicuous, create a feeling of depth and texture.
Sometimes GIF is the best choice for a gradient. If the gradient is a simple two-color transition, GIF works flawlessly in it. However, GIF's limitation to only 256 colors often creates noticeable and sloppy "banding" among more complex gradient transitions. JPEG, on the other hand, can output some pretty neat gradients, but often at the cost of a larger file size. While JPEG gradients are generally quite good, you need to remember that JPEG uses lossy compression, which means the resulting image will never live up to the quality of the uncompressed image.
The typical background gradient style in question is used for buttons, blocks or just anywhere else. It might look like Figure 5-1. Clockwise from the top left corner, we see the original (uncompressed) image, GIF version, PNG version and JPEG. You can see that the resulting PNG is the smallest size (515 bytes). This is four times smaller than a GIF image. JPEG is slightly larger than PNG at 637 bytes and is also lower quality due to lossy compression (although the ability of the human eye to detect the difference in quality in this simple example remains in question).
Figure 5-1
Photoshop panel - Save For Web,
showing file size differences for the same image in different formats
Sometimes you need to create an image that works the same on different substrates. Some common examples are logos and icons. GIF files have traditionally dominated these situations, but there are several reasons why PNG may be a better choice in this situation. PNG usually wins in file size for logos or some other simple "art". Plus, PNG's inherent transparency makes it easy to create single files that work on top of any background. PNG offers binary transparency like GIF, but also provides the much more desirable option of an alpha channel, in which pixels can be partially transparent instead of just being turned on or off. Using the latter increases the file size, sometimes even larger than a GIF with binary transparency, but it allows for anti-aliasing on the edges of your image and makes it more elegant to place it on top of the background.
However, I reworked their concept using a white image with stencil symbols. They used a white symbol on a transparent background, which could generally be quite effective. In this case, your CSS background color would appear in a square or rectangular area around the symbol, instead of the symbol itself.
Both Dan and PJ used a transparent GIF instead of a PNG. This completely covered their needs, and they had to create pixel images to match the style of the icons. Using PNG, you can achieve a similar technique, but with some advantages in the form of anti-aliasing and partial transparency for use in more detailed icons.
Okay, but in which browsers does this work?I know what you're thinking: all this PNG transparency looks good, but is it practical?
The good news is that all modern browsers fully support PNG images, including alpha channel transparency, the benefits of which I showed in the examples. Safari (all versions), Firefox (all versions), Opera (versions 6 and above), Netscape (versions 6 and above), and Mozilla (all versions) will do everything I ask them to do. But there is one bad news - the only browser that I have not yet mentioned and which most of your users have: Internet Explorer.
Internet Explorer 6 and below does not support the alpha channel transparency built into the PNG format. Ever since the browser choice (or non-choice) was made for most of the many web surfers, this gaping hole has kept web designers away from PNG. But, with the release of Internet Explorer 7, we got full support for PNG alpha transparency in all major browsers. What's next, are there any ways to work with PNG alpha transparency in Internet Explorer 6 and below? So, if you want to use this effect, nothing will stop you. Internet Explorer 6 and its earlier versions require more attention than necessary, but it is definitely possible.
Hack for Internet Explorer: AlphaImageLoaderInternet Explorer comes with various native filters. They are used in CSS, but they are not any part of the official CSS specification. In other words, they are not standardized on the web. Unfortunately, Internet Explorer 6 and below do not fully support the PNG format (which is recommended by the W3C), but Microsoft has a filter that eliminates this shortcoming: AlphaImageLoader.
According to a section on Microsoft's official website, AlphaImageLoader "displays an image within the boundaries of an object and between the object's background and its contents." In other words, AlphaImageLoader loads a PNG image with its full transparency, but it loads it as its own layer, underneath which is the content of the object on which it is applied. PNG images loaded this way act more like background images than foreground images (although they actually "sit" on top of the object's background).
Basically, you can simply apply AlphaImageLoader in CSS on img elements and enjoy the result. The image will be loaded first, the transparency will remain, but then the image will be loaded again - as the front contents of the object - with opaque areas (thus "shadowing" your transparent version).
You can't use a transparent PNG as a CSS background image for an (X)HTML element (say) and expect AlphaImageLoader to do the job properly in Internet Explorer. Remember that AlphaImageLoader inserts your image between the background and foreground of the object. So while it will load your image in all its transparent glory, it will also continue to load it as a CSS background image, and without your wonderful translucent pixels.
Real use of AlphaImageLoaderLet's go back to one of the earlier examples and try to load it correctly in Internet Explorer. Remember Channel 49, the TV station in Topeka? I'm sure yes. Figure 5-21 shows what the site looks like in Internet Explorer 6.

Figure 5-21
The headline 49abcnews.com, rendered in Internet Explorer 6 for Windows, with PNG transparency intact.
The HTML for the weather top part looks like you might have already guessed:

Currently in Topeka, KS:
82° Overcast
Get the forecast and more...
You see an image, and it's definitely a PNG; even Internet Explorer loads it flawlessly. The secret ingredient to this is JavaScript. I actually used a bit of DOM scripting to remove the img element on the fly and replace it with a div element that - you guessed it - uses AlphaImageLoader. JavaScript is described inside conditional comments, another handy but completely non-standardized idiom from Microsoft built into Internet Explorer. Conditional comments allow you to use code only for a known version of Internet Explorer. The code is ignored by all other browsers, so it does not affect them in any way. In the site element www.49abcnews.com, you will find:
Thanks to the first line, if lte IE6, this script will only be included in the rendered document if it is shown in a version of Internet Explorer less than or equal to (this is indicated by lte) 6. All other browsers, including the newly arrived Internet Explorer 7, will completely ignore this .
So, what's in the JavaScript fixWeatherPng.js file? Let's take a look:
Window.attachEvent("onload", fixWeatherPng); function fixWeatherPng() ( var img = document.getElementById("weatherImage"); var src = img.src; img.style.visibility = "hidden"; var div = document.createElement("DIV"); div.style. filter = "progid:DXImageTransform.Microsoft. AlphaImageLoader(+ src + "", sizing="scale"" // Some 49abcnews.com-specific CSS styling omitted for brevity. img.replaceNode(div); )
Let's analyze, step by step, what the script does. First, we tell the browser that we want to execute the fixWeatherPng function when the page loads. The rest of the script is the function itself.
Let's start, first we look for the image with which we will work by its id attribute and save it in the img variable. We save the src attribute (URL to the image file) in the src variable. Then we hide the img element by setting the CSS visibility property to hidden.
As a result, we replace the original img element (which is hidden) with a newly created div element, to which the AlphaImageLoader is successfully attached.
Using DOM scripting to insert your AlphaImageLoader - filtering bits on the fly - has its ugly but necessary downside - incorrect CSS. Moreover, outside of your (X)HTML markup there will be non-semantic div elements. And as long as all this is described inside conditional comments, there is no chance for other browsers to be corrupted by Microsoft's code. (handyblogger: Here Jeff is trying to subtly point out Microsoft's "clumsy" solution)
If you have to do something incorrectly, at least you can extract it and keep it separate from everything else where it is not needed.
In custodyPNG, as a graphic format, offers many technical advantages beyond those commonly used in GIFs. In fact, the advantages are so great that PNG could have long ago assumed a dominant position as a non-photo graphics format. Internet Explorer's lack of support for some of PNG's more significant features, such as alpha channel transparency, has as a result deterred many web developers. But there are two very good reasons why you shouldn't be afraid of PNG.
First: even Internet Explorer 6 and its earlier versions almost completely support PNG in a way that GIF can (with the exception of animation, of course). PNG almost always produces smaller files, allowing them to load faster and use fewer resources.
Second: Internet Explorer 7 offers full support for PNG alpha transparency. The effects that can be achieved with the full range of translucent options are virtually limitless. I expect that for designers who find interesting ways to use PNG transparency like the ones described in this article, the door will be opened to a new level of styles never seen before. I've given you some useful ideas of what you can create with PNG transparency, but don't stop there. Look for yourself!
Excerpted from Web Standards Creativity by Cameron Adams, Mark Boulton, Andy Clarke, Simon Collison, Jeff Croft, Ethan Marcotte, Derek Featherstone, Ian Lloyd, Dan Rubin, and Rob Weychert; published by friends of ED. Copyright Jeff Croft 2007. Used with permission of Apress, Inc.
Online program Pixir - make a transparent background for a picture.Sergey Feschukov
Sometimes you come across a very suitable picture for your post and everything would be fine... But the background of the picture does not match the background of the blog or block with text. Apparently no one has this problem and no one has a white background, which would be suitable in most cases. I need a transparent background!
I couldn’t find any good ideas on the Internet on how to make a transparent background for a finished picture, so I started experimenting myself and found a more or less suitable solution!How to make a transparent background for a picture
Let’s take as an example one simple picture in .jpg format (in general, the format is not particularly important):
![]()
There's a white background here that I want to get rid of and make a transparent background instead. Pixlr, an online version of Photoshop, will help us with this.
![]()
Uploading our image. On the right in the “Layers” window a “Background” layer will appear, on which there is a lock (prevents the background of the picture from being deleted).
![]()
By double-clicking with the left mouse button on this lock, you can remove the lock from the background. A checkmark will appear instead of a lock. Now take the magic wand (toolbar, right column, second button from the top), specify the following parameters: tolerance = 21, checkboxes for smoothing and continuity
![]()
(usually such parameters are standard), although you can experiment with the parameters; and click on the background of the picture (in our case, on the white background).
![]()
![]()
Now we delete the background by pressing the “Delete” button and get the image we need with a transparent background.
![]()
The only disadvantage of Pixlr is that you cannot save the image in the .gif format, which also preserves a transparent background, but is much lighter than the .png format. But if there is no other choice, why not take advantage of this?
thanks to Natalia Petrova
Online program Pixir - make a transparent background for a picture.Sergey Feschukov
Sometimes you come across a very suitable picture for your post and everything would be fine... But the background of the picture does not match the background of the blog or block with text. Apparently no one has this problem and no one has a white background, which would be suitable in most cases. I need a transparent background!
I couldn’t find any good ideas on the Internet on how to make a transparent background for a finished picture, so I started experimenting myself and found a more or less suitable solution!How to make a transparent background for a picture
There's a white background here that I want to get rid of and make a transparent background instead. An online version of Photoshop will help us with this.
![]()
There's a white background here that I want to get rid of and make a transparent background instead. Pixlr, an online version of Photoshop, will help us with this.
![]()
Uploading our image. On the right in the “Layers” window a “Background” layer will appear, on which there is a lock (prevents the background of the picture from being deleted).
![]()
By double-clicking with the left mouse button on this lock, you can remove the lock from the background. A checkmark will appear instead of a lock. Now take the magic wand (toolbar, right column, second button from the top), specify the following parameters: tolerance = 21, checkboxes for smoothing and continuity
![]()
(usually such parameters are standard), although you can experiment with the parameters; and click on the background of the picture (in our case, on the white background).
![]()
![]()
Now we delete the background by pressing the “Delete” button and get the image we need with a transparent background.
![]()
The only disadvantage of Pixlr is that you cannot save the image in the .gif format, which also preserves a transparent background, but is much lighter than the .png format. But if there is no other choice, why not take advantage of this?
thanks to Natalia Petrova
2 votesGood day, dear readers. The ability to make images with transparent backgrounds is incredibly necessary for every beginning website developer, designer, and even an ordinary person.
This is the most popular function in Photoshop, and therefore I decided to tell you in as much detail as possible not only about the process itself, but also about how to save a picture in Photoshop without a background.
It turns out that many people have difficulties with this, but there are no publications on the Internet on this topic at all. Only a few topics on the forums. But, I take upon myself the mission to correct this injustice...

So, now I will put on knightly armor and dispel all fears, doubts, misunderstandings and turn the difficulties of the art of Photoshop into simple everyday life. I will also tell you about all the subtleties of craftsmanship. Get ready. I will “lead” in very simple language so that everyone can understand it, so I apologize to readers who are embarrassed by such meticulousness and they themselves know everything perfectly well.
I thank those who are more patient for their understanding. Let's get started.
What needs to be achieved to make the photo truly transparent?Transparency in the picture is usually displayed like this. If you see it on Google, it means the image can be downloaded without problems and when this object is superimposed on another background, the color will not change.
As you can see, such a checker is not displayed if the image in the search is reflected through the thumbnail. You need to click on the picture and additional information will open.

Look, I copied this drawing and pasted it into a photo of the field. I won’t go into exactly how I did it, it doesn’t matter now. The most important thing is that you see all parts of the field, the cubes seem to have been cut out and superimposed on the picture.

If I hadn’t found a photo with a checker in the search, the illustration would have looked completely different. The background would be white and rectangular.

Why is that? This checkerboard is a generally accepted sign; if you see it, it means there is no color at all in this part of the illustration, and when overlaid, you will see the lower part of the drawing. Transparency is displayed in the same way. If you need to remove the background from a photograph, then you need to ensure that instead of color, you can see this treasured pattern. Checker.

We are all accustomed to this photo format as jpeg. Some people don't even know that others exist. However, he does not understand what transparency is. In order to download and store the “correct” photos on your computer, you will need to understand and remember the new format - png.
You see, in addition to the checker, on Google you can almost always see this combination of letters along with the necessary pictures.

Then select the desired file type, png, and you're done. It is available in any version. If you don’t see it, look more carefully. There is no way without him. Trust me.

Why was it necessary to come up with a different format? The thing is that the popular jpeg does not understand what transparency is. He changes it to his usual white one.
How to get rid of the background: a simple and fairly quick way without unnecessary hasslesIn my blog you can find an article in which I show 4 tools and provide a video in which you can find 3 ways to get rid of the background in a drawing (). You can read it if you are interested. Now I would like to show you one more technique, because I believe that without this the article would not be complete. You never know, someone won’t want to surf my blog. And here everything is in one place.
So, open the picture.

Find the “Background Eraser” tool. If you can’t find it, then hold the mouse for a few seconds with the left button pressed on the button of a regular eraser. The required tool will open. You can add it by clicking on it.

You can increase the diameter of the eraser to make erasing more convenient.

Now fiddle around with the unnecessary elements in the picture. You will see how the checker begins to appear and the color disappears!

I hope that after you finish, you will not have a question in what format to save the processed drawing. Of course PNG.
This erasing method cannot be called the best and incredibly convenient. Therefore, I recommend that you still pay attention to my previous article, which is entirely devoted to this topic.
And if you are interested in working in Photoshop, then I advise you to start making money on it! There is demand. You can easily try, process pictures, and do a lot of interesting things. Believe me, this is really necessary. You can see for yourself by checking out a few freelance sites.
Think you can't do it or you're too old for this shit? Not enough time? Believe me, these are all ridiculous excuses. I'm a lawyer and I earn enough, but... do you have a hobby, a favorite hobby? Are you living life to the fullest? Are you really not bored?
Whatever you know and whatever you are interested in. The Internet opens up a lot of new opportunities. Let changes into your life. If money doesn't interest you, that's even better. This gives your project a better chance of becoming expensive, cool and successful. All famous people do not work for profit, they work because they love what they do. Rarely do any of them call it “work.”
The time has passed when people spent most of their time at the computer or TV. Now everyone is developing, improving some of their skills and sharing with people what they know. In fact, it has always been this way, only the scale has increased.

By the way, not long ago I read the secrets of the longevity of the Caucasian highlanders. One of the principles is that the younger generation constantly comes to them for advice on some important issues. Old people feel needed and therefore do not experience any negative emotions regarding old age. In the Caucasus, there is no fear of becoming old.
By the way, a positive attitude is another secret of theirs. The elders claim that no one wants to communicate with angry, irritated and boring people who have no interesting hobbies, and therefore this lifestyle is extremely unprofitable, especially in old age.
Do something new. If you love Photoshop, pay attention to the course by Zinaida Lukyanova - “ Photoshop from scratch"and master it perfectly. Very quickly you will have a profitable hobby. Not that into design? Pay attention to this and create your own projects.

If you liked this article and I even interested you a little, subscribe to the newsletter. Even if not now, give yourself a chance to do something new. I will send you my publications on how you can make money on the Internet.
Perhaps one of them will inspire you to do something new and as yet unknown. You will realize that it is interesting and want to try it yourself, and then... who knows what will happen then?
Will your hobby turn into something more or will you simply show the result of your work to your friends in order to receive their praise and admiration? Unlike many, you will get off the couch and do something that will take you beyond your usual. You will try to change your life. This is very commendable.
I sincerely wish you success in your endeavors and hope that this meeting will not be our last.
Most often, a transparent background is required to overlay one part of the image on another or on the illustration itself. Colorless backgrounds are actively used when designing websites. Many photos in online stores also require a white color behind the main image, which can only be achieved using a transparent one, since the camera is not able to create a pure white background of RGB color 255,255,255.
Using a magic wandThe easiest way to make a transparent background in Photoshop CS6 and new versions is to use the “magic wand” tool. The following are step-by-step instructions:
EraserThe magic eraser tool removes similar colors, moreover, it automatically converts the background layer to a normal one. Below are step-by-step instructions for creating a transparent background for a picture:

This function allows you to replace the background or even make it transparent. Detailed instructions for its use:

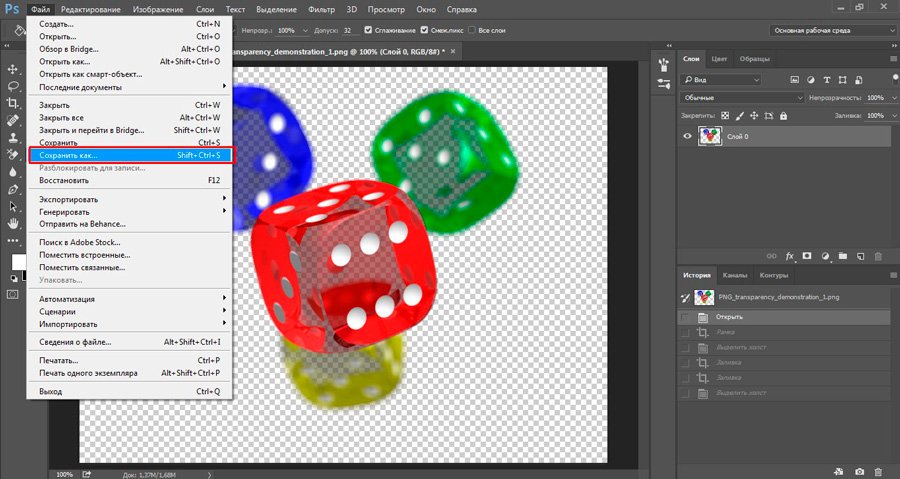
It is not possible to save an image without a background in the usual JPEG format; after saving the illustration, the background will be created automatically. To save the desired illustration with a transparent background, you need to use the PNG format. To use it, you need to follow the path: file - save as - specify the type when saving as PNG. 