How to copy all layers in Photoshop. Important operations with layers. Selecting layers. Rulers, Guides and Grid
A layer in Photoshop is a key element in building an image. Today we will talk in detail about what layers are, why they are needed, and what you can do with them, as well as get acquainted with the move tool and auxiliary elements.
Introduction
We are absolutely sure that for many of you after reading this lesson, Photoshop will open up from a different, more professional side. Today you will find out what lies at the heart of what makes it possible in this editor to construct such diverse images of varying complexity, as well as how even inexperienced users can already initial stage create your own masterpieces without fear of ruining anything.
Of course, you already understand that most of this material we will talk about layers and operations on them, but we hasten to reassure those who think that this is not enough for one lesson. There will be a lot of information, as at the same time we will learn how to create geometric figures using the selection tools and copying image fragments to layers, and also get acquainted with the color palette, the move tool and many other interesting things.
Layers are probably the main component on which Adobe Photoshop based on working with images. To understand what this is, imagine a stack of absolutely transparent sheets, each of which contains some kind of image. If you look at them from above, then visually all the images will merge into a single picture, since through the transparent areas of the upper sheets you can see the contents of the lower ones.
The same goes for layers. Every layer in Photoshop is a virtual transparent sheet on which any graphic object. You can create as many layers as you need, and the main thing is that they will all form the final image based on the principle of overlay. Thus, with the help of layers, an image can be created in fragments, which can be worked on separately. This approach provides users with very wide opportunities when creating and editing graphic documents.
To manage layers and work with them in the editor, there is a panel, located by default at the bottom of the right column. Here you can see all the layers that make up the document, as well as enable or disable the display of layers and organize them. If for some reason the panel is closed, then open it by selecting the option in the main menu Window, and then point .
First, let's create new document using menu commands File - Create or using the keyboard shortcut “Ctrl + N”. When you open or create a new image in the editor, it consists of one layer. You can verify this by looking at the “Layers” palette, where immediately after creating the document there will be one single layer with the name "Background".

The background in Photoshop is the lowest opaque layer, the order of which, the blending mode and the degree of opacity cannot be changed. Thus, fo new layer is, as it were, a substrate for the image, the editing of which is subject to a number of restrictions.
Any image can only have one background. At the same time, all images that you, for example, shot with a camera or scanned, when opened in Photoshop, will have one single background layer. Try opening any photo in the editor and see for yourself.
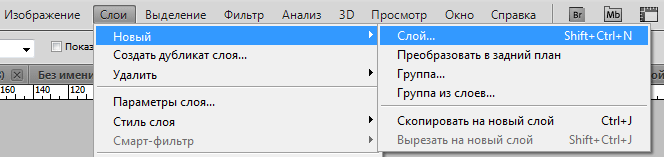
Now let's create a new layer. There are several options for this in the program. As always, this can be done using the main menu. Select the option, then the item New and then the command Layer.
Second and more in a convenient way, is the use of the button Create New Layer, which is located at the bottom of the Layers panel and has a curled leaf icon.

You can also use the button for calling the main menu of the “Layers” panel, which is located in the upper right corner of the palette and contains the command.

Finally, you can use the keyboard shortcut “Shift + Ctrl + N”.
It is worth noting that when creating a layer using the first and last two methods, an additional window will appear in front of you, in which you can set an arbitrary name for the layer and select a number of parameters. However, all this can be done later, and we will not dwell on these parameters in detail for now. The main thing here is to click OK.

Immediately after performing the soya creation operation, a new layer will appear in the Layers palette, which will automatically be named “Layer 1”.
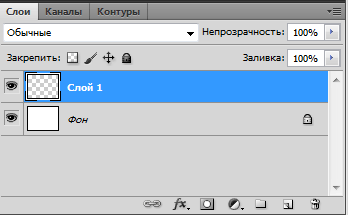
At the same time, you will not notice any visual changes on the sheet with the image itself. It will remain just as clean and white because our new layer is completely transparent. That is why the miniature of “Layer 1” in the “Layers” palette is painted over with a checkerboard pattern.
Now let's create a simple geometric object on our new layer. Select the “Rectangular Area” tool (M) from the panel on the left and use it to select an arbitrary area on the sheet.

As we remember, our layer is transparent, so in order to get a visually visible figure, let's paint the selected area with some color, and at the same time get acquainted with one of the ways to select a working color in Photoshop.
Before filling, we need to make sure that the main color is set to any option other than white (otherwise we won’t see anything on a white background). To do this, look at the second icon from the bottom on the toolbar, which is made in the form of two intersecting squares. The top one denotes the current main (working) color, and the bottom one denotes the current background color. Thus, in our case, the top square should be painted a different color from the color of the bottom square. If this is not the case or you just want to change the main color, then click on the top square and in the window that opens Color palette (Primary color) select any suitable color (in our example, red is chosen). If necessary, you can also change the background color by clicking on the bottom square, but in our case we will not do this.

After you have figured out the fill color, select the items in the main menu Editing, and then Fill or immediately use the key combination “Shift + F5”.

After filling, we need to deselect. To do this, it is best to use the “Ctrl + D” keys. We strongly recommend that you remember this combination, since when working in Photoshop you have to perform this action very often.
As a result, we should get a colored rectangle on the sheet. At the same time, changes will also occur in the Layers panel. Notice that a rectangle has appeared in the Layer 1 thumbnail, indicating that this layer is no longer empty and contains the shape we drew.

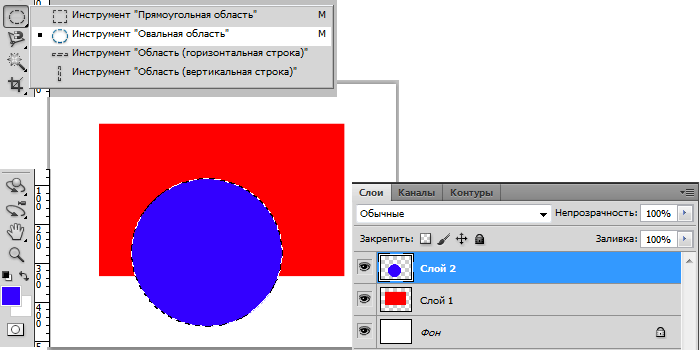
Now let’s create another layer using the already familiar algorithm, but instead of a rectangle, draw an oval on it and paint it with a different color. Click on the leaf icon to create a new layer. Change the “Rectangular Area” tool to the “Oval Area” (right mouse button), as well as the fill color (in our case, we chose blue). Next, select an oval or round area (while holding down the "Shift" key) and fill it.
In general, you can create as many additional layers, How many do you need. True, their number may limit the amount of software installed on the computer. random access memory. If there is little RAM, then when large quantities layers, the PC will begin to slow down greatly, and the application will crash.
Basic operations with layers
Moving layers
Now you can see that in our image the blue circle is located above the red rectangle, and both figures are placed on a white background. Now let's look at the list of layers: at the top is “Layer 2” with a blue circle, in the middle is “Layer 1” with a red square, and the bottom layer is “Background”. Let's try to change this sequence. Move your mouse cursor over “Layer 2”, and then, holding down the left key, move it down to the border between the “Layer 1” and “Background” layers. When you release the button, you will see that “Layer 1” and “Layer 2” will switch places.

Let's pay attention to the image - there have also been changes in it. Due to the fact that “Layer 1” has now become the top one, the figure now has a red square on top, rather than a blue circle, as it was before. Thus, it can be seen that layers higher in the list are superimposed on lower ones. Be sure to take this into account when creating your image.
Changing the transparency of layers
In the current arrangement of layers, we see that the area of the blue circle that is overlapped by the red square is completely invisible. But Photoshop has a great feature that allows you to change this state of affairs by changing the opacity of the layers. Let's see how it works.
The layer opacity control tool is located in the Layers panel and is located in its upper right part. By default, the opacity value is 100%, which means that all images on the layer are completely opaque and will completely cover the areas below. Switch to “Layer 1”, click on the arrow next to the opacity value and change it to 50% using the slider. You can also set the value manually directly from the keyboard.

Now, after changing the transparency of the layer, the part of the circle that is overlapped by the rectangle has become visible. It looks as if we placed a red piece of glass on the blue circle. Controlling the opacity of layers is very important and useful opportunity, with the help of which a huge number of effects are created in Photoshop.
Surely many have noticed that under the parameter Opacity a parameter is placed with similar controls, but only under the name Fill. In fact, these two tools are very similar in their purpose, and are responsible for changing the transparency of a layer, but with a slight difference. Application Fills has no effect on effects applied to the layer (layer styles). True, we will talk about them in another material, but for now, at this stage, these two parameters will be completely identical in their effect for you.
If there are no problems with changing the transparency of ordinary layers, then, as mentioned above, such a trick will not work with the background layer due to a number of restrictions imposed on it. Well, what if this is necessary? For example, the background layer may be a photograph with which you would like to perform all the same actions as with a regular layer.
To convert the background layer to a normal layer, double-click on it with the left mouse button in the Layers palette. A window will open in front of you, as in the case of creating a new layer, where you just need to click OK. You can also create a layer from the background using the context menu. Click right click on the “Background” layer and select the command Background from the background.
Turn layers on, off, or delete
Of course, when working in Photoshop you not only have to constantly create layers, but also delete them. To delete an unnecessary layer, just select it and click on the button with the trash can icon, which is located at the bottom of the “Layers” panel, or simply drag the layer row there. It’s even easier to delete a layer by pressing the “Del” key.

You can also not delete, but disable unnecessary or temporarily unused layers. To do this, each layer has a button on the left with an image of an eye, which indicates the visibility of the layer. If there is an icon with an eye, then the layer is visible; if it is not there, then the layer is disabled. Turning layers on/off is done by simply clicking on this button.
Renaming and grouping layers
As you have already noticed, each created layer is assigned the typical name “Layer” with serial number. It is not uncommon for the total number of layers in a document to number in the dozens. In such a situation, even despite the thumbnails, it becomes difficult to remember what exactly each of the layers contains, which in turn leads to confusion while working. But this can be avoided if you immediately give the layers meaningful names.

To rename a layer, hover your mouse over its name and double-click on it. Then enter a new name in the active field and press “Enter”.
Continuing the conversation about organizing layers, we cannot help but say that they can be combined into thematic groups (folders). Believe me, this greatly simplifies navigation in large projects and allows you to perform certain actions with a whole group of layers at once.

To create a group, there is a special button with a folder icon at the bottom of the Layers panel. After clicking on it, a folder is created in the list of layers, which is automatically assigned the name “Group” with the current serial number. As with layers, to improve information content, it can be renamed in exactly the same way.
Immediately after creation, the group folder is empty and you must manually move all the necessary layers into it. This is done by simply dragging the layer into the folder using the mouse. You can also select several layers at once (using the Ctrl or Shift keys) and move them all to the desired group in one operation.
In our example, we created a group called “Shapes” and placed two layers there - “Rectangle” and “Circle”. Visually, we can observe this by the fact that the thumbnails of layers in one group are slightly shifted to the right, while the background layer's thumbnail is located directly at the left edge of the list. By the way, next to the folder there is a triangle, by clicking on which you can collapse or expand the group, thereby optimizing the workspace in the Layers panel.
If you need to display a layer and groups, then drag it with the mouse to the area above the folder. If you need to completely disband the group, this can be done using the context menu and the command Ungroup layers.
Move tool. Copying images and their fragments to layers.
Before we continue talking about layers, let's take a short detour and get acquainted with a new tool that you will use very often. While working in Photoshop, it is often necessary to move various graphic objects inside the composition to find their most successful location. For this purpose, the program has special tool with a telling name - "Move" (shortcut key"V") located at the very top of the toolbar.

This tool works very simply: move the cursor over the desired object, hold down left button mouse and, without releasing it, move the cursor along with the object to the desired point in the document. To complete the action, release the paddle key. In this case, the object can be either an independent graphic fragment or any selected area.
In addition to the usual movement of selected fragments across the sheet, this tool can be used for other useful purposes, such as copying objects from one file to another.
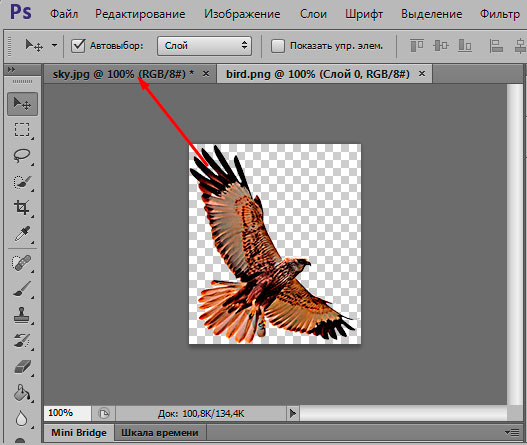
In order to clearly demonstrate how this works, we downloaded two files from the Internet with an image of the sky and a bird on transparent background(PNG format) and then both opened them in Photoshop in two windows vertically next to each other.

Now let's activate the tool "Move", move the mouse cursor over the bird, hold down the left key, and without releasing it, drag the cursor to the image of the sky. After you release the button, the image of the bird will appear against the sky. Please note that in a document with an image of the sky, after copying a new object there, a new layer will be automatically created. Thanks to this, you can easily move the bird to any point in the background image using the same tool "Move".
In order to copy an object in standard single-window mode, when the active file occupies the entire workspace, you need to open two images, grab the desired object in one of them, as we did above, and move the cursor up to the tab with the name of the required file.
When the cursor is on a tab, Photoshop will automatically switch to the specified file. To complete the operation, lower the cursor to the desired point in the opened image and release the left mouse button.
You can also use the clipboard to copy objects to separate layers. Wherein this method can be considered the most universal, convenient and widespread. To place any graphic fragment or the entire image on the clipboard, you need to select it in any way known to you, and then select the command Copy from menu option Editing or simply use the keyboard shortcut “Ctrl + C”. To place an object on a new layer from the clipboard, use the command Editing - Paste or "Ctrl + V" keys.
In our example, to copy the bird onto the sky background, we do the following. Choosing a tool "Rectangular area" and allocate them. It is clear that the object must completely fall within the selected area. Next, press the “Ctrl + C” keys, then go to the file with the sky image and use the “Ctrl + V” key combination. Immediately after this, the selected graphic object will be placed on a new layer in the document and automatically aligned to the center of the canvas.
It is noteworthy that to paste a fragment from the clipboard, in addition to the classic command Insert You can use other options located in the options from the menu Editing.

- Paste instead of (Shift +Ctrl +V)- copies the object to the same relative area of the image from which it was copied. For example, if the fragment was in the upper left corner of the source image, then it will be placed in the upper left corner of the target document.
- Paste into (Alt+Shift +Ctrl +V)- allows you to insert an object into a user-selected area of the image.
- Paste outside- allows you to copy an object from the clipboard beyond the user-selected image area.
Sometimes when working with an image, it becomes necessary to place some part of it on a separate layer.

In order to carry out this operation, you need to select the desired area of the images, right-click on the selected area and select the command in the context menu that opens Copy to new layer. Immediately after this, a new layer with the selected object will be created in the document, but it will also remain part of the original image. That is, in essence, a duplicate of the selected fragment will be created on its own layer, which you can work with without fear of spoiling the main image.
If there is no need to leave the selected fragment on the original image, then you can select the command Cut to new layer. Then the selected object will be removed from the original layer and moved to a separate layer.
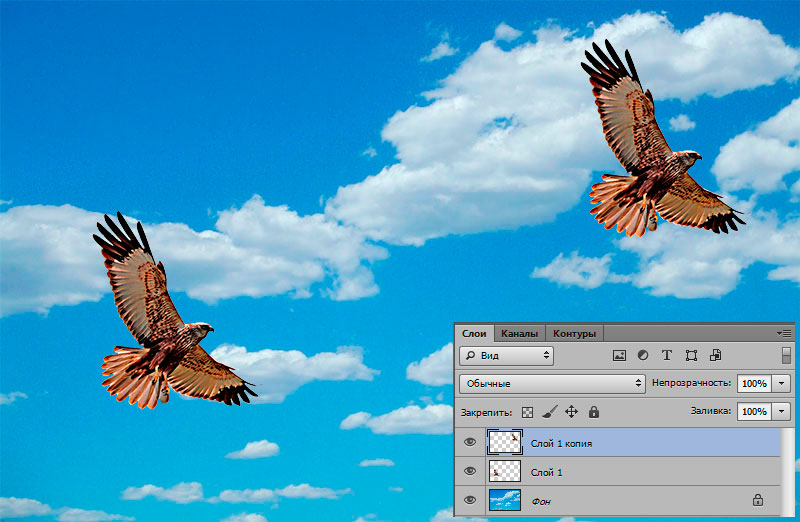
Sometimes as you work, you may need to create an exact copy of an existing layer, for example, to place several identical objects in an image. To quickly duplicate a layer, select the tool "Move", move the cursor over the image contained on the layer, and then, while holding down the Alt key and the left mouse button, drag it a little to the side. In this case, the name of the newly formed layer will contain the word “copy”.

You can also create a copy of a layer using the Layers panel. To do this, drag the layer line onto the blank sheet icon or call the context menu by right-clicking on the layer line and select the command in it Duplicate Layer. By the way, the layer’s context menu contains a number of other useful commands, which you will often have to deal with. So we advise you not to forget about this tool if you want to learn how to work in the program most effectively.
Selecting layers. Rulers, Guides and Grid
It's time to return to our example, in which we copied the bird onto the sky background. Let's try to create a duplicate of the layer with the bird using any of the methods described above, and then place the resulting copy and original in different corners of the image, using the tool we are already familiar with "Move".
When you work with several layers, you need to be careful and constantly make sure that the layer you are going to work with is currently active. Otherwise, you risk accidentally starting to edit an unplanned fragment of the image, and quite possibly ruining the work already done.
Thus, in order to move a certain object to the desired point, we need to make sure that the layer on which it is placed is active at that moment. In our example, we have only three layers, and therefore you can select them directly in the “Layers” panel. But in other situations, when the image consists of many layers, sometimes finding and selecting the desired layer from an impressive list is not so easy. In this case, it is much more convenient to select a layer by clicking on the image itself while holding down the “Ctrl” key.
You can also activate a special tool that allows you to select layers by clicking on the image without pressing the “Ctrl” button. It can be turned on/off in the properties panel of the Move tool (located immediately below the main menu).
So, we randomly placed our birds in different parts of the background, without really thinking about their placement. But in some cases, you may need to place elements strictly at certain points in the image.
For precise positioning of objects, Photoshop has a number of useful tools. First of all, these are rulers that can be placed on the left and top of the document working area. By default they are disabled. They can be turned on/off in the main menu option View using the command Rulers or using the “Ctrl + R” keys. Ruler units can be pixels, inches, centimeters, millimeters, points, picas, and percentages. To select them, the easiest way is to use the context menu, which is called up by right-clicking on the ruler scale.

The second important tool for precise positioning is guide lines. To place them in the picture, you can also use the menu View by selecting the command there New guide, but there is more interesting way. To place a guide on the canvas, just move the mouse cursor over the ruler and, holding down the left button of the manipulator, drag it onto the image.
You can later edit the position of the guides. To do this, you need to move the mouse cursor with the tool enabled "Move" to the line (the cursor should change and take the form of multidirectional arrows), hold down the left button and drag the guide in the desired direction. If you drag the guide back onto the ruler, it will be removed.
For training, imagine that we need to place our birds with a 2 centimeter indentation from the edges of the corners in which they are located. Turn on the rulers and increase the image scale so that their scale becomes large enough. We “pull out” two guides from the top and side rulers and position them 2 cm from the edges of the image, guided by the ruler scale.

Now all we have to do is use the tool "Move" move the birds so that their plumage does not extend beyond the guides. It is worth noting that for more precise positioning of objects you can use not only the mouse, but also the arrow keys on the keyboard.
There is another way to accurately position objects relative to guides in Photoshop, which is called - binding. It works like this: you bring the object close to the guides, after which it automatically “sticks” to the auxiliary elements. To enable/disable this function, you need to open the menu View, and check/uncheck the commands Binding(keyboard shortcuts “Shift + Ctrl + ;”) or Snap to.

In the first case, automatic snapping is enabled for all possible elements, and in the second, you can select specific elements such as guides, grid lines, layers, cutting fragments and document borders.
In conclusion, I would like to note another useful auxiliary element for positioning image fragments, which is called Net. To enable the grid, go to the menu View, then select Show and then the option Grid or use the “Ctrl + ‘” keys. Using a grid is useful in cases where you need to accurately place many different graphic objects on the canvas, since dragging out guides for each of them is very time-consuming and inconvenient. For example, incorporating a grid can be very useful when designing a website that contains a lot of rectangular block elements.

As with guides, you can also enable object snapping to the grid. True, it is not always convenient to work in this mode all the time, since all the independent image fragments will begin to “stick” to the grid, which is not always necessary and can greatly interfere. So, after arranging all the necessary elements on the grid, it is more advisable to turn off the binding to it, and even the grid itself.
To disable any specific auxiliary elements, be it a grid or guides, use the checkboxes on the desired items in the menu View - Show.

If at some point in your work you want to disable/enable all auxiliary elements at once, you can do this by clicking on the item Auxiliary elements or use the key combination “Ctrl + H”.
Conclusion
It's safe to say that today we've covered one of the most important topics that underlies work in all of Photoshop. As you probably already guessed, we are talking about layers and the principles of constructing images using them. Understanding this issue is really very important and critical for the successful development of this editor.
The beauty of working with layers is that objects placed on separate layers of their own can be edited and moved independently of each other. This allows users to both create images from individual fragments and work with individual fragments of the image, without fear of ruining the entire composition as a whole. This principle of creating graphic documents creates almost ideal creative conditions for both professionals and beginners.
First copy method in it Duplicating a layer.

First copy method in it Duplicating a layer.
If what you want to copy (multiply) is on a separate layer or can be easily dragged into a separate layer, then there are no problems... in the panel Layers right click on the layer and select from the menu Duplicate Layer... (Duplicate layer). Or use main menu from above (also through the item Layer – Duplecate Layer...).
Second copy method I use it often, but not many people know it. It is very convenient when you need to quickly make many copies of a selected area on one layer.
Select the desired area using a selection (lasso or rectangular selection, whichever is more convenient). Next, hold down three buttons on the keyboard: Ctrl + Shift + Alt, click on the selection with the mouse and drag it to the side. In the end you will get copy selections on the same layer.

Third copying method I also use it often. This copying selection to new layer. It's simple... Having a selection, right-click on it and select from the pop-up menu Layer via Copy(Copy to new layer). For the menu to appear, it is important that in the toolbar (Tools) one of the selection tools was selected.
Congratulations to the future Photoshop master!
From this article you will learn the most important operations that can be performed with layers, for example, copy, duplicate, delete, select.
We continue to work with our multi-colored avatars.
1. Copy a layer to a new document
For example, let's copy the layer with the red avatar into a new document.
Make the desired layer active.
Press key combinations: Ctrl+A(select all), then Ctrl+C(copy)
In the main menu select File - Create or just click Ctrl+N
The menu appears:

Choose Clipboard and press the button Create.
A new document appears with the dimensions of the copied layer.
Press the keys Ctrl+V(the copied image is pasted into a new document)

2. Duplicate a layer
First, select the layer to copy and make it active. Then call up the menu:

And press Duplicate Layer. A window appears:

Enter the desired name, then click OK.
The cloned layer appears directly on the next, but new, layer.

3. Removing a layer
First, make active the layer that needs to be deleted and call up the same menu as in the previous paragraph.
Choosing a team Delete layer.
You can also delete a layer in another way: by simply dragging it to the trash.
 - it is located at the bottom of the Layers palette.
4. Selecting an image on a layer
To select an image on a layer, you need to hold down the Ctrl key and hover the mouse over the layer’s thumbnail image (a white palm appears with a selection), and click on it:

You can do whatever you want with this selection: fill it with a different color, move it to a new document, etc.
See you in the next lesson!
Is there a way to copy layers from one Photoshop document to another?
I previously worked on a project that required this, but I didn't know how it could be done.
(The procedure is not as simple as in Illustrator, where a simple Ctrl | Cmd + C and Ctrl | Cmd + V would work.)
Atav32
Did the answers solve your problem? If not, could you edit the question to give more information? If so, don't forget to mark the accepted answer =)
Answers
jhocking
You can simply drag a layer from the Layers panel and drop it into a new document. This can be tricky, however, if your view is set up so that the two documents are not side by side (see below for a description of how to do this using tabs).
Another way to transfer layers between open documents is to use the Duplicate Layer function. By right-clicking on a layer in the Layers panel you can select Duplicate Layer... from the menu. The Duplicate Layer dialog box will then ask you which document to use as the Destination item.
In Tabbed View: Select the layers you want in the Layers panel, take the Move tool (V), click and hold in the document window(not on the Layers panel, just on the image itself), drag the cursor to the title of the desired tab and wait for the document view to change (don't release the left mouse button yet), move the mouse cursor into the document window and release the left mouse button (hold down the Shift key) to place the layer in the center of the document).
Kevin Bomberry
When dragging layers from one document to another, pressing Shift while releasing the mouse will align to the center of the target document. Hooray! (^_^)
counterbeing
This is something that has always bothered me about photoshop, I don't see a reason why they wouldn't implement a duplicate for layers... Anyway, the duplicate trumps all my coordinates when I want to move something :) Thanks!
jhocking
Copy-paste shrug applied to pixels, this is a copy of the layer. It's probably better if they make this a separate button since it's a separate operation.
IROEGBU
Let's say you want to copy from tab A to B, just drag from A to B (B will switch to become the active tab) and then drag to the canvas.
leugim
I always make a duplicate route:
You select the layer(s) and then either
- Layer → Duplicate...
- or via Duplicate... in the Layers Palette Options button.
In the dialog box, select the destination where you want to copy them. It has additional benefit is that you can even choose to duplicate to a new document, which automatically creates a new image with your copied layers.
The whole drag business is not my thing. I'm often afraid that it will be handled incorrectly or at least strangely.
Anthony
Upvote for your answer. I agree that dragging a business is not my thing either. It's often hit or miss.
lawndartcatcher
The easiest way is to select the layers you want to copy and drag them into a new document.
Stacy Lane
Similar to jhockings' answer, but a little faster: you can always right-click on the layer(s) you want to copy and select "duplicate layer". From there you will get a dialog box and you can select the destination of the layer. The current document is selected by default, but you can change it to an open document or a new document.
If you want to place the duplicated layer at a specific location in open document, make sure to select the folder you want to place it in before duplicating the layer. You do this by literally selecting the desired folder in the Layers palette for the final document.
If you find that you need to repeat this action many times, you can always make a new action for it. Open the Action Palette and create a new Action - set hotkey(I use F2). Then, to record the action, click the Options button (in the upper right corner of the palette window) and select Insert Menu Item. Choose Layer > Duplicate Layer. Then click Okay. Now when you press F2 while the layer is active, it will bring up a double dialog box. Select your destination and you're done! Just be careful when choosing hotkeys because it may override some of Photoshop's default actions.
leaveswater02
You can just drag a layer from one project to another, just open two projects and go to Window, Arrange and 2up Vertical, highlight the layer you want to copy and just drag it across
Crys
As mentioned, you can simply extract the layers from the Layers palette and place them in a new document if the windows are located next to each other. There's a trick you can use if you're not viewing them side by side:
- Make sure you are using the Move Tool (V)
- Select your layers
- Drag them to the destination tab, starting from somewhere inside the image itself (not from the layers palette).
- Wait a moment and the destination image will open on the screen. You can then remove the layers in this image.
This trick works in CS4 and CS5; not sure about earlier versions.
Crys
I should have specified that you should drag them from the image window and not from the layers palette. You can select them in the palette, but then drag them from the image to the tab. I'll edit my answer to reflect this.
Adam Elsodany
Here's my must-have Javascript macro for copying layers from one Photoshop document to another for anyone familiar with Photoshop scripting. Tried and tested in CS 5.5 on a Mac.
sourceDocumentName , targetDocumentName and layersToCopy are the only variables you need to edit to suit your needs.
On a Mac, you can simply save as something like copyLayersBetweenDocs.jsx and then drag the script file onto the Photoshop icon in the dock to run it. On Windows, you should save it in the scripts folder C:\Program Files\Common Files\Adobe\Startup Scripts CS5\Adobe Photoshop and open it from Photoshop.
#target photoshop app.bringToFront(); var sourceDocumentName = "source-doc"; var targetDocumentName = "target-doc"; // populate this array with whatever the names of the layers // you want to copy are var layersToCopy = new Array("road-scenery", "car", "wheels", "front-passenger", "rear-passenger" ); // alternatively, specify the name of a layer group containing // the layers you want to copy over. // Just uncomment the following line //var layersToCopy = "layer-group-to-copy"; copyLayers(layersToCopy, sourceDocumentName, targetDocumentName); /** * Copy layer from one document to another * @param (string|Array) layersToCopy * @param (string) sourceDocumentName * @param (string) targetDocumentName */ function copyLayers(layersToCopy, sourceDocumentName, targetDocumentName) ( var sourceLayer, targetLayer , sourceGroup; var sourceDoc = app.documents; var targetDoc = app.documents; if (app.activeDocument != sourceDoc) ( app.activeDocument = sourceDoc; ) if (typeof layersToCopy === "string") ( sourceGroup = sourceDoc. layerSets.getByName(layersToCopy); targetLayer = sourceGroup.duplicate(targetDoc, ElementPlacement.PLACEATBEGINNING) ) else if (Object.prototype.toString.call(layersToCopy) === "") ( for (var i = 0; i< layersToCopy.length; i++) { sourceLayer = sourceDoc.artLayers.getByName(layersToCopy[i]); targetLayer = sourceLayer.duplicate(targetDoc, ElementPlacement.PLACEATBEGINNING); } } }
Farray
Link the layers in the Layers palette and make sure you link the layer masks as well. Then drag (perhaps holding Shift if the documents are the same size or you want to center the layers) onto another document.
If you want to line up the cover exactly, place them in a folder and select an exception in blending mode, then transform.
Bikal Gobena
This quick way if you want to export some parts of your design to PNG or JPG:
- Select the layer you want to copy
- Right click to convert it to smart object
- Double click on the layer, you will be prompted with the smart object details.
- Click Ok, then you have a layer in the new document.
You will get all the layer styles provided to you and the canvas size will be automatically cropped according to the width and height of the layer. From here you can save it as new PSD file or export to another format.
This would be very helpful for a web designer when exporting web elements where you want to export individual elements separately. Disadvantages of this method: When you create a Smart Object, Photoshop saves your layer to separate file, which can lead to additional use memory.
Tracy Ebert
To be able to copy and paste, I do this. Open the layer I want to copy, in most cases my logo, and select Select All (Ctrl + A). Then right-click on the layer and select Rasterize Layer. Then press Ctrl + C to copy, go to a new document and press Ctrl + V to paste. Works for me.
Tom Auger
Sorry Tracy, but this is actually pretty bad practice. If you have to rasterize a layer so you can copy it, that means you're destroying any resolution-independent vector information that was in that layer. You should really try some of the other methods listed above to reap the benefits of saving your information. I'm sure your technique is "working for you", but why not try a new (and hopefully better) way of doing things?
John Fiala
I do what Tracy lists, only without the Rasterize step. But then I'm pretty new to this. I need a tutorial for Photoshop that tells a web developer how to get design and icon information from a file. :)
Online tutorial for beginners
Photoshop lessons
Chapter No. 7. Layers
Copy and paste the visible area of a layer into another image
Use the clipboard (commands Sora(Copy) and Paste(Paste)) if you want to copy only visible points layer (at a viewing scale of 100%) and do not want to copy any points located outside the layer boundary.
- On the palette Layers(Layers) Activate the layer you want to copy.
- Select a team Select > All(Select > All) or press the key combination Ctrl+A. Points located outside the canvas border will not be included in the selection.
- Select a team Edit > Soru(Edit > Copy) or press the keyboard shortcut Ctrl+C.
- Click on the target image window.
- Select a team Edit > Paste(Edit > Paste) or press the keyboard shortcut Ctrl+V. The pasted pixels will appear on a new layer. You can change the position of a layer relative to other layers using the palette Layers(Layers).
- Click on the original image window again and select the command Select > Deselect(Select > Deselect) or press the keyboard shortcut Ctrl+D to make the selected area inactive.