Loading the Linux operating system. Execute a script when linux starts or shuts down. Hardware Configuration
The Linux system boot sequence consists of the following steps:
BIOS (Basic Input-Output System - basic input/output system)
BIOS is the lowest level interface between the computer and peripherals, which searches for and executes the boot sector on any storage device connected to the computer.
Typically this is:
- CD-ROM drive
- HDD
- Disk drive (used less and less)
The list depends on the capabilities of the specific BIOS, as well as your hardware.
The boot priority can be changed in the BIOS. Enter the menu BIOS settings"And, as a rule, you can press Del, F1, F2 or F10 while the computer is booting.
MBR (Master Boot Record)
The first sector of the bootable storage device is reserved for the main sector boot entry. When the device boots, the BIOS loads and executes the bootloader operating system(boot loader) located in the MBR.
In most cases, the bootloader is quite complex and cannot fit into the 512 bytes allocated by the MBR. In this case, the MBR contains the so-called stage1, a program that simply loads the program of the second stage of loading the operating system - stage2 (sometimes the boot sector is loaded as stage2 active partition, boot manager or access authorization and protection program).
Specifically, stage2 of the GRUB bootloader reads data from the file /boot/grub/grub.conf (or /boot/grub/menu.lst, depending on the version), which contains a list of all available operating systems and their boot options. After this, a list of operating systems is displayed on the screen from which the user selects the OS to boot.
Operating system loader
In some cases, stage1 of the GRUB (GRand Unified Bootloader) loads stage1.5, the code of which is located in the first thirty kilobytes of the storage device immediately following the MBR, and already stage1.5 loads stage2.
When stage2 gains control, a (pseudo)graphical menu is displayed for the user to select an OS to boot. It is worth noting that boot options can be changed from the same menu, which allows you to restore the system after menu.lst or grub.conf has been accidentally corrupted.
Once boot options have been selected, GRUB loads the selected kernel into memory and transfers control to the kernel, which then proceeds to boot the system. GRUB can also transfer control not to the kernel, but to another bootloader, using the so-called chain loading, for example to the bootloader of an OS that does not support the Multiboot standard.
Core
In turn, the kernel checks the hardware configuration, initializes the devices and runs initrd (optional), after which it mounts the device specified in the boot parameters as "root" as the root file system.
The device file system is detected automatically. If for some reason the mounting fails, the system issues a kernel panic and the download stops.
After successful installation file system, the kernel starts the init daemon, which gets a process ID of one and starts the rest of the system.
init
init is last step in the system boot sequence. init is the parent (or more distant ancestor) of all processes running on the system. This process is the first to start in the system and is launched directly by the kernel. It also starts all system processes as specified in /etc/inittab.
While the system is running, init will not complete. It is worth noting that init is a user process, not a system one, despite the fact that it is launched as root.
Runlevels
Each entry in /etc/inittab contains the so-called "runlevel" for the process, i.e. information about at what system startup level this process should be launched.
On Linux systems there are seven possible values for the run level, from 0 to 6 inclusive:
- Stopping the system
- Single-user mode
- Defined by the user, usually a multi-user mode without network or graphical shell support
- Multi-user mode without graphical shell
- User defined, generally not used
- Multi-user mode with graphical shell
Based on the current runlevel, init runs scripts located in the /etc/rc.d/ subdirectories, each runlevel has its own subdirectory, from /etc/rc.d/rc0.d to /etc/rc.d/rc6.d .
In reality, the launch of scripts at each runlevel is carried out by the /etc/rc script, which is called at each runlevel with a parameter equal to the current level. The call to /etc/rc with the parameter is registered in /etc/inittab, for each of the possible run levels.
The default runlevel is determined by the entry in /etc/inittab:
Id:3:initdefault:
The current runlevel can be changed by calling:
/sbin/telinit #
Where # is the desired run level. Those. calling "/sbin/telinit 6" will reboot the system.
Press the power button on your system unit, and after a few seconds you will see the login window.
I dare to suggest that everyone has at least once been interested in what happens behind the curtain of splash screens and loading screens from the moment the computer is turned on to the moment when it is prompted to log in.
I suggest you become familiar with the following levels of a typical Linux boot:
1.BIOS
- The BIOS is responsible for basic input/output of data from/to devices.
- Performs some device integrity checks. In addition, POST (Power-on self-test, also known as “test for the adequacy of oneself”, performed as a pre-boot stage), which is controlled by the BIOS, is responsible for testing the performance of electronics.
- Searches for, loads and executes the OS bootloader program
- Takes a loader from a flop, CD or hard drive. While loading the BIOS, you can press a button (usually F12 or F2 or Del, depending on the platform) if you need to make some changes regarding hardware settings.
- Once the bootloader has been detected and loaded into memory, the BIOS transfers control to it.
- In short, the BIOS loads and executes the Boot Record (MBR).
2.MBR
- MBR is the master boot record stored on the hard drive
- It is located in the 1st sector boot disk, for example /dev/hda or /dev/sda
- The MBR takes up less than 512 bytes. It consists of three components: 1) main boot information, “living” in the first 446 bytes; 2) information about the partition table - in the next 64 bytes; 3) and the last 2 bytes are needed to check the correctness of mbr.
- It contains information about GRUB (or LILO).
- In simple words - MBR loads and executes the GRUB boot loader.
3.GRUB
- GRUB - Grand Unified Bootloader.
- If your system has more than one kernel installed, you have the ability to choose which one should run
- GRUB displays a nice plymouth splash animation, and after waiting a few seconds of user interaction if they haven't pressed any keys, it loads the default kernel in the grub configuration file.
- GRUB understands what a file system is (ancient Linux boot loaders, such as LILO, do not understand this).
- The Grub configuration file is usually located along the path /boot/grub/grub.conf (also /etc/grub.conf can be a symbolic link to it). Here is an example configuration file for CentOS:
#boot=/dev/sda
default=0
timeout=5
splashimage=(hd0,0)/boot/grub/splash.xpm.gz
hiddenmenu
title CentOS (2.6.18-194.el5PAE)
root(hd0,0)
kernel /boot/vmlinuz-2.6.18-194.el5PAE ro root=LABEL=/
initrd /boot/initrd-2.6.18-194.el5PAE.img - As a note to the information above, configuration file contains the path to the kernel and initrd image
- In short, GRUB simply loads and executes the kernel and initrd images.
4. Kernel or Kernel
- The kernel mounts the filesystem according to the "root=" setting in grub.conf
- Executes the program /sbin/init
- Since init is the first process started by the Linux kernel, it has a process ID (PID) of #1. You can run “ps -ef | grep init" and make sure.
- initrd is Initial RAM Disk, aka temporary disk in random access memory
- initrd is used by the kernel itself as a temporary root filesystem until the kernel boots into the real mounted filesystem. This temporary disk also contains bootable drivers that allow you to access disk partitions and other hardware.
5.Init
- Looks in the /etc/inittab file to determine the run level.
- There are the following execution levels:
- 0 – abort execution
- 1 – Single-user mode, the so-called “Single user mode”, or in other words, the recovery console
- 2 – Multi-user mode without NFS support
- 3 – Full multiplayer mode
- 4 – not used
- Init determines the default runlevel from /etc/inittab and uses it to load all necessary programs.
- Run "grep initdefault /etc/inittab" on your system and you will find out what your default level is
- If you can’t live in peace, you can install standard level to 0 or 6. :)
- In most cases, level 3 or 5 will be enough for you.
6. Program execution level (Runlevel)
- As Linux boots up, you can see various services loading. For example, these could be messages like “starting Postfix ... OK” (Postfix is starting). These services are called runlevel programs and are executed from the directory that corresponds to the desired runlevel.
- Based on the default settings, the system will execute files according to the following directories.
- Execution level 0 – /etc/rc.d/rc0.d/
- Execution level 1 – /etc/rc.d/rc1.d/
- Level 2 Execution – /etc/rc.d/rc2.d/
- Level 3 Execution – /etc/rc.d/rc3.d/
- Running level 4 – /etc/rc.d/rc4.d/
- Execution level 5 – /etc/rc.d/rc5.d/
- Execution of level 6 – /etc/rc.d/rc6.d/
- But keep in mind that there may also be symbolic links in the /etc directory. For example, /etc/rc0.d is linked to /etc/rc.d/rc0.d.
- In the /etc/rc.d/rc*.d/ directories you can see a list of programs whose names begin with the letters S and K.
- Programs starting with S are used to start. S because s tartup.
- Programs that begin with the letter K are used - correctly - to shut down work. K because k ill.
- There are also numbers next to the letters S and K in program names. These numbers are used to determine the order in which these programs run.
- For example, S12syslog is designed to run the syslog daemon, it serial number 12. S80sendmail - to start the sendmail daemon with sequence number 80. Thus, the syslog program will be launched before sendmail.
That's all. Perhaps this is not new to some of you and there was no particular interest in reading the article, since it is more focused on beginner-intermediate levels of familiarity with Linux.
In this case, I can only say that “repetition is the mother of learning” (c).
Additions, corrections, clarifications
The comments repeatedly referred to the text of the article, so I think it’s worth taking into account some important comments from the habra community. (thanks to artemlight, 3al, Tishka17, HhyperH, Next_Alex, Ilya_Shmelykh, Aux, soomrack, Xpeh)- artemlight: : “Well, let’s face it, not all distros are loaded this way.” The majority agreed with him, noting bsd-style init, u-boot, and although initrd is omitted from the article, it is worth noting that the kernel does not need it in all distributions. It is also noted that in slackware, rc.d support is provided only as compatibility, and embedded systems are loaded differently. Desktops sometimes have EFI, and besides, Linux is popular in the embedded world and there are a lot more different platforms. Linux loads differently on a phone.
- soomrack, citing Wikipedia: I would also like to make a comment about the MBR, the first sector, etc. Everything has become somewhat more complicated in recent years. Now it is more appropriate to talk about EFI.
“GUID Partition Table (GPT) is a standard format for placing partition tables on a physical hard disk. It is part of the Extensible Firmware Interface (EFI), a standard proposed by Intel to replace the obsolete BIOS, one of the last relics of the original IBM PC. EFI uses GPT where BIOS uses the Master Boot Record (MBR)...."
- They also asked us to remember LILO. LILO, we remember you! Hello!
- Xpeh adds that “BIOS (and (U)EFI, not mentioned here) is primarily concerned with initializing devices (including loading their own BIOSes of PCI devices), nothing is written about this. Although this role is gradually decreasing, as more and more hardware initializes itself and/or supports hot plugging and therefore is still initialized by the OS, but, for example, it always initializes RAM. „
- VolCh clarifies the download for Debian-Ubuntu OS:
For Debian/Ubuntu:
- there is no /etc/rc.d/ directory;
- directories /etc/rc?.d/ are real directories, not links;
- these directories store links to scripts in the /etc/init.d/ directoryIt’s better not to edit anything manually in /etc/rc?.d/, but to use the update-rc.d command, which allows you to create links, delete them, prohibit them (in fact, rename them from S* to K*) and allow them (from K* to S*) launch.
Linux, like any other operating system, boots in several main stages: -> Pre-system boot -> Primary bootloader Linux-> Secondary Loader -> Userspace Load ( INIT).
This approach is needed due to the fact that the operating system is a logically complex structure, therefore loading it is quite difficult for a computer. Based on this complexity and incomprehensibility, the idea arose to break the OS loading process into more elementary stages. The first stage is the simplest and lightest for a computer, and the last is the largest and heaviest.
Consider pre-system loading
The task of pre-system boot is to choose how to load the operating system kernel.
The user can choose exactly how to load the kernel independently. In order to choose you need special system management. This control system is usually called loader. IN Linux the most popular and frequently used bootloaders are bootloader LILO (Linux Loader) and bootloader GRUB (Grand Unified Bootloader). They provide the user with the option to select a pre-configured download type. Both of these loaders have text (console) and graphical interface options. The main and key task of such bootloaders is to load the kernel and everything necessary for the successful start of the system into the computer’s memory.
In these settings, you can select the standard boot of the Linux OS, you can call system utility(a small special-purpose program), specify which programs to activate when loading the operating system, and much, much more.
In this simple way we figured out the “OS kernel loader Linux«!
Linux can be useful to you for many reasons. For example, your old computer can't update to new ones Windows versions or macOS, or you need Linux-specific applications, or you're just curious to try something new. Or maybe you just bought new computer without an operating system and want to save money by choosing free Linux.
Installing Linux is easy. Of course, there are distributions like Arch, which are quite difficult to install for a beginner. But most modern distributions are very easy to install. Perhaps even simpler and faster than Windows.
Before installing Linux on your main computer, make a copy of your important data. When working with partitions on your hard drive, you may accidentally erase something important. Of course, if you follow the instructions and carefully read what you are doing, then nothing unexpected will happen. But it’s a useful thing in any case.
You can install Linux on computers running Windows control and macOS or to blank HDD. You can choose Linux as your main system or use it in parallel with your old system.
1. Download Linux distribution
First of all, you need to choose a Linux distribution. The DistroWatch.com rating will help you decide.
Then you need to download the selected distribution. This is easy to do: open the website of the desired distribution, find the downloads section and select the one that suits the bit capacity of your processor.
Usually, Linux distributions The official websites offer two ways to download. The first method is a normal download. The second is via P2P using a torrent client. The second method is naturally faster. So choose it if you want to save time.

When the distribution kit in ISO format is downloaded, you need to burn it to a CD or a regular USB flash drive.
You can burn to CD standard means system: "Burn Disk Image" Windows or "Disk Utility" macOS. Just click on the downloaded image right click mouse and select the appropriate item in the menu.

To burn ISO to a flash drive you will need special utilities. For Windows is better select Rufus, and for macOS - UNetbootin. These programs have a very simple interface, it is quite difficult to get confused in them.
3. Prepare the disk partition
This step should be followed if you want to keep the system installed on you and use Linux at the same time as it. If you decide to switch your computer completely to Linux or are installing the OS on an empty hard drive, skip this paragraph.
Windows

Open Windows Disk Management. Select the drive or partition from which you plan to carve out some space to install Linux. For most distributions, 10 GB is more than enough. But if you plan to install a lot of apps, get more. Right-click on the partition and select Shrink Volume. Enter the size and click OK.
The process can take quite a long time, so be patient.
When Disk Management finishes resizing your partitions, there will be empty unallocated space on the disk, marked in black. We will install Linux there.
Later, if you don’t need Linux, you can delete partitions with it and give the free space back to Windows using the same “Disk Management Tools”.
macOS

You can allocate space for installing Linux using " Disk Utility» macOS. Select your drive and click on the “+” icon to create a partition for Linux. Creating a new partition may take some time.
4. Prepare the bootloader
Windows
This point only applies to new computers running Windows 10, 8.1 or 8 pre-installed. These computers use a UEFI boot loader, which will not allow you to boot into anything other than Windows.
To fix this, go into your computer's BIOS settings and disable the Secure Boot option. Then reboot. Done, you can now download and install other systems next to your Windows.
macOS
Unlike most computers, a Mac requires a couple of additional steps to install Linux on dual boot with macOS.
First of all, disable SIP. Restart your Mac and press Cmd + R. The Recovery menu. Select “Terminal” in it and enter csrutil disable .
Reboot your Mac again. SIP is disabled.
Manual
Suitable if you want to set the sizes for your partitions yourself or, for example, create a separate partition for your files. To do this, select “Other option” and click “Continue”.

Linux will display what partitions you have on your computer. You can delete them, format them, or, conversely, leave the sections with the information you want to save intact.
To install Linux instead of your system, select a partition with installed system and delete it with the “–” button. Then create new partitions in the free space.

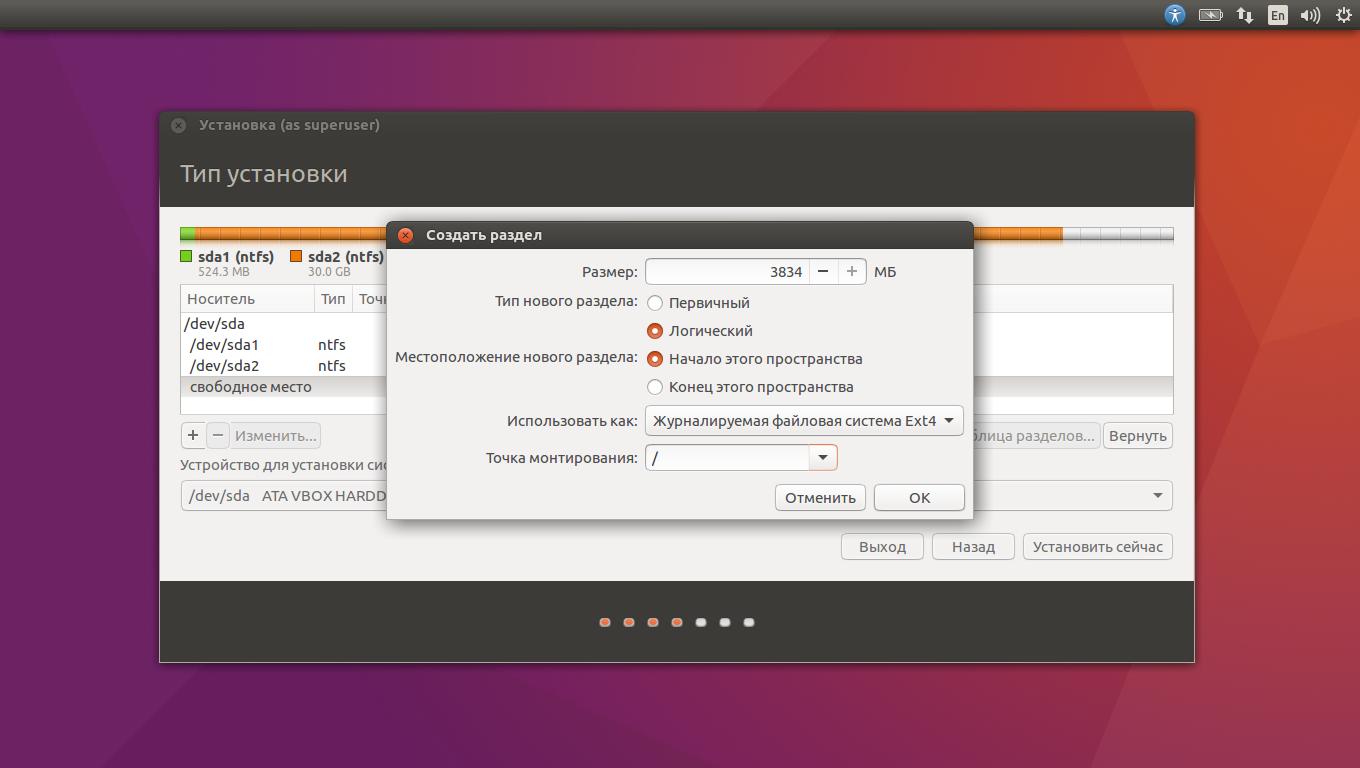
- Root partition for system files Linux. Select Ext4 file system and mount point /.
- The swap partition, or swap partition, is useful if you do not have enough RAM, but fast SSD drive. In the list of file systems, select "Swap Partition".
- Home partition where your files will be stored. Select the Ext4 file system and the /home mount point.
Click Continue and confirm the changes. The installer will erase the partitions you selected and create new ones in the free space.
How to install Linux next to your current system
Install Linux is nearby with your system there are two ways.
Auto

Most Linux installers will immediately detect the systems you have installed. If you haven't created a separate disk space for Linux, you can try selecting the "Install next to Windows" option. The installer will automatically create the necessary partitions, and you will not have to do anything manually.
Manual
If you want to determine for yourself how much space to allocate to the system, and followed the instructions in step 3, click “Other option” and click “Continue”. You will see your disk partitions and empty space that we have prepared for Linux. Create a root partition there (mount point /) as described above. A home partition is not necessary in this case: you will be able to copy and modify files on your main system.
Click Continue. The installer will leave your files in place. It will simply create new partitions on free space. You will be able to choose which system you want to boot at startup.
8. Complete the Linux installation


You will then be asked to introduce yourself. Enter your name and create a password. Don't forget your password, as you will constantly need it to perform tasks on behalf of everyone. If you wish, you can encrypt your home folder.
Then just wait. When the installation is complete, you will be prompted to pull out installation disk and reboot. Don't forget to disable BIOS loading With external drives, if you turned it on.
What to do after installation
When you reboot and your Linux desktop appears in front of you, you can do everything you can do in Windows and macOS: surf the Internet, edit documents and listen to music. Don’t forget to update and look at the “App Store” (or its equivalent, depending on the distribution) to additionally install the applications you need.
Try Linux and you will see that in everyday life it is no more difficult than Windows or macOS.
secondary bootloader diagram with location map. This does the job with LILO an activity that requires increased care, since changing the loading procedure not atomic: first the user modifies the kernel or its modules, then edits the /etc/ file lilo.conf, which contains information about all the computer's boot options, and then runs the command lilo, which collects placement tables for all specified cores and secondary bootloader and writes down the primary and secondary loader along with maps in specified place disk. Primary loader LILO(it's called LI) can be written to both the MBR and the beginning section Linux.The simplest file lilo.conf might look like this:
Boot=/dev/hda map=/boot/map image=/boot/vmlinuz-up root=/dev/hda1 Example 10.1.
The simplest LILO setup: example lilo.conf file LILO This setting defines only one boot option: primary loader is written to the beginning of the first hard drive (line boot=/dev/), hda accommodation map lilo utility writes to the file /boot/map , the kernel is obtained from the file /boot/vmlinuz-up , and the entry root=/dev/hda1 tells the kernel that root file system
is located on the first partition of the first disk. One of the machines that Methodius happened to work on was sometimes used to start the only program , written for MS-DOS. Source texts lilo.conf This program was lost long ago, and so was the author, so I had to install both MS-DOS and Linux on the machine. As a result
turned out to be like this: # cat /etc/lilo.conf boot=/dev/hda map=/boot/map default=linux-up prompt timeout=50 image=/boot/vmlinuz-up label=linux-up root=/dev/hda5 initrd= /boot/initrd-up.img read-only image=/boot/vmlinuz-up label=failsafe root=/dev/hda5 initrd=/boot/initrd-up.img vga=normal append=" failsafe noapic nolapic acpi=off " read-only other=/dev/hda1 label=dos other=/dev/fd0 label=floppy unsafe
Here Linux was installed on the fifth partition of the disk (the numbering of partitions in IBM-compatible computers will be discussed in Lecture 11), and MS-DOS was located on the first. In addition to booting MS-DOS, there are two options for booting Linux and one more - any operating system from a floppy disk. Each download option is marked with the line label=option. At start LILO prints the simplest 3 If a graphical interface is installed, the window can be as decorated as desired. a window that lists all the labels (in this case, “linux-up”, “failsafe”, “dos” and “floppy”). The user uses the arrows to select the option he needs and presses Enter. If necessary, the user can manually add several parameters, they will be transmitted to the system kernel. If the user does not touch anything, then after the timeout expires, the label specified in the default field is selected.
A few more clarifications. The linux-up and failsafe labels in the example use the same kernel (vmlinuz-up), but in the second case the mode is reconfigured graphics card and parameters are added that disable support for hardware extensions that are optional for booting (multiprocessing, automatic power management, etc.). The user could enter the line after append= himself; these are the kernel parameters. The initrd= field indicates in which file the starting point is located virtual disk (section dedicated to him " Start virtual disk and modules" of this lecture), and the somewhat alarming inscription " unsafe" (for the floppy label) just means that the floppy is a removable device, so is meaningless at startup lilo check its correctness boot sector and make a map.
Finally, entries like other=device indicate that LILO unknown type operating system, located on this device, which means it is impossible to load the kernel. But it is expected that in the first sector of the device it will be detected Another one defines only one boot option:, LILO will load it and transfer control along the chain. This is how MS-DOS loads on this machine: defines only one boot option: is taken (by the dos label) from the beginning of the first partition of the first disk.
GRUB
Boot subsystem GRUB is more complex. She also has defines only one boot option:, which is written to the first sector of the disk or partition, and secondary loader, located in file system. However location map V GRUB usually used only for the so-called "one and a half" bootloader ("stage 1.5") - essentially, a driver for one specific file system. The loading procedure looks like this. Primary loader loads one-and-a-half according to what is written in it accommodation map. This map can be very simple, since usually a one-and-a-half loader is placed directly after the primary one in several sectors 4 Those. on the zero track of the zero cylinder, starting from sector 2. This area of the disk is often not used for file systems(see lecture 11). in a row, or in another specially designated place outside file system. One and a half loader can recognize one file system and find a secondary one there already name(usually /boot/ grub/stage2). Finally, secondary loader, using the capabilities of one and a half, reads from the file /boot/ grub/menu.lst menu in which the user can select boot options in the same way as in LILO. Thus, updating and reconfiguring the installed GRUB does not require recalculating placement maps and changing anything other than files in the /boot/ directory grub.
At the request of Methodius Gurevich installed it on a two-system machine GRUB. In this case, the file /boot/ grub/menu.lst it turned out like this:
# cat /boot/grub/menu.lst default 0 timeout 50 title linux-up kernel (hd0,4)/boot/vmlinuz-up root=/dev/hda5 initrd (hd0,4)/boot/initrd-up.img title failsafe kernel (hd0,4)/boot/vmlinuz-up root=/dev/hda5 failsafe noapic nolapic acpi=off initrd (hd0,4)/boot/initrd-up.img title floppy root (fd0) chainloader +1 title dos root (hd0,0) chainloader +1 Example 10.3.
Setting up GRUB on a dual system machine lilo.conf Difference between only in syntax, and also in the fact that hard disks GRUB and sections on them" linux-up ").!}
names it in its own way, in the form (hddisk_number, partition_number), and starts numbering from zero. Labels (" title ") are also numbered from zero, so the entry default 0 means that after the timeout expires, the very first configuration (by name GRUB Studying the manual LILO, Methodius discovered a much more important difference from GRUB. It turns out that in not only the parameters, but also the files themselves (kernel, startup virtual disk etc.) are recognized and loading in progress. Instead of menu items, you can select command line mode GRUB, which looks suspiciously like bash , in which you can force file system load some other kernel, not prescribed by the configuration, look at the contents of the directories , recognized by the one-and-a-half bootloader, and even the contents of these files, regardless of any access rights: the system has not yet been loaded. Moreover, you can reconfigure the bootloader in your own way and write down settings results. Without having time to enjoy the unexpected freedom, Methodius one fine day discovered that the exit to command line
Linux Kernel Actions During Boot Process
So, it takes place in three stages.
- The bootloader from the ROM determines which devices can boot from and possibly prompts the user to select one of them. It downloads from the selected device defines only one boot option: and transfers control to him.
- Primary loader determines (and most often knows) where it is secondary loader- big and pretty intelligent program. It’s easier for him to do this than for a program from ROM: firstly, because for each device defines only one boot option: your own, and secondly, because it can be easily changed when changing the settings of the boot system. In the scheme proposed LILO And GRUB, defines only one boot option: does not enter into conversations with the user, but immediately loads the secondary one and transfers control to it.
- Secondary loader smart enough to know where the system kernel is located (possibly more than one), offer the user several boot options to choose from, and even, in the event GRUB, allows you to set your own boot options. Its task is to load the kernel and everything necessary to start the system into memory (sometimes modules, sometimes not only the parameters, but also the files themselves (kernel,), configure all this and transfer control to the kernel.
The kernel is both the brain and the heart of Linux. All actions that cannot be entrusted to a separate subtask (process) of the system are performed by the kernel. Access to RAM, network, disk and other external devices is managed by the kernel. The kernel starts and registers processes and manages the division of time between them.