Installing templates in joomla 3. How to install a new template on Joomla. Launch Quick Start from the browser
This article provides answers to frequently asked questions regarding working with ready-made Joomla templates. The main example will be Russian-language Joomla 3.4.3 (with the already added option “Install from JED”), the front-end template is RSEvento 1.0.28 (in Russian), the administrative part of the site template is isis 1.0.
Installing a template in Joomla is no different from installing other extensions (components, plugins, modules). In the article “Installing a cracker in Joomla 1.5 - 3.4” this process is discussed for Joomla 1.5, 2.5, 3.0, 3.2, 3.3 and 3.4. Let's look at it in more detail.
Let's return to ISPmanager 4. Log in to the control panel with your username and password.
In chapter Tools, in the left pane, select File manager and go to your Joomla temporary folder. The path to it can be clarified in the Joomla administrative control panel in in the line "tmp_path".
In ISPmanager 4 using the button Create create a folder named "shablon" (without quotes). The name may be different (picture below).

Using the button Upload specify the template file on your computer and download it (picture below). The time depends on the speed of your Internet connection, the size of the template file and server load, approximately 1-3 minutes.

After downloading the file, select it and click the button Extract, which is located in the upper right part of the ISPmanager 4 window. After this, return to Joomla and install the template as described at the beginning of this subsection.
If you know the exact path (URL) to the Joomla template file, for example, on the server of its developer, you can specify it in the field Install URL on the tab (picture below) and install. This method is similar to the method , but does not require you to download the template file to your server and unpack it (everything will happen automatically).

The first tab (picture below) allows you to install an extension on your website from the Joomla Extensions Directory (JED - “Joomla Extensions Directory”, an abbreviation for “Joomla Extensions Directory”). As of 09/05/2015 there were no templates in the catalog. It doesn't suit us very well.

But if they were, having found the desired template, you could click on its icon and go to its direct installation (picture below), as in the example with AcyMailing Starter.

If the extension is paid, such as RSForm Pro, you can proceed to purchase it (picture below).

If you copied a folder with files already installed templateJoomla, perhaps from your other site, into the “templates” folder, then you can try installing it by going to Extensions – Extension Manager – Search by pressing the button Find(picture below).

Wait about 2 minutes. Once the desired template appears, mark it in the table and click the button Install(picture below).

Please note that if the template requires installation of add-ons (framework, plugins, modules, etc.), they must be installed separately. Perhaps the same thing can be achieved using “Search”.
Please note that not all extensions and templates can be installed correctly in this way.
What to do if the template is not installed
During installation of a Joomla template, various errors may appear. In principle, this applies to any extension. Below are some errors, their possible causes and solutions. The list is far from exhaustive. Please note that solutions to one problem may work for others.
Please provide the package directory. May occur when installing a template using “Install from directory” and “Install from URL”.
- The specified address\path to the file\directory (folder\directory) of the template is specified - check the correct spelling and existence of all folders.
The installation package cannot be found. May occur when installing a template using any of the methods.
Possible causes of the error and their elimination:
- The specified address\path to the file\directory (folder\directory) of the template is incorrect - check the correct spelling and existence of all folders and files.
- The template file is damaged, or the archive is missing the required file - use the “working” template file from the developer’s website. If necessary, download it again and try installation again. Contact the template developer.
- The template version is not intended for your version of Joomla - download its version for your version of Joomla from the template developer’s website. Contact the template developer.
- Archive extension is not supported by Joomla - make sure that the template archive has one of the following extensions “.zip”, “.tar.bz2”, “.tar.gz”. If not, then unzip the template on your computer and pack it, for example, into a ZIP archive. Simply renaming the template extension may not help.
Error uploading file to server
Possible causes of the error and their elimination:
- The Joomla and/or server temporary directory is not writable - change the access rights to the Joomla and/or server temporary directory to “755” or “775”. For more information about this problem, you can ask the technical support of your hosting or their help system.
- The Joomla and/or server temporary directory is missing - check the presence and correct spelling of the path to the Joomla and/or server temporary directory. The path to the Joomla temporary files directory can be found in the Joomla administration panel System – System Information – Joomla Configuration File in the line "tmp_path". And the path to the temporary server folder can be clarified in the technical support of your hosting or in their help system.
- The folder with templates is not writable - change the access rights to the templates folder to “755” or “775”. You can read about this in this article.
- The uploaded file is too large - use the tips listed below in the article for the “413 Request Entity Too Large” error.
Error connecting to the server: 404. Error connecting to the server: Could not resolve host . Error connecting to Joomla! server. Try later. May occur when installing a template using “Install from URL”, “Install from JED”.
Possible causes of the error and their elimination:
- Incorrect address - check the URL.
- The server is not available - try again and/or later.
- You do not have access rights to the server - contact the server administrator.
- The file has been deleted - contact the server administrator.
Fatal error: Allowed memory size of XXX bytes exhausted (tried to allocate XXX bytes) . Can occur when installing a template using any method.
Possible causes of the error and their elimination:
- The template file size is too large - use the tips listed below in the article for the “413 Request Entity Too Large” error.
- The server is overloaded - try again later.
- You have reached a limit on the use of memory (RAM) by scripts (Joomla) on your server/hosting account - the easiest way is to first contact the technical support service of your hosting provider or their documentation. But you can try to solve the problem yourself. Option No. 1: in the root of the site, in the “.htaccess” file (not to be confused with “htaccess.txt”), add the line “php_value memory_limit 64M” (without quotes), increasing the number “64” - you increase the memory limit. Option No. 2: create a “php.ini” file in the root of the site (if it does not exist) and add the line “memory_limit = 64M” to it, increasing the number “64” - you increase the memory limit. Please note that the first and second methods may not work depending on your hosting. I recommend that you first contact the technical support service of your hosting provider or their documentation.
413 Request Entity Too Large. Can occur when installing a template using any method. But when using the “Install from directory” method, the likelihood of an error occurring is less.
Possible causes of the error and their elimination:
- The template file size is too large - use the “Install from directory” option. Or try again later (there may be connection problems). Also, some templates are packaged in an archive with documentation, demo data, “QuickStart” (quick start), and so on. It's worth unpacking the archive; it may contain several archives. In this case, install each of the archives in turn. The QuickStart archive is a separate topic, and we will talk about it in.
- The server limits have been exceeded: max_input_time, upload_max_filesize, post_max_size - I recommend that you first contact the technical support service of your hosting provider or their documentation. You can try it yourself in the root of the site, create a “php.ini” file (if it doesn’t exist) and add the following lines to it:
max_ execution_ time– the maximum time that the script can be executed. In most cases, the default is 30-60 seconds.
max_ input_ time– the maximum time during which data can be received on the server\hosting. In most cases, the default is 30-60 seconds.
upload_ max_ filesize– the maximum file size (in megabytes) that is allowed for uploading to your server\hosting.
post_ max_ size– sets the maximum allowed size of data sent to the server\hosting (using the POST method). This value affects file downloads. To download large files it must be greater than the value of the directive upload_max_filesize.
Please note that memory_limit must be more than post_max_size. You can read more about these directives in the article “Description of built-in php.ini directives”.
After installing the Joomla template, go to and click the name of the desired template. In my example it is “RSEvento”.

Please note that template settings may differ significantly from one another. But the "Default" and "Link to Menu" options should be available in all templates.
On the page that opens, in the “Default” drop-down list, select for which languages you want to display this template. If the site is multilingual, then you may want to display one template for one language, and another for another. If you have a monolingual site, or you want to display the template for all languages, then select “All”.

Go to the tab Link to menu and indicate for which menu items you want to apply this template (picture below). Please note that these menu items must already be created in the menu manager.


Customizing\modifying a Joomla template
Most ready-made professional Joomla templates are equipped with settings. These settings are in Extensions – Template Manager and by clicking on the name of the desired template, in my example it is “RSEvento”, you can go to its settings.
To do this, you can refer to the documentation on the template developer's website or to the documentation that comes with the template. In “RSEvento” the position map is in the settings of the template itself (picture below).

There is a “universal” way.
- Go to Extensions – Template Manager and click on the button Settings in the upper right corner.
- On the tab Templates enable the option View module positions.
- Go to the site (to its front part).
- In the address bar, append "?tp=1" (without quotes) to the URL and press the key Enter on keyboard. The names of the template positions will appear in front of you in the places where they are located (picture below).

When you no longer need this option, I recommend disabling it (in order to make it difficult to determine that your site is made on Joomla - to protect it).
How to delete a template
To do this, go to Extensions – Extension Manager – Management. For convenience, in the “- Select type -” drop-down list on the left side of the window, select Sample. Select the desired Joomla template that you want to delete and click the button Uninstall(at the top of the window) (picture below).

If you see the message: “Deleting a template: You cannot delete the default template.” There was an error deleting the template.", then assign any other template installed on your site as the default template. How to do this is described above in the “What to do after installing the template” section. Please note that the administrative part of the site template (control panel template) and the website template are different “types” of templates. If you want to delete a site template that is currently set as the default, you must first set another site template (not the Control Panel) as the default template.
Also, if the folder\files with templates are closed for writing, then there may be a problem with deletion. Change the access rights to “755” or “775” (this can be done on your hosting\server). You can read about this in this article.
In the next article “Answers to questions about templates for Joomla. Making changes » we will touch on the issues of making changes to the template, installing “quick start” and others.
Now let's move on to the question of how to install a template on Joomla 3, although other versions are not very different in the interface. For those who don’t know, ready-made themes for a website are called templates.
I’ve read quite a few manuals where the process of installing templates is described in a very complicated way and forces you to take a lot of extra steps; I’ll try to briefly and straightforwardly explain the simplest method.
Installing a template on Joomla 3
Step #1
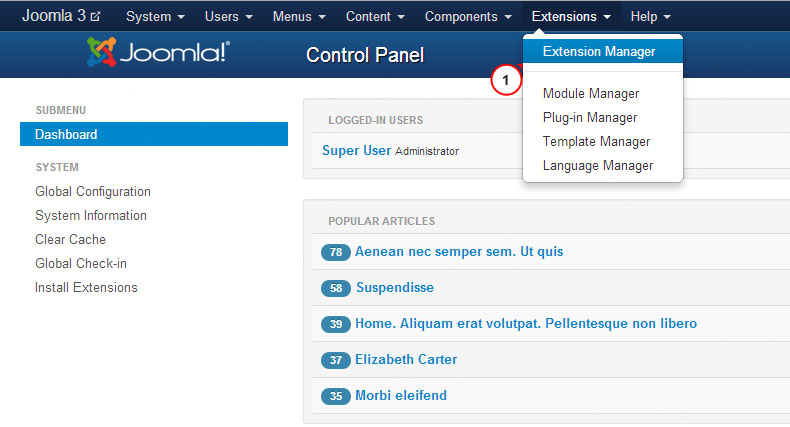
The first step is to go to the site admin panel, where in the top menu you need to select “ Extensions» — « Extension Manager«. 
Step #2
Click on the button " Choose File“, where we find the template we prepared in advance in a zip archive. If you don't have templates, I recommend reading about . 
Step #3
Press the bottom button " Download and install"After which you will have to wait from 1 to 5 minutes until the installation occurs. The topic will automatically become the main one, but if not, then here's another step. 
Step #4
Go to " Extensions» — « Template Manager“We find the template you need in the list that you need to apply and make it the default. 
Attention: the templates that you are trying to install are not always installed and can often show various errors. If after these steps the template does not change, I recommend looking for another one!
Where to download templates for Joomla 3
Every second person faces the problem that the template they downloaded is not installed. Once I found a great template that was not installed. I had to install additional. extensions to make everything work.
However, to make it easier for you and not have to search long and hard for where to download templates for Joomla 3, I have compiled for you a small list of sites where you can find excellent working templates.
1. - a great site with a very large selection of templates, where you can download both paid premium templates and free ones for Joomla 2.4 and 3 versions. True, the templates are all in English.
They have all the necessary functionality for a site, but it would be strange if all Joomla sites had the same appearance. And the site template determines not only the appearance of the site, but also its structure.
Installing and removing a template on Joomla3.X is practically no different from installing and uninstalling other types of Joomla extensions. However, there are some features when working with Joomla templates, which you will learn about in this article.
A Joomla template is an extension that defines the appearance of your site or its administrative panel.
There are two types of templates: Front-end Templates (website template) and Back-end Templates (admin panel template). By default, the Joomla distribution is equipped with 2 administrative panel templates, called Isis, Hathor, and 2 templates for the guest part of the site (Beez3 and protostar). After installing Joomla3.X, the default templates are visible in the Template Manager. There is no particular point in changing the template of the administrative panel, but the template of the site itself, which your visitors see, is usually changed.
Templates for Jomla3.X are not in short supply. Any search engine will give you a large number of companies distributing or selling Joomla templates. We will assume that you have found the template you need and are ready to install it on Joomla3. You need to start by checking the downloaded archive with the template.
Checking the downloaded template
First of all, unpack the downloaded template and find the template itself in the archive. Template manufacturers, in addition to the Joomla3 template itself, package templates for Joomla 2.5, their plugins, Quik Start Joomla and other extensions of their, and not only, production.
Next, unpack the archive of the template itself. Check the archive with the template for an installation file in XML format. Typically, its name is templateDetals. Depending on whether the template archive contains an XML installation file or not, you must choose from the two template installation types below.
Installing a template with an XML installation file
If the template has an XML installation file, then you need to install the template as follows.
In the administrative panel of the site, open the top menu tab Extensions → Extension Manager → Installation or on the main page of the Control Panel, menu EXTENSIONS.

Logging into the Joomla 3.2 Template Manager is slightly different.

Of the three methods for installing extensions, choose the first: Download package file;

Using the “Select file” button, select the ZIP archive of the template on your computer;

Click the blue “Download and Install” button;

A successful installation will be informed by Joomla with a green information line, an unsuccessful installation, as well as warnings will be informed by a line highlighted in pink.

Note. Many templates for Joomla3 are installed and work only together with their framework (Fraemwork).

The framework is an extension of the system plugin type and is activated in the tab: Extensions → Plugin Manager. If the framework is not included in the palgin package, it must be installed separately, as a plugin-type extension, and only then activated in the Plugin Manager (read in detail).
class="eliadunit">
Managing Joomla3 Templates
Joomla3 templates are managed in the Extensions → Template Manager tab. Here you will see a list of all templates. In the template scope column, you can see where the template is applied. This is the “Control Panel” or “Site”.

From the entire list of templates, one template must be designated as the default template. This template determines the appearance of your site.
How to make a template the main one (default)
To designate a template as the default template, you need to do two operations:
- Click on the star in the line with the template name or select the checkbox of the template and click the “Default” button at the top.
- Open the template for settings (click on its name) and in the “Assignments” settings item, link the entire site menu to the template.


The template designated as the master should be marked with a yellow star and a green checkmark.
The default template cannot be deleted.
Deleting a template
I never leave several templates on the site. One default template for the site and one for the administrative panel is enough. Unnecessary templates can be deleted.
To delete Joomla3 templates, you need to enter the tab Extensions → Extension Manager → Management.
- In the filter field at the top, select “Type” Template. Now in the extensions table you can see all the templates installed on the site;
- You can not delete the template, but simply disable the template (the “Disable” button).
- To remove a template, use the “Uninstall” button.


Second option for deleting a template
You can also delete a non-main Joomla3 template from the site directory via FTP. To do this, open the templates folder and delete the folder with the name of your template. After this, log back into the site’s administrative panel in the Extensions tab → Extension Manager →Management and update the cache (the “Refresh cache” button). If this is not enough, remove traces of the deleted template using the “Uninstall” button.
Attention: You will not be able to delete a template designated as the default template. Joomla blocks all objects assigned by default from deletion.
Installing a template without an XML installation file
Let's go back to installing the template. There are times when the template you like does not contain an XML installation file. To install such a template, you need to use the second option for installing the Joomla3 extension called "Install from directory".
In short, unpack the template archive on your computer, upload all files and folders of the template via FTP to the tmp folder of the site directory, in the administrative panel in the extension manager, click the blue “Install” button in the “Install from directory” tab.

If the path to the tmp folder (path_tmp) is correctly specified in the configuration.php file on your website, then the installation should be successful. Read more about this option for installing a template without an XML installation file HERE.
You can install a template from a third-party repository using the template package URL. However, this installation method does not always work.

This completes the topic Installing and removing a template on Joomla3.X.
This installation method can be used if you already have an existing Joomla and want to simply change the appearance of the site using a template.
1. Open the Joomla control panel and go to the menu "Extensions > Extensions Manager".
2. Using the button Package File "Browse" find the file "theme###.zip" in folder "joomla" template. Click the button to install the Joomla template.

3. Install all modules from the folder 'sources_XXX.zip'(this folder must first be unzipped according to the instructions in the file 'info.txt').
4. The next stage is installing demo data.
To install demo data, you must complete the following steps:
Step 1. Upload demo images.
Connect to the server using an FTP client. To download demo images, open the folder "sources" in the template.
The folder is here "to_the_root_directory", containing the files that need to be placed in the Joomla root folder.
Step 2. Import SQL file.
The last and most important step of installing demo data is importing the SQL file using a database management tool (phpMyAdmin).
SQL File - "dump. sql» is in the folder "sources" template.
Do NOT import the SQL file if you have a live website because... it will completely overwrite existing data!
Attention: Before importing the SQL file, make sure that the prefix of the database tables matches the prefix in the SQL file.
The table prefix can be checked directly in the database through a database management tool. Pay attention to the names of the tables. The prefix is a set of characters before the table name. ( for example, in the table "jos_assets" the prefix is "jos_"). You can also find the database prefix in the “configuration.php” file in the Joomla root folder. Line 19: public $dbprefix = "jos_"; ( where "jos_" is the prefix)
If the table prefixes do not match, open the file "dump. sql" in a text editor and, using Find and Replace (hotkeys CTRL+F or CTRL+H), replace the prefix "jos_" ( in the SQL file) database prefix. You can also use a detailed video tutorial on how to change the prefix in an SQL file.
or how to import SQL file using phpMyAdmin tool
Refresh your browser window. Please send us a request if you have any questions.
In this short article we will tell you how to install a template on a Joomla website.
There are two types of installation package, quick start and installer, we will consider both methods.
Quick start, installing the template manually on Joomla 3 using quickstart
Allows you to deploy a website similar to the demo one in a matter of minutes. A very convenient solution, we recommend that beginners use it. Usually there is a quick start in the archive, and the file name flashes " quickstart".
If you have a fast Internet, you can unzip the quick start and upload the contents to a folder on the www server; if it is slow, then this process can take a very long time. But, there is a small solution.
Almost all hosting providers have an archive unpacking function; it allows you to unpack a quick start archive on the server. Upload the archive to the www folder and unzip it through the hosting panel. By doing this, you will save significant time.
Once downloaded, open the site in your browser. If the cms Joomla installation page appears, then everything has been done correctly.

Enter the data and continue installation by clicking "Next". At this stage, you need to create a database in the hosting panel. You will need the database server name, database and user name, and password. Enter your details and continue with the installation.

At the next stage, you will be asked to check the entered data and delete the installation directory, confirm. Installation completed.
Installer
This option is suitable if you already have Joomla installed. IN administrative part of joomlaGo to the "Extension Manager" section, use the "Select file" button and select the installation package, click "Download and install". In the template manager, check the box for the installed template and use the "Default" button.At this point the installation is complete.If you encounter an error when installing the template, write below and we will be happy to help you.