What is a login in Yandex disk. Yandex.Disk - registration, configuration and use. So, what is the Yandex Disk cloud?
Hello! Surely many of you have already heard the news that Yandex has launched a new service - a cloud service designed for storing photos, videos and other files. Today I will do a short review.
It is worth noting that the use of Drive is available from all devices with an Internet connection and will be a real competitor to the now popular Dropbox. I have already made a choice in favor of a new storage service for several reasons:
- 10 gigabytes of free disk space - free;
- free unlimited cloud for photos and videos in original quality when auto-upload from your phone is enabled;
- viewing and editing Microsoft Office files online;
- sharing files and folders;
- screenshot editor.

Personally, I like the current trends of market globalization. Having one single account, you can perform a whole range of work, and at the same time, the functionality expands each time, winning more and more new users.
Registration on Yandex Disk and downloading the application
Registration is not required if you already have an account on Yandex. Just go to disk.yandex.ru. Otherwise, complete a simple registration to gain access to numerous services.

After registration is completed, you can start working. The Disk web interface is in no way inferior to applications; it has all the necessary tools:
For the convenience of users, Yandex Disk has convenient applications for all modern platforms: Microsoft Windows, Apple macOS, Linux, mobile devices and even TVs with Smart TV function.
Go to the download page and select your desired platform. For mobile phones and tablets, the application is available in the Google Play and App Store.
Working with the Yandex Disk application for Windows
Now let's figure out how to use the application for working with Yandex Disk using the Windows operating system as an example. After downloading, run the installation file and perform the necessary operations. At the last stage of the installer, I recommend unchecking additional checkboxes to refuse installation of additional software and clicking Finish to complete:

When you first start the program, you must enter your username and password for your Yandex account, if you wish, remember the authorization and log in:

Next, we customize the program to your taste. I recommend checking the box next to launching the program at system startup, and also independently designating the destination folder for the location of the files. Carefully study all possible settings located on several tabs.

Access to the system folder for storing files can be obtained in the main Explorer window, and of course, by direct access to the folder that was assigned in the application settings:

An icon will appear in the tray; right-clicking on it will open a pop-up menu with basic functions and settings:

The Yandex Disk application for computer allows you to:
- free up space on your computer by transferring files to the cloud,
- write notes (text can be dictated or typed),
- take screenshots by pressing PrintScreen, draw arrows and other shapes, add comments.

Increasing the volume of Yandex Disk
The most obvious way to increase the amount of free space is to buy a Disk Pro subscription. There are several tariff plans with an increase of 100 gigabytes or 1 terabyte. Discounts apply when paying annually.

Subscription benefits:
- extended history of file changes,
- no advertising on Drive,
- priority support,
- unlimited downloading from public links.
Subscribers to the Yandex Plus service receive an additional 10 GB of free disk space.
Registration gives you 10 GB for storing files, but there are a few simple steps to get free space on Yandex Drive forever:
- enabling mobile startup +32 GB,
- mailbox birthday +1 GB every year.
I really liked the new Yandex cloud service for storing files, I will actively use Disk! By the way, do not forget that when auto-upload from your phone is enabled, photos and videos do not take up available space, and the storage of these files is not limited.
Yandex.Disk is a cloud service designed for storing user files. It is developed and supported by the Yandex search engine. If necessary, the user can open public access to their files, which is especially convenient if you need to send large documents and/or provide access to them to a significant number of people. It is possible to structure files (creating folders and collections, placement hierarchy) in the same way as on a regular computer. The maximum size of uploaded files is 10 GB, storage time is unlimited. All files are scanned by an antivirus, and their transfer is carried out over an encrypted connection.
Unlike file sharing services, Yandex.Disk provides cloud storage, i.e. files are located on different servers, and not on one. This ensures high reliability: there is no fear that data will be lost due to physical damage or hacking of the servers. Direct analogues of Yandex.Disk are Google Drive, Cloud Mail.Ru, Dropbox.
How to upload files to Yandex.Disk
Via the service web interface. To do this, go to Yandex.Disk using the link disk.yandex.ru and register there or create an email account on Yandex. If you are already a registered user, simply log in. After this, you will have access to cloud storage and you will be able to upload your files to Yandex.Disk. Using the web interface is convenient because you can log into your account from any PC without installing any programs.
Using the program. If you wish, you can install Yandex.Disk on your computer. To do this, download the installer from the link disk.yandex.ru/download/ and install the appropriate program. Pay attention to additional settings, for example, the offer to make “Yandex” the home page. If you do not need additional options, uncheck the corresponding boxes. As a result of installation, a system folder is created on the computer’s hard drive, fully synchronized with your account in the Yandex.Disk service. All actions performed with files in this folder will be duplicated on cloud storage servers. In other words, if you copy a file to this folder, it will appear on the server. Using the Yandex.Disk program on a PC is especially convenient if you need to work with a large number of files and/or with data that changes frequently. New versions of this program (from the second and higher) also eliminate the need to store copies of files on your hard drive.
Via a smartphone application. Users of mobile devices on Android, iOS and Windows Phone can download an application that will allow you to store photos and videos, as well as other documents and open them from anywhere in the world where there is Internet access.

Features of the Yandex.Disk service
Yandex.Disk is not only a convenient free file storage, but also provides ample opportunities for editing them. It is easier to upload data to cloud storage, exchange it with other users, etc. The service provides the following features:
- auto-uploading videos and photos from phones and smartphones. This allows you to save memory on mobile devices. All content is downloaded in original quality, thanks to the large amount of allocated space, an impressive number of photos and videos can be placed on the “Disk”;
- Convenient file sharing up to 50 GB. The service allows you to create short links to such files, which ensures quick exchange of data with other users. Files via links can be viewed directly in the browser, saved to your “Disk” or downloaded to your PC;
- several versions of the Yandex.Disk program for computers. Versions 3.0 are available for Windows and macOS operating systems. The programs allow you to work with files on Yandex.Disk as conveniently and quickly as if they were stored on your PC’s hard drive;
- free access to the online version of Microsoft Office. This allows users to work with Excel, Word, PowerPoint directly in the browser, without installing programs, which is especially convenient when you need to quickly edit files and/or work from mobile devices.
The service also provides a screenshot editor and a number of other useful options. The functionality of Yandex.Disk is constantly being developed and updated with new features.
Features of Yandex.Disk 3.0
Selective synchronization. The user can choose which files he will store exclusively on Disk, and which ones it would be advisable to duplicate on a PC.
Cloud sorting. To manage files, they do not need to be downloaded to your hard drive. Right in the cloud storage, you can sort data, collect it into albums, share links with friends, etc.
Work with files without Internet access. If the user makes changes to files when there is no access to the Network, Disk remembers such actions and, when the Internet appears, automatically updates the versions of the files stored on the cloud server.
Notes (available for Windows version). This is a beta version that appeared only in the Yandex.Disk 3.0 program, but it already contains everything you need to work with notes. Users can leave not only printed but also spoken notes on files. Based on SpeechKit technology from Yandex, the program automatically translates dictated information into text.
Clear identification. The developers have updated the file icons, making them clearer and brighter. Thanks to this, users are given the opportunity to clearly identify where the file is stored - only on disk or on the cloud, and whether its download is completed. This innovation reduces the likelihood that a user, for example, will delete a file from the hard drive, mistakenly believing that there is a copy on Disk.
Simplified interface. In the computer program and the web version of Yandex.Disk, the interfaces became similar and were simplified. For example, users have access to a context menu, all the usual tools and methods for managing files.
The program version 3.0 is completely free. To get it, you need to log into Yandex.Disk and download it by clicking on the appropriate link. This page also provides instructions for upgrading the old version and the ability to download previous versions.
Editor's Choice
How to log into your page in Yandex.Disk? Instructions for all devices
Today, any user can access a cloud account, regardless of the characteristics of their account or location.
Despite open access to the storage from, users often have difficulty logging into the disk and getting started.
Registration and login via browser
Any browser can be used.
To log into the cloud you need an existing email account. If you don't have an account, please register one first. Follow the instructions:
- Open your browser;
- Enter the address yandex.ru in the address bar and go to the search engine page;
- At the top right of the page, find the login panel. Since you don’t have mail yet, this window will not work for us. Click on the “Get mail” tab, as shown in the figure:

Rice. 2 – main window of the Yandex search engine
- Next, you will be automatically redirected to a new page in which a form will appear for entering personal data for a new account. Fill out the First Name and Last Name fields with real data, because as a result of registration, other services that require real user identification will also be linked to your page. If you enter fictitious data, difficulties may arise in the future using some services;
- Create a strong password that consists of at least 8 characters, including lowercase and uppercase letters, numbers and special characters. This will significantly increase the security of your account and protect it from hacking. Duplicate the password in the confirmation column to make sure it is entered correctly;
- Enter . You will receive a registration confirmation code. Instead of a phone number, you can set a security question, however, this method of verifying the user does not provide the proper level of protection. We recommend that you link your phone number to your account;
- Enter the captcha and confirm registration.

Rice. 3 - registration of a new user
Now go to the yandex.ru page again and log into the email window using the data you came up with at the registration stage.

Rice. 4 – login to your account via browser
Go to the email client window and in the top tabs find the link to go to cloud storage.

Rice. 5 – login to the cloud via email
If you have already registered in the Yandex system, you can access the disk using the link https://disk.yandex.ru/ - just enter the login and password for your mail account.
After successful login, the browser will redirect you to the cloud home page. It looks like this:

Rice. 6 – main directory of Yandex cloud storage
Note! If you are using a Yandex browser, after logging in, a cloud storage icon will appear on the toolbar. By clicking on it, you will be automatically redirected to your file storage directory.
Recovering login data via browser
If you have a created Yandex account, but do not remember your login or password, use the access recovery form.
Then type the code that came via SMS to your phone into the text field. Access will be restored and you will be able to set a new password.

Rice. 7 – access recovery page
If the user does not remember the login, you need to indicate this in the recovery tab. Next, the system will scan your browser for the latest successful authorizations in Yandex.
You will be offered several options for the logins you used to log in. Select the one you need and restore access to your profile.

Rice. 8 – automatic login recovery
Authorization via Windows application

After installing the file, run the program. A disk login form will appear. Enter login and password. Check the “Remember” box and log in.

A folder will appear in which all your files will be displayed. Now you can easily move files and folders from your computer directly to the service.
File synchronization requires .

Rice. 11 – display storage on PC
Login to the program for Mac OS
Go to the disk through a browser and select the field in the main window "Applications for all platforms":

Rice. 12 – main window of the cloud
In the tab that opens, select the desired operating system and download the installation file to your computer. Install the client and open it.
A login form will appear. Enter your account details and confirm the action.

Rice. 13 – logging into the client for Mac OS
View a short slide show on using the program and click on setting the location of the storage folder.
Now click on “Edit” and select the directory from Finder in which the cloud storage data will be displayed.

Rice. 14 – getting started with the client for Mac OS
As a result of the setup, a storage icon will appear on the desktop; by clicking on it, you will see a pop-up window with the latest files added to the disk.

Rice. 15 – viewing the Yandex cloud folder on Mac OS
The synchronization status is displayed at the bottom of the disk folder.
If a system error message occurs, check your Internet connection and log out of your account, and then log in again.
Running a cloud on Android
And also, you can upload any other file formats to disk or download documents and folders from the cloud to your gadget.
Go to the installed application and log in. After a few seconds, a window with cloud folders will appear:

Rice. 16 – main window of the Android application
Instructions for iOS
As a rule, IOS users use Yandex disk as additional cloud storage, because all Apple gadgets.
Thanks to the increasing popularity of the Yandex cloud, developers have created a client application for owners and . You can download the program through the official App Store.
In addition, you can additionally purchase utilities for encrypting data in the cloud. Before sending a file from a PC to the service, it is encrypted with one of the cryptographic algorithms.
Advantages of the cloud from Yandex:
- Structured interface. A beginner will be able to quickly understand the basics of how the cloud service works, and an advanced user will configure it based on their preferences;
- The function of creating folders and files on the disk itself is available;
- Multiplatform - access from any device that is connected to the global network. All existing client applications are very well adapted to their OS. Do not cause crashes or errors even when downloading large files;
- Russian-language interface. All design is fully adapted for Russian-speaking users. If necessary, you can easily change the language in the settings;
- Free distribution. You don't have to pay to install the drive app on your computer, smartphone or tablet. All programs are available in official stores for free;
- The service provides 10 free GB to each user. In the future, to increase your space, you can use bonus programs or top up your account. On your account birthday you will receive an additional 2 GB of memory absolutely free.
To log into your Yandex cloud storage account, just select the device and application that you will use in the future.
Then log in through your mailbox or login form in the program and enjoy using the best cloud on the RuNet.
Thematic videos:
Installation of YandexDisk and link to download instructions
Hello, dear viewer! In the last lesson, we created an archive of our instructions. Since we will have to transfer the archive of this instruction to our partners, in order to automate this transfer process, it is best for us to upload the archive with the course to the Internet, receive a download link and provide this link to our partners. This way, they will be able to download and use the instructions provided on their own.
How to quickly log into your mail on Yandex
A small tweak in the Opera browser and we can log into our mail much faster. Video tutorial for beginner Internet users
Good day everyone! Today we are talking about a very convenient service that I have been using in my work for a long time - Yandex Disk. What kind of “beast” is this? - you might ask. I will talk about this in detail in the article below. If you have any questions, ask them in the comments, we will figure it out and look for answers! In the meantime, let's get acquainted with one of the most convenient file storages from the developers of the popular Russian search engine Yandex.
1. Yandex Disk: what is it
Yandex.Disk is a popular cloud storage that allows users to store various information (photos, videos, audio, texts and other files) in the so-called “cloud”, i.e. on a server on the network. Data stored on Yandex.Disk can be shared with other users, as well as accessed from various devices - other computers, tablets and smartphones. The basic version of Yandex.Disk is completely free and available to everyone. I remember that in 2012, registration was by invitation only, and I used an alternative service - Dropbox. But now I have completely switched to Yandex Disk Cloud. After all, free, and even accessible from everywhere, 10 GB is never superfluous.
2. Yandex Disk: how to use - step-by-step instructions
So, I convinced you, and you decided to install Yandex Disk on your computer. Now let’s take a closer look at how to use Yandex Cloud (also called Yandex.Disk, since it is a cloud data storage).
2.1. How to create Yandex Disk (registration in Yandex Cloud)
In order to start using Yandex.Disk, you need register and create a mailbox from Yandex(if you already have one, go straight to the second point).
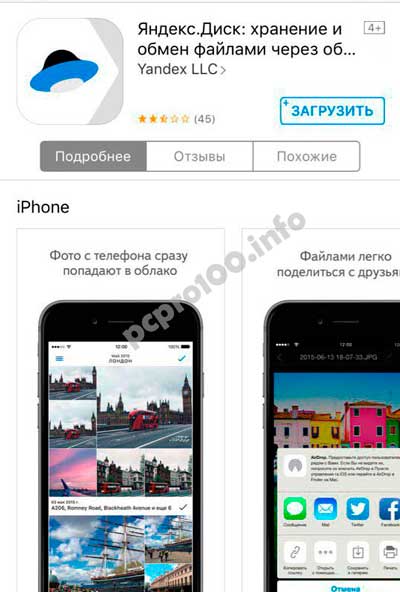
4. Installing Yandex.Disk on a smartphone. Free apps are available for iOS and Android, so you can easily download them from the App Store and Google Play. The application for iOS does not have a very high rating, there are some shortcomings, all of which can be seen in the reviews.
2.3. Yandex Disk: how much free space?
Immediately after registering and installing Yandex.Disk, you can access 10 free GB of space in the Cloud. This is quite enough for a start; it lasted me about six months. What to do if there is not enough space?
- Additional free 10 GB for inviting friends. You can get 512 MB of free cloud space for each friend you invite. Go here - https://disk.yandex.ru/invites and you will see your referral link, which you need to copy and send to your friends. After each user registers using your link, you will receive additional disk space, and the invited friend will receive an additional 1 GB.

- Additional up to 250 GB as a gift from Yandex partners. Various promotions are regularly held that will allow you to get additional gigabytes of free space. You can track current promotions on this page.
And of course, as you can expect from Yandex, additional space can be purchased. However, the pleasure does not come cheap:

If you need a lot of space in the Cloud, but don’t want to pay, you can create several mailboxes and create Yandex.Disk for each of them.
2.3. Login to Yandex Disk
Registration has been completed, the available space has been sorted out, the question arises - ?
You can view downloaded files in several ways:
1. Open the Yandex.Disk folder shortcut on the Desktop, if you did not delete it after installation.
2. Open Yandex.Disk in the My Computer folder.
3. Click on the Yandex.Disk icon in the taskbar, located in the far right corner of the screen.

4. Log in to your Yandex mail through any browser and at the top there will be a link to the Cloud:
6. Go to the Yandex main page while logged in to your email. In the upper right corner there will be a link to Yandex.Disk:

2.4. How to upload files to Yandex Disk - 7 easy ways
Let us now consider the most important point, because of which we took all these actions -. Again, there are several ways to do this:
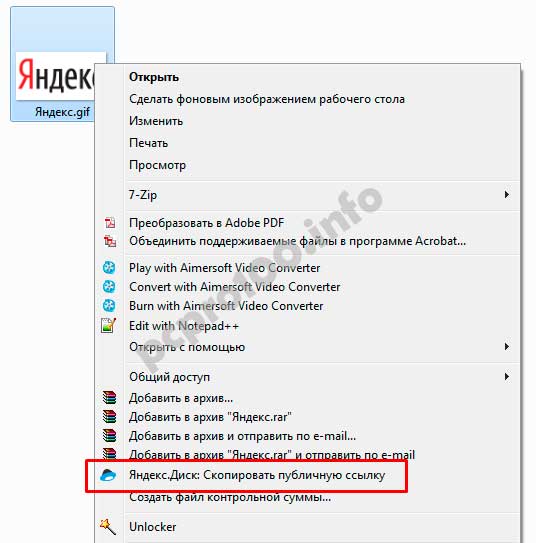
1. Via context menu. Select the file that needs to be uploaded to the Cloud, right-click on it and select the item: “Yandex.Disk: Copy public link”:
2. Copy the file to the Yandex.Disk folder(I wrote above how to enter it). By default, this folder is synchronized automatically, so when you copy there, all files will be immediately added to your Disk.
3. Upload files via mobile app iOS or Android. I can consider this method in a separate article, if you leave such a wish in the comments.
4. Upload a file to the Cloud via browser. To do this, simply drag and drop the selected files into a browser window with Yandex.Disk open:

5. Copying other people's files. If someone shared with you a link to a file that is stored on Yandex.Disk, you can easily save it to your Cloud. To do this, you need to follow the sent link like https://yadi.sk/*** and click on the “Save to Yandex.Disk” button on the right.

They also often ask - how to upload a folder to Yandex Disk. The principle is the same as stated above in the files section. But there is one more additional advantage - the folder can be assigned to Shared access. This way, other users to whom you grant access rights will be able to view and download files in this folder, as well as upload their own files there.

How to upload a video to Yandex Disk?– is also a very popular question from Cloud users. This is due to the fact that video files are usually large, and many people worry that they simply won’t “fit” and cannot be stored there. This is not true, video files, just like photos, can be uploaded and stored on Yandex.Disk.
2.5. Yandex Disk: how to transfer files to another user

You can also remove access to the file by clicking the mouse and switching it to the OFF position.
If for some reason you need to remove Yandex.Disk from your computer, then you should do the same as with a regular application - use standard operating system tools.
Let's move on: Start -> Control Panel -> Programs and Features
In the window that appears, select Yandex.Disk (usually it is the last one in the list) and click the “Delete” button. The downloaded files will remain in your account; only the application will be deleted from your computer.

Hello, dear readers of the blog site. Yandex Disk, which will be discussed in this article, has been around for quite some time, and I actively use it for downloading, storing, and whatever else.
The very idea of cloud storage and data synchronization (it was first embodied in a product in 2010) is very promising and is finding an increasing number of fans among Internet users.
I have not yet had time to test all the cloud products on the market, except for Dropbox, and, but I was impressed with the capabilities of Drive.
With it, you can upload all the data that is important to you to the cloud and store it there for as long as you like.
You can work on documents located in the cloud in the office, at home, and on the road, receiving via disk free access to Microsoft Office Online.
In this case, everything will be quickly synchronized, and device failure will not lead to the loss of files, duplicates of which were automatically uploaded to Yandex.
In addition, you can upload files to Yandex Disk not only for storage, but also for transferring them to your friends, and there will be no time restrictions on their storage (using the link received, the user will be able to either download files up to 50 GB in size, or view the object you downloaded directly in the cloud storage, or save it on your Disk).
You can work with this service either through a special program for a PC or laptop, or through a mobile application. We will talk about all this in detail in the continuation of this publication.
7 reasons to choose Yandex Disk
As I already mentioned, there are quite a lot of cloud services. They are all fighting for a share of the same pie (for you and me). Naturally, any innovative solution applied in one service is immediately picked up in others. The decisive factors now are convenience, reliability and affordability.
Let's look at what the brainchild of Yandex can offer us so that we would want to start using this cloud and even pay for it. Go...
When you install the Disk application on your mobile phone or tablet, you will be able to activate auto-uploading of all photos and videos taken with your gadget’s camera to the Yandex cloud.
This function itself is very convenient and exists in many competitors. But in this case, all photos and videos from a smartphone or tablet can be download unlimited.

What does it mean? Let's say you have those 10 GB that were provided to you for free immediately after registration. You install the Yandex Disk application on all your mobile gadgets (as well as, for example, on your significant other’s gadgets) and activate unlimited auto-download of media files.
All of them will fall into the “Camera” folder in your cloud, but the space they occupy will not be taken into account in your tariff. For example, the Camera folder can store terabytes of photos and videos, but you will only have a 10 GB free plan.
You can get GB of disk space for free using promotions and promotional codes
Immediately after registering with the service, you receive as much as 10 GB (free) in your undivided possession. However, in order to popularize the service, promotions are constantly held and promotional codes are distributed to receive additional gigabytes in the Yandex cloud.
You can get from tens to hundreds of GB of storage space for free and forever (no one will take it away from you). There are people who get a quarter or more of a terabyte this way for free. Here are examples of past promotions:

How can I find out about an ongoing promotion? Everything is very simple. You register in Drive and you will receive notifications by email about the next distribution of free gigs. As you understand, Yandex mail and the cloud are essentially one service. So, the older your mailbox (account) is, the more free gigs you will receive - 1 GB per year of existence.


Anyone can use this link to view this file (if it is a document, video or photo), or download it (to their computer or to their cloud on Yandex). Unlike Dropbox, there are no special restrictions on the number and frequency of downloads (within reasonable limits, of course). At the same time, you can upload very large files to the cloud - up to 50 GB.
The cost of purchasing additional space in Yandex Cloud is low
I’m used to storing a lot of things in a cloud service (now Dropbox) - from passwords to photos from children’s albums. It turns out to be a very large volume and I don’t have enough free gigabytes on any cloud Drive. Now I have a 1 Terabyte tariff in Dropbox and I pay $99 for it annually (about 7 thousand rubles).
If we consider this Yandex service, then 1 terabyte I'll only get up to 2 thousand rubles per year, which is more than three times cheaper.

I’m about to renew my subscription in Dropbox and I’m determined to finally move to Yandex - it’s very tempting in terms of price and almost the same in terms of capabilities.
How to create Yandex Disk and log into your page
It’s actually very simple, but I’ll still focus on simple things that new to cloud services usually remain not fully understood. Let's be brief:
- The disk is created in the cloud, i.e. on servers () of Yandex. This is a physical area on server hard drives that is allocated to you to store any files.
- Access to the cloud can be obtained either through the web interface (at disk.yandex.ru), or through special programs for a PC (laptop) or for a mobile device.
- Files from your disk will be accessible from anywhere in the world from any device, unless you lose the password to your Yandex account.
- You can also create a copy of the disk in the cloud on your computer (full or partial). To do this, you will need to install the special Yandex.Disk 3.0 program and mark those folders from the cloud that you want to synchronize with the folder created on your computer (laptop).
- On mobile devices, a copy of the entire Disk is not created - you can only upload the necessary files on the fly, or configure the storage of some of them in the memory of your device.
- Remember that when you delete something from the Yandex Disk folder on your computer, you simultaneously delete it from the cloud. There is always strict synchronization here. The opposite is also true - adding something to this folder through synchronization, it will also end up in the cloud.
- One “Disk” can be used from several computers and gadgets at once. This is even convenient, because it allows, for example, to exchange files with your “family” without sending them by mail. Moreover, for each computer you can configure synchronization of only certain directories (not all).
- It is very convenient, in my opinion, to buy a 1 Terabyte tariff and use the cloud with the whole family. Profitable and convenient. This is not an advertisement, because there will be no profit from the fact that you buy or don’t buy the missile defense system. So, thinking out loud.
So, create Yandex Disk- first of all it’s simple create an account in Yandex(register). If you already have it, then you already have the Disk, you just didn’t know about it or didn’t pay attention. How to check?
Create or just log in?
Installation on Windows occurs in the standard way. But free cheese only comes in a mousetrap, so by default the checkboxes are checked, suggesting that you simultaneously make this a search engine, and, of course, that the same RuNet mirror will be installed.
You are free to uncheck all these boxes, but personally I like their browser, and I’ve been using their search for ten years now. So let them live:
Next, they will tell you about this wonderful program and the wonderful idea of storing files on Yandex, which allows you to access them from anywhere in the world and synchronize the contents of the cloud and the folder on your computer, as well as share some of the files for public or personal access.
Auto-upload photos and videos to Yandex.Disk from your phone
This is one of the enticements that allows you to promote the service on the market. The thing is wonderful, In fact.
Enable auto-upload of photos and videos in the application settings
After you install the Disk application on your mobile device and launch it for the first time, you will immediately be informed about this function and asked to activate it (either only when connected via Wi-Fi, or with any type of Internet connection):
There is nothing new in this. Dropbox has been automatically synchronizing photos and videos from your phone with its storage for many years now. But the trick is that in Dropbox these files eat up the disk space allocated to you, but in Yandex they seem to don't count. Even if you throw terabytes from your phone, it will not affect the size of the space allocated to you.
Synchronization itself occurs in the background from the moment you launch the application on your mobile phone:
True, if you have set a restriction in the settings to transfer photos and video materials only when connected to the Internet exclusively via Wi-Fi, then the draining of multimedia will not begin with a regular Internet connection (Yandex takes care of your paid traffic).
P.S. When the battery charge is low, the synchronization process is slowed down. Just connect the device to the charger and everything will start uploading to the cloud again. It's the same in Dropbox.
These and others startup options available in your application settings (gear in the upper left corner on iPhone):
At all YandexDisk mobile application very similar to what I'm used to in Dropbox, and this is a huge plus for me. The same four tabs at the bottom and almost the same settings available by clicking on the gear icon:
In addition to the settings for unlimited startup, here you can also see the remaining free space in the cloud, and also set a password for the application itself (to avoid it, so to speak). I just did the latter, since I plan to keep valuable information in this repository:
Mobile photos and videos from Yandex.Disk on your computer
Now let's see where to look for these graphic and video files automatically uploaded to the cloud from your phone. Logically, in cloud storage they should be in the “Camera” folder, but there is only an invitation to install the program on a PC (why is this not clear?).
In general, you will find all the photos from your mobile phone in the “Photos” and “Latest” folders on the cloud. But that is not all. For example, it’s very convenient for me to take pictures and screenshots on my mobile phone, and then automatically open them on my computer through a cloud service. I got used to this in Dropbox and don’t want to get out of the habit.
But there are no problems here. Yandex Disk perfectly knows how to synchronize everything merged from mobile gadgets with a specially created one on your computer folder “Photos and videos from Yandex.Disk”. Another thing is that by default this option is not enabled and you will need to activate it, simultaneously selecting the storage location for all this mobile junk.
To do this, right-click on the program icon in the tray and select "Settings". Go to the last tab and check the box “Copy photos and videos to your computer so you have them at hand.”
As soon as you check this box, you will be asked in a separate window select folder location(directory), where all this stuff will be automatically downloaded. Moreover, this folder will not have to be located inside the YandexDisk folder created when installing the program. Choose a location based on available space on your computer or other criteria.
When you click “OK” and “Apply”, you will be asked if you want to immediately download the videos and photo files already available in the cloud that got there from your mobile gadgets.
Agree and the process will begin, and in the future you won’t have to worry about anything - downloading new media files will happen automatically.
How to use the Yandex.Disk program
However, we got a little distracted because we were installing the Y.Disk application on our computer (or laptop). Before you start uploading your files to Yandex, you will need to log in (log in with your username and password).
Sharing files and folders via YandexDisk
All files uploaded to the cloud from the Yandex Disk folder you can make it public. Not even that.
Any file or folder on your computer you can make it public. What does it mean? Well, you can send someone a link in a letter, like, look at our vacation photos. The opponent will receive this link and, by clicking on it, will calmly look at the photos you shared in this way (or any other files).
In fact, this will turn out to be an analogue of a file hosting service, but without any restrictions on storage time.
In order to make any file on your PC public (even one that is not in the YandexDisk folder), you just need to right-click on it and select the item from the context menu “Copy link to Yandex.Disk”.
Immediately after this, in the lower left corner of the screen you will see a message that the link to this file or folder has been copied to the clipboard and you can safely send it by mail, post it on a forum or on a social network.
It is noteworthy that this way you can share not only the files already in the Yandex Disk folder, but also any others on your computer. As soon as you do this, they will be automatically uploaded to the cloud storage (the program tray shortcut will turn blue during the download), and you will receive a link that you can send to your friend, publish on the website, or do something else with it.
For example, this is what the page your opponent (to whom you sent the link) will look like if you shared an entire folder of photos with him. He can view them right here (in photo gallery format), and then, if desired, he can download them to his computer (in one archive), or upload them to his cloud on Yandex disk.
This is what a presentation file that you have made public might look like (again, you can view it directly in the cloud or download it).
Right-click on the desired folder and select "Set up access"(see previous screenshot). I’ll warn you right away - don’t be alarmed if you see a whole list of people there marked “Full access” (I was scared at first). It’s just Yandex pulling your contacts from your mail, and these are just blanks for sending an invitation and they have not yet been granted any access.
You must first send an invitation to this person, having previously indicated what level of access you will give him: Full (the ability to edit and delete) or View Only. An invitation can be sent to any person - if only he had an Email. He will receive a similar letter to this same email:
If this person has an account in Yandex, then after clicking on the link, he will automatically go to his Drive, accept the invitation and see there the folder that was offered to him for shared access. If there is no account, then he will first have to create one, and only then, by clicking on this link, he will see the treasured folder. Or won't he see it?
He won't see it until he presses the button. "Accept invitation" on the left menu tab "Sharing". After this, you can search for the shared folder on the “Files” tab of the same left menu.
That's all, all that remains is to transfer office files there for collaboration or create them using the built-in Disk tools and save them in this shared folder. Voila.
What can you do by logging into your page in Yandex Drive?
Well, in general it will be possible to upload files without installing the Yandex Disk program through your mail interface. When you go into it, you will see the “Disk” tab at the top. Actually, that’s how I found out about this cloud service - I received an email with a link, following which I was encouraged to try this miracle in action.
By going to this tab, you will get all the same options for managing your files in the cloud (downloading, storage accounting, moving, etc.) as when using the desktop program.
Even a little more - it becomes possible to see the basket that is taking place, as well as view objects that are in the public domain:
Files stored in the cloud, which are marked with black circles on the right, are published, i.e. available for download by anyone who knows the download link (personally, I often use Y.Disk to upload files to it that need to be transferred to someone).
You can change the access status, as I already mentioned, using the context menu of a file or folder, called by right-clicking. You can view a list of all shared files on the “Sharing” tab.
And the most delicious feature, which is available only in the Yandex cloud web interface, is, of course, ability to view document versions and the ability to restore from one of these versions. For example, while editing a text file, you could inadvertently change (erase) something, and then save the file without noticing.
But if it is stored (synchronized) in the cloud, then it’s okay. Just go to disk.yandex.ru, go to the “Files” or “Last” tab, find this file and right-click on it. From the menu that opens, select “Change History”.
In the window that opens, you will see all versions of this file for the last two weeks (with a paid plan, changes will be stored for three months). Find the version you need using the date or simply opening them all in a row, and then restore it. All.
Go ahead. Depending on their type, many of the files downloaded and stored in Yandex can not only be downloaded, but also viewed through the web interface. These are primarily text and Word documents, pictures, music files, and something else.
All the main tools that allow you to upload, create, delete and download files are in plain sight. When downloading via the web interface, you will see 10 gigabyte limit, which is due to the imperfections of some browsers. To download larger objects, you will have to use a desktop program that can pull files weighing up to 50 GB.
You can simply upload files to this cloud dragging them with the mouse directly to the Disk page opened in the browser, or by traditional digging into the depths of your computer through the “Download” button in the upper left corner of the Disk web interface.
In the download dialog, you can immediately make this object public and immediately copy a link to it.
Yandex cloud in your pocket
The interface of the mobile versions of Yandex Disk is very similar to the Dropbox I have already described (the link to the article is at the beginning of this publication). Application version for iOS (iPad and iPhone) can be downloaded, and for Android — .
You can simply use your smartphone:
Just switch your phone to photo mode and bring it to the screen - the phone itself will prompt you to follow the link:
I use Yandex disk on my iPhone SE and find it quite convenient (although I also work with Dropbox in parallel, because one does not interfere with the other). When you first enter this application, you will immediately be prompted to activate auto-download and storage of photos and videos captured on the gadget in a folder specially created in this cloud (unlimited). I have already written about this in detail and will not repeat it.
If you initially rejected startup and have now changed your mind, this option can be activated in application settings(gear in the upper left corner).
There you can also choose when to upload new photos and videos from your iPad to the Yandex cloud - when working via Wi-Fi or always:
In general, the interface of the mobile version of the YandexDisk program is very simple and understandable:
This mobile application will allow you to view most of the files stored on Yandex, and you can try to open what doesn’t work in a specialized application on your tablet or smartphone.
You can see various icons to the right of files and folders. A chain means that you have made this file or directory public (created a link to it and possibly shared it with someone). The airplane icon means "Offline mode", i.e. this file or folder is located not only in the cloud and on your gadget (in its memory).
In general, this is very convenient and significantly saves traffic. Let's say you're connected to the Internet via Wi-Fi at home and you can easily upload movies, photos, books, etc. to the Yandex cloud. rubbish. Then open Drive on your phone and make each of these files available offline:
For this it is enough only swipe the file with your finger from left to right (or vice versa), and select the airplane icon in the menu that opens. All files marked in this way will immediately be physically downloaded to your phone (over your free home Wi-Fi, mind you). That's it, consider yourself prepared for work.
Conveniently, all offline (already stored in the phone’s memory) files can be found on a separate tab of this wonderful application:
Naturally, you can upload files from your gadget to the cloud (the blue plus button is used for this), but there is little point in this if you have multimedia auto-download enabled. In general, Yandex Disk, in my opinion, can become a convenient way not only to store, but also to transfer files (photos, captured videos, etc.) from a smartphone to a desktop computer or laptop.
And, conversely, transferring various text files or videos to a smartphone so that you have something to do on the way to work (at home, you can download via Wi-Fi without bothering with traffic).
Total
I like everything so far and I have a week left to make a decision about moving from Dropbox to Yandex Disk. Why am I thinking about moving? Banal redneck. Why pay three and a half times more for the same service.
See for yourself:
- Ya.Disk now also stores file versions (change history).
- For the same terabyte they ask for much less.
- The mobile application is very similar both in appearance and in functionality.
- Media files from gadgets are downloaded automatically, and even without taking into account their weight (a cool trick, actually).
- The desktop program YandexDisk, although not familiar, is quite functional if you look at it and does exactly what I need.
Why am I hesitating? It’s trivial that I’ve tested Dropbox for years of constant use, but I still use Yandex Disk not so intensively and therefore I’m afraid that some pitfalls may emerge during the transition.
Therefore, I ask for advice from those who have been using this cloud for a long time. What do you think?
Good luck to you! See you soon on the pages of the blog site
You might be interested
Search by picture, photo or any uploaded image in the free service picid.club - how does it work?
Free file hosting services - how to upload a photo and get a link to the picture
Radikal - free photo hosting with fast and easy photo uploading via Radikal.ru


