How to cancel the update in VK. How to cancel VKontakte updates on your phone - How to remove the latest VKontakte update on Android? How to delete the latest VK update on iPhone
A new version (new design, appearance, design) of VKontakte appeared in April 2016. The old one existed for a very long time and is outdated. First, during trial period, each user could enable himself new version, and if you don't like something, then return to the old one.
How did you turn on the new version of VK?
At first it was like this: the person who wanted to open the news on the VK blog and at the very end of the page clicked "Join Testing"
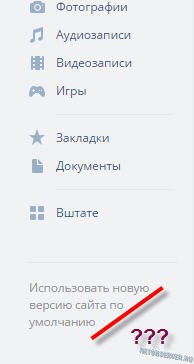
You could also enable the new version using the link “Use the new version of the site by default” in the left column of the site, at the bottom (if you open VK on a computer, not on a phone).
How did you include the old version?
It was possible to return the old one back in the same place, at the very bottom of the narrow left column of the site, a pale gray link. She was called "Back to old version site". Then she did not stay with everyone, and even later disappeared completely. Read more:
Why did the new version turn on by itself and how to go back?
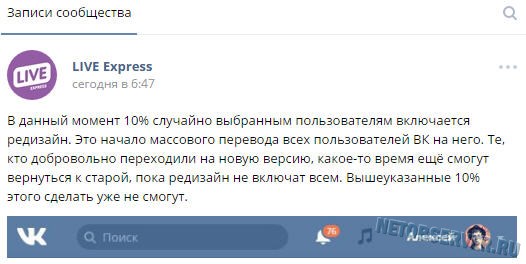
Since June 9, 2016, a part of VK users (about 10 percent) received the new version forcibly, that is, it turned on itself, and they could no longer return to the old one. You could also be among these users. Nothing can be done about it, one could only get used to it, because a person gets used to everything. The best option is to take the change calmly. Some time will pass, and the old version will already seem uncomfortable to you. And in any case, the developers of the VK site would not be able to support the old version for a long time.
This was the beginning of the mass transfer of all VK users to the new version. Here is the official news about it. Those who did not fall into the mentioned 10% could still switch to the new version and back to the old one for some time, but since August 17, VKontakte has completely switched to the new version, She herself turned on for everyone without the possibility of returning to the old one.
Since then, due to numerous requests from users, some changes have been made (they changed the font, left the ability to use dialogs similar to those in the old version, etc.). But in general, there will never be a return to the old version. Most likely it no longer exists.
How to return the old version of dialogs?
Go to "Messages" and find the gear icon at the bottom -. Click on it and choose "Switch to classic interface." After that, you will have dialogs like in the old version. To go back to the new version, just click on the gear and select "Go to the new interface."
Is the new version on the phone too?
The new version is full version website that people use on computers and tablets. This does not apply to the VK application for phones, which is developed and updated separately (see How to download VK to your phone). Is there some more mobile version VK site, which also exists separately, but it also gradually borrowed many elements from the new "full" version.
How to return the old version of the VK mobile application on the phone?
You can install the old version of the mobile app manually, see here:
The old version may not play music. No one guarantees that older versions of the application will work at all. The VK administration can disable them. For the future, you can disable automatic update and the app will not update.
A better option is to get used to the new version of the application. When something new comes along, there are always people who don't like it. So it was with the new version of the VKontakte site - many promised to leave VK forever, but they are still sitting there perfectly. It's all about habit.
Who doesn't like the new version of VKontakte?
Not everyone likes the new version of VKontakte. Many demand to return the previous version, which they consider more convenient. Someone argues that the new design is too similar to Facebook and even Odnoklassniki. Users even created an online petition demanding that they keep the old version and give them "the right to choose" (this did not affect anything). Online petitions are often created for various reasons and thanks to them the information is disseminated very widely. But in fact, the petition has not helped anyone yet. When the noise subsides, everyone forgets about her.
VKontakte laughed at its users, who promised to leave if they did not return the old version. A month after their promise, they still continued to sit in VK ().


It is known that any big update some people always meet with hostility, as it is too painful for them to change old habits. But over time, they calm down.
Our instructions will help you quickly navigate the new version of VKontakte: Where are the settings, my answers, music, birthdays, output, statistics in the new version of VKontakte ...?
Please write below in the comments what you think about the new version of VKontakte! Your opinion matters.
Why is it important? When you express your opinion, it will become easier, you will release your negativity. True, 92% of people will not read this, but will immediately look for where to write - they do not care. Congratulations if you are reading this! If you really want to contact the VKontakte staff and ask them to return the old version, try contacting their support team - but we don't think this will affect anything.
What happened to VKontakte music? Why is she paid now?
It has long been rumored that the VK application will appear paid subscription to music. At the end of April 2017, VK decided to transfer music listeners to the Boom application, where there is a paid subscription. The application belongs to the partner Mail.ru Group, which includes VKontakte itself. The music section in VK has changed - playlists and advertising have appeared. In the VK application for Android, music caching has disappeared (now you can’t save music and listen to it without the Internet). Why did all this happen? The fact is that if everyone listens to music for free, the musicians will have nothing to eat and they will have to go to another job. Therefore, it could not continue indefinitely. You can express your outrage right here in the comments. Be sure to share this page with your friends!
Here is how representatives of VKontakte answer questions about free music in the application.
I'm not kidding. Since the transition to such an interface is obviously inevitable for everyone, the question is, how to return the old design of Vkontakte has only a temporary solution. But since albeit temporarily, disable the new Vkontakte design and it is still possible to continue working with the usual sane interface, then we will do this.
This question is relevant, perhaps, for all Vkontakte users who have become accustomed for 10 years to the simplicity and convenience of the old design and use its functionality to the fullest. In particular, this applies to those who created and administer communities and groups - the developers of the new VK.com, of course, made life difficult for them with their innovations.
By the way, for this category of VK users, I would like to give a practical recommendation: in order not to waste precious time on independent promotion of the public both on Vkontakte and on all other popular social networks, and fully concentrate on quality content for your community, you should contact the service social like. Judging by the numerous positive reviews, this PR team knows their business and will be able to quickly provide your group with the right number quality subscribers.
Let's return to the main question. Immediately make a reservation - we will talk about browser version social network. Android and iOS applications, alas, will not be considered in this article.
Upd. 08/17/2016. Dear Reader, in order not to waste your precious time, I would like to immediately inform you: "The uprising is suppressed, Skynet has won." Well, jokes aside, the inevitable happened: despite all the protest moods of Vkontakte users, the developers, after several “waves” of transferring users to the new design, decided that it was enough to waste time on trifles: on August 17, 2016, ALL users of the social network were transferred to the new design ... Accordingly, the new addresses .vk.com simply does not exist at the moment, and recommendations using its return do not work ...
This does not mean that there are no ways to return the old Vkontakte design now: especially for those who do not give up, we suggest that you familiarize yourself with the ““ block located below in the text. There you will find a way that will probably be able to extinguish the flame of righteous anger in you.
Well, before this block, information will be given that is more of historical than practical significance: the following is a chronology of the fight against the disease called " New design Vk.com". Familiarization with this information will take you, dear Readers, not so much time, and it will probably be interesting for someone to know “how it all began”, so all previously workable methods remained in the article. So let's start.
For those who have become a “guinea pig” for Vkontakte designers involuntarily (i.e., they just encountered a new interface at some point), there should be a link “Return to the old version ...”, located at the bottom of the left column with a menu and advertising. In truth, the designers clearly tried to make the tool for how to return the old version of Vkontakte as invisible as possible: gray letters on a gray background - it's hard to notice.
Those who voluntarily joined the "ranks of testers" of the new interface (by clicking on the ill-fated "Join Testing" button) may not find links to return to the old version.
And how to disable the new Vkontakte design in this case?
Pay attention to the address bar of the browser:
 Attention to the address bar!
 As you can see, before vk.com added “ new". Those. in fact, it's a different user profile page. To return the usual vk.com/id_page, and with it to return the old version of Vkontakte, we simply “correct” the address: you need to erase “ new.". And, of course, press Enter (or the input confirmation key on a touch device).
The following result will come out:
 Removed “new.” from the address, got what you need!
 Familiar? Probably painfully 🙂. Yes, yes, this is the good old vk.com interface, which everyone has gotten used to over the 10 years of its existence. Well, now the matter is small: all that remains is to bookmark this page in the browser so as not to edit the address each time, and call this page after authorization on the social network.
It is not yet known exactly when the redesign of Vkontakte will “cover” everyone, so there is hope that the old version of vk.com will be used for a long time.
Upd. 06/09/2016. It seems that the Old Believers did not rejoice for long: the VK.com team began a forced transfer to a new design without the ability to return to the previous version.
Upd. No. 2 - joyful (not so joyful anymore - has lost its relevance ...)
It turns out that there is still a workable method to return the old Vkontakte interface, even to those who, it seems, were left with no options (at least for this method in VK they repeatedly thanked the “prompter”). However, we warn you right away - you will have to perform all actions at your own peril and risk, and the risk may be present. The return method of the old vk.com design is related to running scripts, and Netobserver does not guarantee that there is no code in the body of the script that can steal user login and password.
Let's consider a really working method suitable for Google browser Chrome and its "brothers", like Yandex.Browser (browsers based on the Chromium platform):
So, the method is as follows: we find on Google Play market

Install the first plugin in the list:

After installation, the activity of the plugin can be checked by the icon in the upper right corner of the browser:

In the tab that opens, click on the "Install this script" button: 
Next, a warning from Tampermonkey will appear that you should only run reliable scripts (i.e. once again warns - you act at your own peril and risk), and the installed script is displayed:

That's all - the script immediately starts its work. You just have to go to Vkontakte (or refresh the page if you are already there), and make sure that the good old vk.com is back!
Moreover, the effect will be preserved when switching between the elements of the Vkontakte menu, and upon re-entry.
This is more convenient than the method that was proposed in the comments to this article (however, I want to say “Thank you” for this option for resolving the issue “How to return the old Vkontakte design”).
There are also Tampermonkey extensions for other browsers:
- For Ognelis: ;
- for Opera: ;
- at Safari - .
Well, after installing the extension for your browser, you return to the step with downloading the userscript - and then in order 🙂.
Upd. 3 - for the most stubborn.
Dear readers, you have 2 options: accept and start getting used to the new design (this is difficult, but possible - I say from my own experience), or fight to the end 🙂 . The remaining way to fight - use custom styles. Now there are several of them being developed, and all of them are still very raw. But, as they say, on lack of fish and ...
For enthusiasts who do not give up and are ready to "get confused", we have prepared the following recommendations:
- Application of a user script through Tampermonkey;
- Using the plugin for Stylish browsers with style loading(most popular option) .
For those who have already learned how to work with Tampermonkey (see the description in Upd.2- above in the text), an alternative script is proposed (though very crude), returning some kind of old version. Applying it for now, perhaps, makes little sense, but you can track the changes being made - I'm sure that after a while this user style will work much better.
https://userstyles.org/styles/userjs/128986/%D0%A1%D1%82%D0%B0%D1%80%D1%8B%D0%B9%20%D0%B4%D0%B8%D0 %B7%D0%B0%D0%B9%D0%BD%20%D0%92%D0%9A.user.js
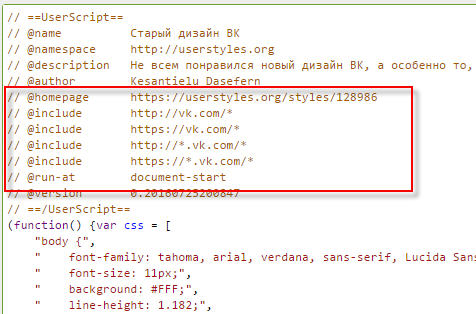
The script will need to be edited. Specifically, the following lines are of interest (from 7 to 10):
// @include http://new.vk.com/*
// @include https://new.vk.com/*
// @include http://*.new.vk.com/*
// @include https://*.new.vk.com/*
You need to remove "new." on lines 7 and 8, ".new" on lines 9 and 10.
It should turn out like this:
The Stylish plugin is the most publicized version of the return of the old Vkontakte design
In principle, the Stylish algorithm is similar to the Tampermonkey method, with the only difference being that Stylish, unlike the latter, works with styles, not scripts.
Warning: Do not run Tampermonkey with Stylish! Although both plugins are designed to do, in principle, the same thing, it is not a fact that using them together will lead to twice as much best result(rather the fact that it will not lead 🙂).
So, if you have already tested the first method and decided to move on to the second, first deactivate the Tampermonkey plugin.
After installing the extension, you need to make sure that it is activated. For Chrome, the picture will be as follows: an icon with the letter “S” will appear in the upper right corner of the browser:

The next step is to download the style from the developer's site: .
On the page that opens, you will need to use the big green button - it's hard to miss it:


Judging by the speed of releases, the author is trying very hard to eliminate all the shortcomings that are currently available. Therefore, I recommend that you bookmark this page so that after a few days (weeks) you can download the modified style for Vkontakte, which will no longer be so raw.
In the meantime, let everything be the same for you as the lucky one who left such a review:

Dear readers, if you have alternative methods for reverting to the old Vkontakte design, feel free to leave them in the comments! We are also waiting for the feedback of those who were helped by the above recommendations.
Good mood to you all!
Article How to return the old Vkontakte design - disable the new version was modified: May 4th, 2017 by Netobserver
Updates by the developers of the most popular social network VKontakte very often turned out to be very controversial and did not find support from users. This could be explained by the reluctance of many to move away from the already familiar and beloved interface. However, the latest, not so long ago, update of VKontakte - 3.0, caused negative feedback even among devoted supporters of the developers.
Cons of the update
Most of all, the negative consequences of the update were felt by users of the VKontakte mobile application on the iPhone. Last year, IOS removed the ability to cache music, and in update 3.0, developers left free music listening only as part of their added audio recordings.
The practically paid music section is not the only innovation that has caused a storm of negative emotions. The completely updated interface for most immediately raised the question of how to return the old version of "VK" to the iPhone. There are currently several methods available.
Consider how to return the old version of "VK" to iPhone
The PP Assistant program is a Chinese development, which you need to download it to your device, install, run. Next, connect the iPhone to the computer via USB and confirm the access permission for the application on the phone. In the search bar you need to enter VK, after which it remains only to download the old version. In a few seconds, it will appear on the device, and it will be possible to use the familiar application with pleasure.
Another way, on an iPhone, is to use the "Purchases" section in App Store. To use this method, you must remove updated application"VKontakte" and disable auto-update in the settings. Next, you need to go to the App Store, go to the "Updates" section. There you can find the VK APP application and install it on your device. The old version will be installed. However, many say that with the release of the new VKontakte update, this solution to the problem will most likely no longer work. These are the two main ways to install the old version of VK on an iPhone.

What should be expected?
Despite the negative reviews, the developers are purposefully pursuing a policy of moving away from democratic old versions, introducing new restrictions in the music section, in order to earn as much money as possible from users. Therefore, it should be expected that in the near future all loopholes about how to return the old version of VK to an iPhone will be covered, and it will not work to roll back to previous versions of the VKontakte application on your gadget.
The majority of users have already noticed how the design of the popular social network Vkontakte has changed. This "nightmare" happened on August 17, 2016 early in the morning and now all VK users are shown a new updated design. Now no one can return the old version of the resource back, since the developers do not officially provide for this.
At the moment, the Internet is full of discussions about the global redesign of the Russian social network, many users are unhappy with the new changes. However, the developers left the following message to supporters of the old version of the site: “We got rid of unnecessary details and made the resource easier for your perception.”
Fundamental changes have affected the font, icons, navigation bar, avatar design. According to the leading developer Dorokhov V., work on the new design of the social network was carried out for a year and a half. Since April 2016, the developers have started testing a new type of site, and any user could take part in this. For all the time, more than 2500 minor and major corrections have been made to the resource code, listening to the wishes of users. The main task is to improve the stability of the site, as well as switch from the outdated Flash technology to the new one - HTML5.
Once again, the official way bring back the old Vkontakte design alas, no, despite the dissatisfaction of many users social network. However, there is still only one way to remedy the situation. Below we will look at how you can return the old version of Vkontakte to a PC in a few clicks.
How to return the old Vkontakte design in a couple of clicks
So, in order for the design of the site vk.com to regain its former form, we will use you special extension for browser Google Chrome. This extension is called “Return the old VK design”. While revenge is one of a kind, but I believe that over time there will be a considerable number of analogues. To date, there is one caveat: the version of this extension is still damp, so you can see some bugs when surfing the social network, but the developer often releases an update to this extension, eliminating the errors found by users. To change the design of the site, go to the Google store and install the extension.
Click on the "Install" button, a window will appear, where we click "Install Extension".

After the extension is installed, click once with the mouse on the icon:

and update the VK page. Below you can see what the page looked like in the new design:

and here is how it looks after installing the extension that changes the new version of the site to the old one:

Time will pass, and there will be a sufficient number of such extensions. You can find out which one is the best by rating in the Google store. However, I believe that many users will simply get used to the new Vkontakte design and the need for the old version will disappear automatically.
As you can see, friends change the new version of VK to the old one very simple: it is enough to carry out a few simple actions. If you liked the instruction, share it with your friends using the social buttons below.
As you know, not all updates are equally useful, so some applications with updates work very badly, and sometimes even refuse to work at all. The thought arises - why not remove the updates?
Alas, the operating android system does not allow you to remove downloaded updates for applications. However, there are exceptions. For example, some application is "sewn" into the firmware. In our case, this is the Google Chrome browser. Since the application is "sewn" into the firmware, it is impossible to remove it without root rights, but it can be updated with Google play. After the update, the "Delete" button will appear.
No, by clicking on it, you cannot delete applications, but you can delete all updates by clicking on the OK button.
Of course, this only applies to some applications that cannot be uninstalled without root rights, including Google services.
There is another option. Go to the Applications section.
Select an app, then click Uninstall Updates.
Confirm the removal of updates.
Step by step guide to uninstall app updates on Android
- 1 Removing updates
- 2 Android update setup
At turning on Wi-Fi on most Android devices software and game updates start downloading. The process is useful, but sometimes updating on Android causes the application to start working incorrectly. In this case, users of Android devices begin to wonder how to remove updates and return programs to a working state.
Removing updates
You can only remove updates for built-in Android applications - Google Chrome, Play market. If you are looking for how to uninstall an update third party program on Android, you will be disappointed. The only way that works is to uninstall the app itself and then find and install the older version.
You can search for older versions on sites like w3bsit3-dns.com - there you can find any popular Android program. Downloading installation files from other portals is more dangerous, but it is also possible, especially if the site has been verified by other users. To remote application after installation, it was not immediately updated, you need to configure the order in which updates are downloaded to Android.
If you don't like how one of the standard applications Android (for example, the Play Market), then it can be quickly rolled back to its original state:
- Open settings, go to Apps.
- Find the program whose updates you want to remove from the list. Click on it to open a page with additional settings.
- Tap on the "Uninstall Updates" button.
Remote updates may download back when connected to Wi-Fi. To prevent this from happening, follow the best practices for setting up app updates on Android.
Android update setup
By default, programs start updating when Wi-Fi is turned on. On mobile traffic updates are not downloaded, because it has a limit - a specific number of gigabytes per month. Most Android users are satisfied with this approach: turn on Wi-Fi, the application is updated, you don’t have to worry about the relevance of the programs. But if you want to have full control over how it loads Last update, additional system configuration is required.
The first thing you can do is set a limit for background processes. It will help to fix the situation when the system freezes due to the simultaneous update of several applications.
- Open the settings, section "For developers".
- Scroll down the screen to the Background Process Limit option. Click on it to change.
- Set a value that suits you - for example, no more than 2 processes at the same time.
If you want to disable auto-update altogether, then the easiest way to do this is to use the Play Market settings:
- Launch Play Store. Call the control menu and go to the settings.
- Click on "Auto Update" and select "Never".
Some applications are updated without the help of the Play Market, so following the steps above will not be enough to completely disable auto-update. To fix this shortcoming:
- Open the phone settings, go to the "About device" section.
- Select "Software Update".
- Uncheck the box next to Auto Update.

After turning off auto-update, you will have to update programs manually:
- Open the Play Market, call the control menu.
- Go to "My apps & games".
- Open the Installed tab.
- Click "Update" next to the application for which you want to download and install the update.

Manual upgrade - not the best convenient way keeping programs up to date, but you will be in complete control of the situation.
How to turn off app updates on android
Today, Android games and programs are regularly updated by the manufacturer. The system often installs them on its own without notifying the user. The question arises: how does updating applications on android work? Content:
Why Apps Are Constantly Updated
 Different applications are permanently updated for different reasons. So, with each update, antiviruses replenish the virus database, cleaner programs get new functionality, games get new maps and levels. The manufacturer is constantly trying to improve applications, so it is forced to release new versions. Updates are also released if the previous version turned out to be “buggy” (slows down or does not start at all) or a new one android version does not support old, unoptimized applications for it.
Do I need automatic app updates?
Here it is worth clearly indicating where automatic updating is mandatory, and where it is not. Antivirus utilities, for example, need to be updated regularly. If the user decides to download new versions of firewalls on an irregular basis, then the system will be vulnerable to attacks spyware, advertising banners and viruses. Navigation utilities should also be allowed to automatically update: each new version of the same Google Maps or Here carries new maps and more detailed schemes of the old ones. In other programs like Google Chrome, CCleaner or Total Commander, automatic updates are not necessary: an updated design, one or two innovations, and the traditional “Minor bugs fixed” (Minor bugs fixed) are all that a consumer usually receives after downloading a fresh version of the utility.
It is better to update such programs once a month. In games, every update brings new maps and levels, so it's also best to let them download new versions on their own.
How to uninstall app update on android
If the update of the android application does not satisfy the user (an ill-conceived interface, jamming, or the program does not start at all), then it can roll back to previous version. You can return only those utilities that were originally installed by the manufacturer. Those multimedia files that the user uploaded himself cannot be rolled back. How to remove a system application update: go to the device menu, then to "Settings". There, click on the "Applications" / "Application Manager" tab (in different devices it's called by different names). Find the program you want to roll back. Then click on the "Uninstall update" button. If it is not there, go to "Options", and only then - to the "Uninstall update" tab. After that, a menu will pop up that will ask you to confirm the rollback. It is worth noting that after that the utility returns to its original version (for example, if Google Chrome v 1.0 was installed “from the factory”, and then the user himself updated it to v 2.0 and v 3.0, then when you roll back from the third version, the program will return to v 1.0).
How to uninstall non-system app update: The only way out is to search on the Internet setup file(with apk format) old version.
How to disable app updates on android
 To turn off app updates, you first need to go to Google Play, then you need to click on the menu icon or swipe from left to right. We find the "Settings" tab, then go to "Auto-update applications". In the menu that appears, select "Never". Tip: You can also select "Only via Wi-Fi" to not use the tariff megabytes.
How to cancel app update on android
If the Android application is at the download stage, then you need to go to the Google Play menu. There you need to find the "Downloads" tab and select the downloaded file. You can cancel its download by long pressing on the file.
How to update Android apps manually
We go to Google Play, call the main menu, then go to the "My Apps" tab. A page will open showing all installed games and programs, including factory ones. Utilities that have updates will be separated from those that do not. Each app's tab will have an "Update" button. Also in this submenu there is a button "Update all". With it, the files will be updated "in a chain". If the application requires access to identification data, media files or contacts, it will notify you of this. Press the "Accept" button. If the program does not need additional special permissions, then it will throw out a corresponding message - click "Accept". Updating media files, however, requires space in the smartphone's memory (namely, the smartphone, not the memory card). To free it, you should delete any files from the smartphone's memory (music, pictures, another application, the cache of various programs). Before updating the heavyweight utility, Google Play will offer to download it via Wi-Fi so as not to waste mobile traffic.

Disable update of one specific android application
We go to Google Play, in the search bar we drive in the name of the required application. In the list of games and programs that appears, click on it, then click on the three dots located in the upper right corner. The "Auto-update" item will fly out, you need to uncheck it.
Why apps don't work after android update?
 The fact is that the applications on Google Play are not optimized for new system. A prime example is the upgrade from Android 2.3 to 4.0. In this case, the best help is: 1) Re-installing applications; 2) Full reset copying all data. At first, it is better to simply reinstall the necessary games and programs. Don't worry about Google re-charging you for downloading paid apps: once you've purchased media files from Google Play, you can reinstall it countless times. By the way, when deleting most games and programs, only the executable files are erased: the cache (for example, progress in Angry Birds) remains. However, sometimes you have to completely reset the device parameters. In this case, before that, you need to make a backup of the data. Download and install on PC free version Titanium Backup utilities. Then we connect the smartphone to the computer. After starting the utility, the user is asked about root rights, click on the "Allow" button. Go to the smartphone menu, then to "Processing". We click on " Backup". Titanium Backup will then present you with a list of applications from which you must choose which media files to back up. By choosing desired applications, click on the "Start batch processing". After the operation, Titanium Backup will issue a list where games and programs will be ticked as confirmation of successfully made copies. The backup itself will be saved on the micro-sd card of your smartphone; for reliability, you can also save it on a PC.
Recently, developers have released a new version 3.0 of the VKontakte application for iPhone. User reaction to the new design and user interface has been mixed. Many immediately wanted to return the old version of VK to the iPhone and, at a loss, began to look for a way to do this. In this article, we will tell you in detail how to roll back the VK 3.0 version on the iPhone to the old one. We urge everyone who wants to cancel the update of VKontakte to do the following.
How to remove the restriction when listening to music in VK —


How to return the old version of VK to iPhone
Unfortunately, the App Store does not provide the ability to download the old version of VKontakte on the iPhone. At the moment, there are two ways: one is temporary, the second is for advanced users.
Download the old version of VK and install
This method VK application rollback working, tested on iPhone 5 and 6S. In order to download the old version of the application, we need Chinese program PP Assistant (aka Chinese iTunes). Works with iPhone, iPad and iPod.
Instruction:

How to roll back VK update on iPhone and install the old version?
At the moment, a "life hack" is working - you can install the old version 2.15.3 from the Purchases section of the App Store. First remove the VK 3.0 application, then open app Store, go to the Updates section, there will be a Purchases section at the top - in it, find the VK App application from the list, install it. At the time of this writing, this method helps to return the old version of VKontakte to iPhone. Most likely, with the release of the next VK update, this method will stop working.

How to roll back VK 3.0 version on iPhone
If the first method did not suit you, connect the advanced skills of the "user". This method is working - we checked it. And it won't take much of your time.
- First you need to download and then install the Charles program. Next Run it and click on the Grant Priveleges tab if you're using OS X, then enter the administrator password.
- We download the application whose old version you want to install from using iTunes on your computer, and then go to the Structure tab in the Charles application. You will see the "buy" server.
- Right-click on the "buy" label and select Enable SSL Proxying.
- Now stop downloading in iTunes.
- Again we find the application by opening the page with a description. We start the download, then cancel it again.
- Next, open the “buy” server pop-up menu and select buyProduct.
- Click on Response, with right button click on buyProduct and select Export. Select the Desktop as the export location, select the XML format and click Save.
- Opening the XML file with text editor and find this text:
softwareVersionExternalIdentifiers Under this text, you will see something like this:
1862841
1998707
2486624
2515121
2549327
2592648
2644032
2767414
These are the versions of the application from oldest to newest. Now you need to copy the version number you want to download, then close the text editor. - Now we return to Charles and right-click on buyProduct, select the Edit item.
- Select Text and find the following line:
appExtVrsId
Below it you will notice the number in the tag, replace it with the number you copied and click Execute. - Scroll down to Response, next you will notice bundleShortVersionString. Below it, you will see the version of the application you have selected.
- Right click on buyProduct in the list under the "buy" server and select Breakpoints.
- Find the app again in iTunes for the program to refresh the page, and now click on the download button again.
- Return to Charles and you will see a popup. Click Edit Request, then XML Text and under the line
appExtVrsId paste the number copied in the eighth paragraph. Click Execute again. - Now you will need to press the Execute key.
- Check iTunes. The download should start and finish.
- Open the My Apps tab in iTunes and you should see the downloaded app. By right clicking on it you can request more information and make sure you downloaded the old version.
- Connect your mobile device to iTunes and install the app on your device.
- Close and uninstall Charles. Ready!
As you know, not all updates are equally useful, so some applications with updates work very badly, and sometimes even refuse to work at all. The thought arises - why not remove the updates?
Alas, operating system Android does not allow you to delete downloaded app updates. However, there are exceptions. For example, some application is "sewn" into the firmware. In our case, this is the Google Chrome browser. Since the application is "sewn" into the firmware, it is impossible to remove it without root rights, but it can be updated using Google Play. After the update, the "Delete" button will appear.
No, by clicking on it, you cannot delete applications, but you can delete all updates by clicking on the OK button.

Of course, this only applies to some applications that cannot be uninstalled without root rights, including Google services.
There is another option. Go to the Applications section.
Select an app, then click Uninstall Updates.

Confirm the removal of updates.

androidnik.ru
Step by step guide to uninstall app updates on Android
- 1 Removing updates
- 2 Android update setup
When you turn on Wi-Fi on most Android devices, software and game updates begin to download. The process is useful, but sometimes updating on Android causes the application to start working incorrectly. In this case, users of Android devices begin to wonder how to remove updates and return programs to a working state.
Removing updates
You can only remove updates to built-in Android applications - Google Chrome, Play Market. If you are looking for how to uninstall a third-party program update on Android, then you are in for a disappointment. The only way that works is to uninstall the app itself and then find and install the older version.

You can search for older versions on sites like w3bsit3-dns.com - there you can find any popular Android program. Downloading installation files from other portals is more dangerous, but it is also possible, especially if the site has been verified by other users. To prevent the remote application from being immediately updated after installation, you need to configure the order in which Android updates are downloaded.
If you do not like how one of the standard Android applications (for example, the Play Market) works after the upgrade, then you can quickly roll back to its original state:
- Open settings, go to Apps.
- Find the program whose updates you want to remove from the list. Click on it to open a page with additional settings.
- Tap on the "Uninstall Updates" button.
Remote updates may download back when connected to Wi-Fi. To prevent this from happening, follow the best practices for setting up app updates on Android.
Android update setup
By default, programs start updating when Wi-Fi is turned on. Updates are not downloaded on mobile traffic, because it has a limit - a specific number of gigabytes per month. Most Android users are satisfied with this approach: turn on Wi-Fi, the application is updated, you don’t have to worry about the relevance of the programs. But if you want to have full control over how the latest update is loaded, you need to do some additional system configuration.
The first thing you can do is set a limit for background processes. It will help to fix the situation when the system freezes due to the simultaneous update of several applications.
- Open the settings, section "For developers".
- Scroll down the screen to the Background Process Limit option. Click on it to change.
- Set a value that suits you - for example, no more than 2 processes at the same time.
If you want to disable auto-update altogether, then the easiest way to do this is to use the Play Market settings:
- Launch Play Store. Call the control menu and go to the settings.
- Click on "Auto Update" and select "Never".
Some applications are updated without the help of the Play Market, so following the steps above will not be enough to completely disable auto-update. To fix this shortcoming:
- Open the phone settings, go to the "About device" section.
- Select "Software Update".
- Uncheck the box next to Auto Update.
After turning off auto-update, you will have to update programs manually:
- Open the Play Market, call the control menu.
- Go to "My apps & games".
- Open the Installed tab.
- Click "Update" next to the application for which you want to download and install the update.
Manual upgrade is not the most convenient way to keep programs up to date, but you will be in complete control of the situation.
www.poandroidam.ru
How to turn off app updates on android
Today, Android games and programs are regularly updated by the manufacturer. The system often installs them on its own without notifying the user. The question arises: how does updating applications on android work? Content:
Why Apps Are Constantly Updated
Different applications are permanently updated for different reasons. So, with each update, antiviruses replenish the virus database, cleaner programs get new functionality, games get new maps and levels. The manufacturer is constantly trying to improve applications, so it is forced to release new versions. Updates are also released if the previous version turned out to be “buggy” (slows down or does not start at all) or the new version of Android does not support old applications that are not optimized for it.
Do I need automatic app updates?
Here it is worth clearly indicating where automatic updating is mandatory, and where it is not. Antivirus utilities, for example, need to be updated regularly. If the user decides to download new versions of firewalls on an irregular basis, then the system will be vulnerable to attacks by spyware, banner ads and viruses. Navigation utilities should also be allowed to automatically update: each new version of the same Google Maps or Here carries new maps and more detailed schemes of the old ones. In other programs like Google Chrome, CCleaner or Total Commander, automatic updates are not necessary: an updated design, one or two innovations, and the traditional “Minor bugs fixed” (Minor bugs fixed) are all that a consumer usually receives after downloading a fresh version of the utility.
It is better to update such programs once a month. In games, every update brings new maps and levels, so it's also best to let them download new versions on their own.
How to uninstall app update on android
If the update of the android application does not satisfy the user (an ill-conceived interface, lags, or the program does not start at all), then it can roll back to the previous version. You can return only those utilities that were originally installed by the manufacturer. Those multimedia files that the user uploaded himself cannot be rolled back. How to remove a system application update: go to the device menu, then to "Settings". There, click on the "Applications" / "Application Manager" tab (it is called differently in different devices). Find the program you want to roll back. Then click on the "Uninstall update" button. If it is not there, go to "Options", and only then - to the "Uninstall update" tab. After that, a menu will pop up that will ask you to confirm the rollback. It is worth noting that after that the utility returns to its original version (for example, if Google Chrome v 1.0 was installed “from the factory”, and then the user himself updated it to v 2.0 and v 3.0, then when you roll back from the third version, the program will return to v 1.0).
How to remove the update of non-system applications: the only way out is to find the installation file (with apk format) of the old version on the Internet.
How to disable app updates on android
 To turn off app updates, you first need to go to Google Play, then you need to click on the menu icon or swipe from left to right. We find the "Settings" tab, then go to "Auto-update applications". In the menu that appears, select "Never". Tip: You can also select "Only via Wi-Fi" to not use the tariff megabytes.
How to cancel app update on android
If the Android application is at the download stage, then you need to go to the Google Play menu. There you need to find the "Downloads" tab and select the downloaded file. You can cancel its download by long pressing on the file.
How to update Android apps manually
We go to Google Play, call the main menu, then go to the "My Apps" tab. A page will open where all installed games and programs, including factory ones, will be displayed. Utilities that have updates will be separated from those that do not. Each app's tab will have an "Update" button. Also in this submenu there is a button "Update all". With it, the files will be updated "in a chain". If the application requires access to identification data, media files or contacts, it will notify you of this. Press the "Accept" button. If the program does not need additional special permissions, then it will throw out a corresponding message - click "Accept". Updating media files, however, requires space in the smartphone's memory (namely, the smartphone, not the memory card). To free it, you should delete any files from the smartphone's memory (music, pictures, another application, the cache of various programs). Before updating the heavyweight utility, Google Play will offer to download it via Wi-Fi so as not to waste mobile traffic.

Disable update of one specific android application
We go to Google Play, in the search bar we drive in the name of the required application. In the list of games and programs that appears, click on it, then click on the three dots located in the upper right corner. The "Auto-update" item will fly out, you need to uncheck it.
Why apps don't work after android update?
 The fact is that applications on Google Play are not optimized for the new system. A prime example is the upgrade from Android 2.3 to 4.0. In this case, the best help is: 1) Re-installing applications; 2) Full reset with copying of all data. At first, it is better to simply reinstall the necessary games and programs. Don't worry about Google re-charging you for downloading paid apps: once you've purchased media files from Google Play, you can reinstall it countless times. By the way, when deleting most games and programs, only the executable files are erased: the cache (for example, progress in Angry Birds) remains. However, sometimes you have to completely reset the device parameters. In this case, before that, you need to make a backup of the data. Download and install the free version of the Titanium Backup utility on your PC. Then we connect the smartphone to the computer. After starting the utility, the user is asked about root rights, click on the "Allow" button. Go to the smartphone menu, then to "Processing". Click on "Backup". Titanium Backup will then present you with a list of applications from which you must choose which media files to back up. After selecting the desired applications, click on the "Start Batch Processing" button. After the operation, Titanium Backup will issue a list where games and programs will be ticked as confirmation of successfully made copies. The backup itself will be saved on the micro-sd card of your smartphone; for reliability, you can also save it on a PC.
If, after installing the update, the VKontakte client on Android started to work with errors, users have a logical desire to uninstall the updates. You can't just skip the latest version. To roll back an app, you'll have to uninstall it and then install the older version using the APK file.
Prevent automatic updates
Before you understand how to uninstall a VK app update on Android, you need to prevent programs from updating without your permission.
- Launch the Play Market, call the main menu and go to the settings.
- In the "Auto-update" section, select "Never". Check the box next to "Notifications - notify me when updates are available."
After disabling auto-updates, apps will not download updates until you allow them. You can install the latest update manually through the Play Market. Go to the "My Applications" section, and you will immediately understand for which programs the developers have released updates - next to them there will be an "Update" button.
Removing a new version
You have forbidden automatic downloading of new versions, but if the program has already been updated, how to cancel the upgrade? In VK, after updates, errors often appear, so it becomes necessary to remove updates. This can only be done through complete removal apps from your phone.
At system programs in the settings there is a button "Uninstall updates". If you go to the Google Services or Play Market options, you can easily roll them back to their original state. In the case of third party applications there is no such possibility. Therefore, you have to delete programs and then install them again, downloading older versions in the form of APK files. To remove VK from Android:
- Open the settings, go to the "Applications" section.
- Find the VKontakte client in the list. Open its properties.
- Click Uninstall and wait for the uninstall process to complete.

When deleting a client, user data will not be affected, since they are posted on the VK website, and the application is just one of the ways to use the account.
Finding and installing an old version
Only available on the Play Market latest version client, so there is no point in downloading the application from there. Old versions can be found on forums and specialized sites. Use only trusted sources - for example, 4pda.ru, where you can find almost any version of all popular applications and at the same time read how it works.
Speaking specifically about the VK client, old versions can be found on this page: https://trashbox.ru/link/vkontakte-android. You just need to select the appropriate assembly and download it to your computer. After downloading the installer, one question remains - how to install the program from the APK file on the phone? This will require separate instructions.

Instead of file manager You can use a browser to install from an APK file. Open it and enter in address bar command "content://com.android.htmlfileprovider/sdcard/FileName.apk". The "sdcard" fragment indicates that the installer file is stored in the root of the SD card. If you uploaded the APK to another directory, specify the path to it and be sure to write the file name correctly.
In contact with has been around for about 10 years and during this time has managed to gather millions of users in one place. Thanks to the convenient old VK interface, you can chat with your friends, send various photos or videos very quickly and most importantly for free. Once you install this application, you will not have to download anything in the future. In addition, it is possible to listen to music online, join interesting groups and even create your own community where you can gather thousands of like-minded people.
Constant new updates from the developers did not appeal to some users who are unhappy with unnecessary chips. Now there is a way to roll back to old version of the application VKontakte and make it the same. Listen to music for free, just like before. No one else will take that right away from you. Go to any previously inaccessible sections, conveniently view the profiles of other users and share your entries.

Take advantage of this unique opportunity download VK old version for android for free and install it on your phone or even tablet with any firmware. See what your friends have been up to lately, read their latest comments on posts, and follow their social life, don't forget to share new information about my. Send friend requests, listen to music, look for your old classmates thanks to a convenient search that was not removed in the penultimate version of the Vkontakte application. Attach any files to messages, even word and txt.
Despite the fact that developers strive for the ideal, a new update of a familiar application does not always bring pleasure to the user. It's more of a matter of habit though. However, many people want to leave the application as it was before the changes were made and are looking for information about .
It is worth noting that VKontakte in the fall of 2017 completely updated its mobile app. This is one of the most tangible changes that the program's interface has undergone recently, before that a similar upgrade was presented by the developers in April last year. Almost everything has changed, from new user features to common organization workspace. And even "likes" are now red.
Despite the fact that the optimization is pretty good and the application itself has become more convenient, many (as, indeed, last time) want to continue using the old, more familiar version.
All Android users are well aware of the service for downloading and installing new PlayMarket applications. Depending on the settings set in this application, the programs installed on the user's device will be updated in two available modes:
- Manual - when PlayMarket simply offers and recommends available updates, and the owner of the gadget independently decides which one to install and which one to ignore.
- Automatic - as soon as a new update appears in the Device Market, the installed program independently accepts it and updates itself. In this case, the user enters the application and sees the new design and interface (as happens with VKontakte).
In this connection, the first action that an adherent of the old software for VKontakte should do is to disable auto-updates of applications and switch it to manual mode.
To do this, go to the PlayMarket application menu, to do this, click on the "sandwich" in the upper left corner, in the menu that appears, go down and find the "Settings" section. In Group general settings we find the item "auto-update applications" and select the three proposed settings options "Never". 
At this point, the settings are complete. This was the first step in resolving the issue how to return the old version of VK to android.Now PlayMarket will not automatically update installed programs, and the user will be able to safely use the old-style program without fear of autocorrect. If you need to get a new version of the program, just go to the installed applications section yourself and check for updates, and also, if necessary, start the upgrade.
After external settings that affect the version update are installed, you can start working with the program on the device itself. if Market doesn't automatically update apps anymore? In this case, everything is quite simple, the process is divided into two steps, which involve uninstalling the updated program and installing the desired version.
Uninstalling the updated app
This step is extremely simple and straightforward, you just need to completely remove the existing one. If you are an inexperienced user and are worried that you will lose information or access to your account, then these are groundless fears. The old version will contain everything that is on your page now, it does not depend on the use of the software.
There are several ways to uninstall an installed application:

After the updated version, you can additionally clear the cache and delete unnecessary files on the phone. The procedure is not required, but it will not become superfluous.
Installing the correct version
After the smartphone's memory has been cleared of the remnants of the previous version of the program, it is time to take the final step in resolving the issue, how to return the old version of VK to Android.
The main question of this stage is where to get the distribution kit of the previous version of VK. Today on the Internet you can find a lot of offers to download and install any program, and not just VKontakte. Before turning to any source, you should first check its reliability. Installing software for mobile access to a personal VK page from a third-party resource can be fraught with unpleasant consequences, and VKontakte itself does not distribute previous versions of the application.
Before you download a package of files and install them on your phone, you should look for reviews about the source. Today, old versions of VK can be found on TrashBox or UpToDown.
Before downloading the distribution kit, you need to set the settings on the gadget. For added security, devices have default set parameters, which prohibit downloading and installing applications from third-party resources. To install an older version, you need to change these settings. Usually when trying to install desired program a pop-up window pops up. A warning about unauthorized actions and a suggestion to deny or allow the process. 
As you know, not all updates are equally useful, so some applications with updates work very badly, and sometimes even refuse to work at all. The thought arises - why not remove the updates?
Alas, the Android operating system does not allow you to delete updates downloaded for applications. However, there are exceptions. For example, some application is "sewn" into the firmware. In our case, this is the Google Chrome browser. Since the application is "sewn" into the firmware, it is impossible to remove it without root rights, but it can be updated using Google Play. After the update, the "Delete" button will appear.
No, by clicking on it, you cannot delete applications, but you can delete all updates by clicking on the OK button.
Of course, this only applies to some applications that cannot be uninstalled without root rights, including Google services.
There is another option. Go to the Applications section.
Select an app, then click Uninstall Updates.
Confirm the removal of updates.
Step by step guide to uninstall app updates on Android
- 1 Removing updates
- 2 Android update setup
When you turn on Wi-Fi on most Android devices, software and game updates begin to download. The process is useful, but sometimes updating on Android causes the application to start working incorrectly. In this case, users of Android devices begin to wonder how to remove updates and return programs to a working state.
Removing updates
You can only remove updates to built-in Android applications - Google Chrome, Play Market. If you are looking for how to uninstall a third-party program update on Android, then you are in for a disappointment. The only way that works is to uninstall the app itself and then find and install the older version.
You can search for older versions on sites like w3bsit3-dns.com - there you can find any popular Android program. Downloading installation files from other portals is more dangerous, but it is also possible, especially if the site has been verified by other users. To prevent the remote application from being immediately updated after installation, you need to configure the order in which Android updates are downloaded.
If you do not like how one of the standard Android applications (for example, the Play Market) works after the upgrade, then you can quickly roll back to its original state:
- Open settings, go to Apps.
- Find the program whose updates you want to remove from the list. Click on it to open a page with additional settings.
- Tap on the "Uninstall Updates" button.
Remote updates may download back when connected to Wi-Fi. To prevent this from happening, follow the best practices for setting up app updates on Android.
Android update setup
By default, programs start updating when Wi-Fi is turned on. Updates are not downloaded on mobile traffic, because it has a limit - a specific number of gigabytes per month. Most Android users are satisfied with this approach: turn on Wi-Fi, the application is updated, you don’t have to worry about the relevance of the programs. But if you want to have full control over how the latest update is loaded, you need to do some additional system configuration.
The first thing you can do is set a limit for background processes. It will help to fix the situation when the system freezes due to the simultaneous update of several applications.
- Open the settings, section "For developers".
- Scroll down the screen to the Background Process Limit option. Click on it to change.
- Set a value that suits you - for example, no more than 2 processes at the same time.
If you want to disable auto-update altogether, then the easiest way to do this is to use the Play Market settings:
- Launch Play Store. Call the control menu and go to the settings.
- Click on "Auto Update" and select "Never".
Some applications are updated without the help of the Play Market, so following the steps above will not be enough to completely disable auto-update. To fix this shortcoming:
- Open the phone settings, go to the "About device" section.
- Select "Software Update".
- Uncheck the box next to Auto Update.
After turning off auto-update, you will have to update programs manually:
- Open the Play Market, call the control menu.
- Go to "My apps & games".
- Open the Installed tab.
- Click "Update" next to the application for which you want to download and install the update.
Manual upgrade is not the most convenient way to keep programs up to date, but you will be in complete control of the situation.
How to turn off app updates on android
Today, Android games and programs are regularly updated by the manufacturer. The system often installs them on its own without notifying the user. The question arises: how does updating applications on android work? Content:
Why Apps Are Constantly Updated
Different applications are permanently updated for different reasons. So, with each update, antiviruses replenish the virus database, cleaner programs get new functionality, games get new maps and levels. The manufacturer is constantly trying to improve applications, so it is forced to release new versions. Updates are also released if the previous version turned out to be “buggy” (slows down or does not start at all) or the new version of Android does not support old applications that are not optimized for it.
Do I need automatic app updates?
Here it is worth clearly indicating where automatic updating is mandatory, and where it is not. Antivirus utilities, for example, need to be updated regularly. If the user decides to download new versions of firewalls on an irregular basis, then the system will be vulnerable to attacks by spyware, banner ads and viruses. Navigation utilities should also be allowed to automatically update: each new version of the same Google Maps or Here carries new maps and more detailed schemes of the old ones. In other programs like Google Chrome, CCleaner or Total Commander, automatic updates are not necessary: an updated design, one or two innovations, and the traditional “Minor bugs fixed” (Minor bugs fixed) are all that a consumer usually receives after downloading a fresh version of the utility.
It is better to update such programs once a month. In games, every update brings new maps and levels, so it's also best to let them download new versions on their own.
How to uninstall app update on android
If the update of the android application does not satisfy the user (an ill-conceived interface, lags, or the program does not start at all), then it can roll back to the previous version. You can return only those utilities that were originally installed by the manufacturer. Those multimedia files that the user uploaded himself cannot be rolled back. How to remove a system application update: go to the device menu, then to "Settings". There, click on the "Applications" / "Application Manager" tab (it is called differently in different devices). Find the program you want to roll back. Then click on the "Uninstall update" button. If it is not there, go to "Options", and only then - to the "Uninstall update" tab. After that, a menu will pop up that will ask you to confirm the rollback. It is worth noting that after that the utility returns to its original version (for example, if Google Chrome v 1.0 was installed “from the factory”, and then the user himself updated it to v 2.0 and v 3.0, then when you roll back from the third version, the program will return to v 1.0).
How to remove the update of non-system applications: the only way out is to find the installation file (with apk format) of the old version on the Internet.
How to disable app updates on android
To turn off app updates, you first need to go to Google Play, then you need to click on the menu icon or swipe from left to right. We find the "Settings" tab, then go to "Auto-update applications". In the menu that appears, select "Never". Tip: You can also select "Only via Wi-Fi" to not use the tariff megabytes.
How to cancel app update on android
If the Android application is at the download stage, then you need to go to the Google Play menu. There you need to find the "Downloads" tab and select the downloaded file. You can cancel its download by long pressing on the file.
How to update Android apps manually
We go to Google Play, call the main menu, then go to the "My Apps" tab. A page will open where all installed games and programs, including factory ones, will be displayed. Utilities that have updates will be separated from those that do not. Each app's tab will have an "Update" button. Also in this submenu there is a button "Update all". With it, the files will be updated "in a chain". If the application requires access to identification data, media files or contacts, it will notify you of this. Press the "Accept" button. If the program does not need additional special permissions, then it will throw out a corresponding message - click "Accept". Updating media files, however, requires space in the smartphone's memory (namely, the smartphone, not the memory card). To free it, you should delete any files from the smartphone's memory (music, pictures, another application, the cache of various programs). Before updating the heavyweight utility, Google Play will offer to download it via Wi-Fi so as not to waste mobile traffic.
Disable update of one specific android application
We go to Google Play, in the search bar we drive in the name of the required application. In the list of games and programs that appears, click on it, then click on the three dots located in the upper right corner. The "Auto-update" item will fly out, you need to uncheck it.
Why apps don't work after android update?
The fact is that applications on Google Play are not optimized for the new system. A prime example is the upgrade from Android 2.3 to 4.0. In this case, the best help is: 1) Re-installing applications; 2) Full reset with copying of all data. At first, it is better to simply reinstall the necessary games and programs. Don't worry about Google re-charging you for downloading paid apps: once you've purchased media files from Google Play, you can reinstall it countless times. By the way, when deleting most games and programs, only the executable files are erased: the cache (for example, progress in Angry Birds) remains. However, sometimes you have to completely reset the device parameters. In this case, before that, you need to make a backup of the data. Download and install the free version of the Titanium Backup utility on your PC. Then we connect the smartphone to the computer. After starting the utility, the user is asked about root rights, click on the "Allow" button. Go to the smartphone menu, then to "Processing". Click on "Backup". Titanium Backup will then present you with a list of applications from which you must choose which media files to back up. After selecting the desired applications, click on the "Start Batch Processing" button. After the operation, Titanium Backup will issue a list where games and programs will be ticked as confirmation of successfully made copies. The backup itself will be saved on the micro-sd card of your smartphone; for reliability, you can also save it on a PC.
The majority of users have already noticed how the design of the popular social network Vkontakte has changed. This "nightmare" happened on August 17, 2016 early in the morning and now all VK users are shown a new updated design. Now no one can return the old version of the resource back, since the developers do not officially provide for this.
At the moment, the Internet is full of discussions about the global redesign of the Russian social network, many users are unhappy with the new changes. However, the developers left the following message to supporters of the old version of the site: “We got rid of unnecessary details and made the resource easier for your perception.”
Fundamental changes have affected the font, icons, navigation bar, avatar design. According to the leading developer Dorokhov V., work on the new design of the social network was carried out for a year and a half. Since April 2016, the developers have started testing a new type of site, and any user could take part in this. For all the time, more than 2500 minor and major corrections have been made to the resource code, listening to the wishes of users. The main task is to improve the stability of the site, as well as switch from the outdated Flash technology to the new one - HTML5.
Once again, the official way bring back the old Vkontakte design alas, no, despite the dissatisfaction of many users of the social network. However, there is still only one way to remedy the situation. Below we will look at how you can return the old version of Vkontakte to a PC in a few clicks.
How to return the old Vkontakte design in a couple of clicks
So, in order for the design of the vk.com website to return to its previous form, we will use a special extension for the Google Chrome browser with you. This extension is called “Return the old VK design”. While revenge is one of a kind, but I believe that over time there will be a considerable number of analogues. To date, there is one caveat: the version of this extension is still damp, so you can see some bugs when surfing the social network, but the developer often releases an update to this extension, eliminating the errors found by users. To change the design of the site, go to the Google store and install the extension.
Click on the "Install" button, a window will appear, where we click "Install Extension".

After the extension is installed, click once with the mouse on the icon:

and update the VK page. Below you can see what the page looked like in the new design:
and here is how it looks after installing the extension that changes the new version of the site to the old one:
Time will pass, and there will be a sufficient number of such extensions. You can find out which one is the best by rating in the Google store. However, I believe that many users will simply get used to the new Vkontakte design and the need for the old version will disappear automatically.
As you can see, friends change the new version of VK to the old one very simple: just a few simple steps. If you liked the instruction, share it with your friends using the social buttons below.
If, after installing the update, the VKontakte client on Android started to work with errors, users have a logical desire to uninstall the updates. You can't just skip the latest version. To roll back an app, you'll have to uninstall it and then install the older version using the APK file.
Prevent automatic updates
Before you understand how to uninstall a VK app update on Android, you need to prevent programs from updating without your permission.
- Launch the Play Market, call the main menu and go to the settings.
- In the "Auto-update" section, select "Never". Check the box next to "Notifications - notify me when updates are available."
After disabling auto-updates, apps will not download updates until you allow them. You can install the latest update manually through the Play Market. Go to the "My Applications" section, and you will immediately understand for which programs the developers have released updates - next to them there will be an "Update" button.
Removing a new version
You have forbidden automatic downloading of new versions, but if the program has already been updated, how to cancel the upgrade? In VK, after updates, errors often appear, so it becomes necessary to remove updates. This can only be done by completely removing the application from the phone.
System programs in the settings have a "Delete updates" button. If you go to the Google Services or Play Market options, you can easily roll them back to their original state. In the case of third-party applications, this is not possible. Therefore, you have to delete programs and then install them again, downloading older versions in the form of APK files. To remove VK from Android:
- Open the settings, go to the "Applications" section.
- Find the VKontakte client in the list. Open its properties.
- Click Uninstall and wait for the uninstall process to complete.

When deleting a client, user data will not be affected, since they are posted on the VK website, and the application is just one of the ways to use the account.
Finding and installing an old version
The Play Market hosts only the latest version of the client, so there is no point in downloading the application from there. Old versions can be found on forums and specialized sites. Use only trusted sources - for example, 4pda.ru, where you can find almost any version of all popular applications and at the same time read how it works.
Speaking specifically about the VK client, old versions can be found on this page: https://trashbox.ru/link/vkontakte-android. You just need to select the appropriate assembly and download it to your computer. After downloading the installer, one question remains - how to install the program from the APK file on the phone? This will require separate instructions.
Instead of a file manager, you can use a browser to install from an APK file. Open it and type "content://com.android.htmlfileprovider/sdcard/FileName.apk" in the address bar. The "sdcard" fragment indicates that the installer file is stored in the root of the SD card. If you uploaded the APK to another directory, specify the path to it and be sure to write the file name correctly.