Denwer - your local web server: installing and configuring Denwer. Opening access to the Denwer server from the local network Setting up Denver for the local network
Good day dear readers. This topic has been chewed up and down and is probably on everyone, somewhere there are inaccuracies and incompleteness of information, and there are not enough photos and step-by-step screenshots, after reviewing all the sites I made a complete review, detailed guide for installation and configuration useful tool for a webmaster - Denver(it reads "Denver" - a gentleman's set of a web developer).
Theory. What is Denver and how does it work?
Denver is a software shell ( web server emulator on the systemUnix ) including a set of distributions and modules ( Apache+SSL, PHP5, MySQL5, phpMyAdmin, etc.) to debug sites on ( local, https://localhost) computer or laptop without the need to access the Internet.
Support OS (Operating Systems): Windows XP/Vista/7/8.
Features
A key feature of Denver is support for working with several web projects at once, each of which is located on a separate virtual host (in the form of a separate folder). Virtual hosts for projects are created automatically: for example, you just need to copy the project files to /home/WebProjectName.ru/www, and it will immediately become available at https://WebProjectName.ru, then we will consider this in more detail.
All Denver components are already configured and ready to work (in particular, the Russian-language encoding of MySQL, SSL, etc. is correctly configured). In addition, you can update any of Denver's services (Apache, PHP, MySQL, etc.) manually by simply copying new versions of distributions over old ones.
Denver Basic Package Includes:
- Apache 2 with SSL support and mod_rewrite.
- PHP5: executable files, module for the Apache web server, distributable and adapted configuration file, GD library, MySQL and sqLite support modules.
- MySQL5 with support for InnoDB, transactions and Russian encodings (windows-1251).
- phpMyAdmin - database control panel MySQL data, as well as a script that makes it easy to add a new MySQL user.
- Debug sendmail emulator (/usr/sbin/sendmail) that does not send messages, but writes them to the /tmp/!sendmail directory.
- System automatic search virtual hosts and system updates hosts file, as well as the Apache configuration. Thanks to her, adding a new virtual host (or third-level domain) is simple creation directory in /home (see by analogy with existing hosts) and restarting the complex. All changes are made to the configuration and system files automatically, but you can control this process using the host template mechanism (see /usr/local/apache/conf/httpd.conf for details).
On the official website of Denver, add-ons ("expansion packs") are available that expand the capabilities of the basic kit:
- PHP version 3 as a CGI program;
- PHP version 4 as a CGI program;
- additional modules for Apache;
- additional modules for PHP;
- full version of ActivePerl;
- ActivePython interpreter.
- MySQL server version 4;
- Parser technology support modules;
- DBMS PostgreSQL;
- DBMS FireBird versions 2 and 1.3
- other popular modules.
I think enough theory, let's move on to practice ...
Installation Denver (Denwer)
At the time of writing this tutorial, I am using the following version of Denver:
Version: Denver-3 from 2012-09-16
You can always download latest version Denver from the official site, which is listed above.
How to install Denver? detailed instructions
So, you have downloaded the Denver installation file. We open the file, a small window will appear "Are you sure you want to install the base package?" press Yes.
Then a browser window will open, which you can immediately close, you will see the following picture ..
As you can see, the entire installation will take place in the cmd shell, the first welcome window, to continue, press the button Enter.
The program will check for the necessary drivers and system components, then ask us to indicate in which directory to install Denver.
If you do not specify anything, then by default the program will be installed in the C:\WebServers directory, I specified C:\Server as follows, you can specify your name or leave it by default, then click the button Enter. There will be a question..
Press " y" yes
Next, we will check the necessary utilities to create virtual disk, in windows this utility is called subs. You will need to specify the name of the virtual disk, by default the system offers disk Z, my disk Z is busy, so I chose disk X, you can also specify any free disk or leave the default drive Z if it is not busy. Click Enter.
After copying is completed, you need to specify in which mode Denver will start, select the item, press [ Enter]
All! Denwer installation completed. A browser window will open about the end of the installation, read and close.
Shortcuts should appear on the desktop..
| Label | Team | Action |
|---|---|---|
| StartDenwer | C:\[your_dir]/denwer\ r un.exe) | start server denver |
| Restart Denwer | C:\[your_dir]/denwer\ restart .exe) | restart denver server |
| Stop Denwer | C:\[your_dir]/denwer\ stop .exe) | Server stop |
| C:\[ your _ directory ]/denwer\ SwitchOff.exe |
Starting and configuring Denwer
To start enjoy Denver, do the following:
- Launch Denver using the shortcut Start Denwer on the desktop.
If you did not create shortcuts, then you can start Denver by command C:\[your_directory]/denwer\Run.exe , for this we press the key combination [ Win]+[R] and in the window that appears, enter the command.
- Open a browser and go to https://localhost
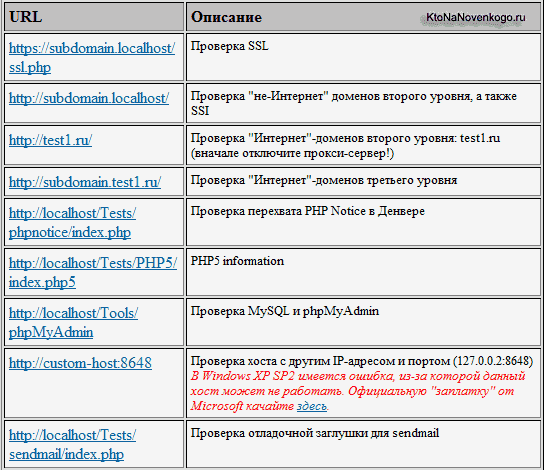
- You must see home page Denver. A little lower on this page there is a table with links, I immediately advise you to check the performance of all links.
- If after the launch of Denver https://localhost does not open, check if Denver is being blocked by your antivirus or firewall. For example, problems were noticed with NOD32 in Windows XP (in it, you need to add the X: /usr/local/apache/bin/httpd.exe process to the exclusion list, this can be done in the IMON / Settings / Miscellaneous / Exclusion window).
Attention! If you are using Skype, make sure it doesn't occupy ports 80 And 443 required to run Apache in Denver (" Tools - Settings - Advanced - Connection - Use ports 80 and 443 as incoming alternate» should be disabled).
Attention! Common mistake: If only localhost is running and other hosts are does not work please check if your proxy server is disabled ( Tools - Internet Options - Connection - Network settings).
Now you know how to use Denver as a testing and debugging platform for your sites. I want to tell you some more useful information..
Denwer directory structure
HTML documents must be in the /home/ directories<имя_хоста>/www. There are 3 virtual hosts configured by default:
— https://localhost (contains testing scripts and various utilities);
— https://test1.ru;
- https://custom-host:8648 (a host that has its own IP address and port);
Virtual hosts with domain names of the third and higher levels are also supported. Examples of how Apache looks for hosts document directories in this case:
Domain name Document directory
~~~~~~~~~~~~ ~~~~~~~~~~~~~~~~~~~~~
abcd.test1.ru /home/test1.ru/abcd
ab.cd.test1.ru /home/test1.ru/ab.cd
test.localhost /home/localhost/test
ab.cd.localhost /home/localhost/ab.cd
The /usr/local directory contains software components - Apache, PHP, MySQL executable and configuration files. The authors have tried to keep this arrangement close to that adopted in the UNIX environment. But there are serious differences - not all components of the package are distributed in the appropriate directories. In any case, a complete analogy with the UNIX OS cannot be achieved, but this placement of executable and configuration files makes it somewhat easier to navigate the server components.
Utilities in the "Gentleman's set"
- DNSearch: search files — the search is carried out in files with extensions htm, html, shtml, xhtml by directly viewing the contents of documents.
- List of registered sites – the utility generates a page with web projects (sites) created in the system.
- Setting up new MySQL databases and users - a very convenient and simple utility for creating databases (DB), unlike phpMyAdmin.
- phpMyAdmin - administration DBMS MySQL
How to uninstall Denver?
Denver is autonomous: it can be located in any directory on the disk (or even on a flash drive). It also does not change system files windows, so Denwer can be uninstalled by easy removal your folder.
What needs to be done to remove Denver?
- Stopping the Denwer Server(on the desktop, run the Stop Denwer shortcut or command in cmd:
C:\[your_dir]/denwer\ stop .exe) - Stopping and Disabling a Virtual Disk(command in cmd: C:\[ your _ directory ]/denwer\ SwitchOff.exe
- Delete the directory where Denwer is installed
- Remove desktop shortcuts
On this I want to end this lesson, I hope it was useful for you. If you have any questions, write in the comments or email me.
Sincerely, Sergey Chirkov.
This is another article from the Webmaster Tools section, in which I want to talk called Denwer, which can be freely downloaded from the developer's resource. First, let me tell you what is local server and why should we work with him. Simply put, you can install and configure it on your computer, receiving a free analogue of hosting (read about what hosting and domains are).
For you, in this case, you do not have to buy hosting and do not even have to have access to the Internet. The capabilities that Denver gives you are practically no different from those of a remote host, and it will consist of the same components and have the same capabilities. It already contains read more about this script), the Apache server (read), has PHP support and much more.
Where to download Denwer, how to install and run it?
You can download separately all the components of the local server described above and, having installed them on your computer, configure them correctly, but not everyone is able to do this. And even those who understand what's what can experience a lot of difficulties during installation and especially when configuring it.
Therefore, in order to simplify life for us, various installation packages (assemblies) were invented and created, allowing you to download a fully working and configured complex with minimal effort.
You just have to download the appropriate assembly and install your project engine (Joomla, WordPress, etc.) on it, and then start working on it, just like you would if you found the engine files on a physical host. By the way, as an option and alternative this decision, can be considered , i.e. able to work with Joomla and WordPress. But in this article we will speak specifically for localhost.
So, what do the developers of such free installation packages offer us? Let me list links to resource pages where you can download them, and then I will tell you in detail about installing and configuring one of them, which I chose as a favorite.
This is my personal choice, and you can use the package that suits you best. Fortunately, working with them is quite the same type and, having understood how to work with one assembly (today we will talk exclusively about Denwer), you can easily figure it out with any other.
Where you can download local server builds for free:
- Denver - free download
- VertrigoServ -
By clicking on the link, you will have to register in the proposed form, after which you will receive an email with a link to download the Denwer distribution.
Run the downloaded file with the exe extension, agree to install the package, after which it starts unpacking, and then a browser window will also open with a description of the installation, which you can immediately close, and a black DOS window with the installation wizard will also appear:
Following the instructions of the wizard to continue the installation, press "Enter". In the next window, we need to specify in which folder on our computer we will install the server. You can select, for example, C:\server .

Press "Enter", when asked if you really want to install Denver in this directory, you answer by setting "y" (y) and press "Enter" again. Next, we are informed that a separate virtual disk will now be created, which is necessary for the functioning of all components of the local server.
Just press "Enter", and in the next window select the letter for the virtual drive. This letter, of course, should not be used by your system at the moment (i.e., the disk, the Latin letter “c”, definitely does not need to be selected).
It is better to choose something from the last letters of the Latin alphabet, for example, Z. If it turns out that this letter is already used to designate a disk in your Windows operating system, then you will see a message that it is impossible to create such a disk.
In this case, you will need to press "Enter" and repeat the step with entering the name of the installation directory, press "Enter" again and enter another letter. You can see which letters to designate drives on your computer are already taken in "My Computer".
If the letter you selected is not occupied, you will see a message about the successful creation of the virtual disk.

Press "Enter", as a result of which the files of this assembly will be copied to the folder you specified earlier on the computer. Next, you will be prompted to select a download option, to which you respond by entering a unit and pressing "Enter". You will also be asked whether to create shortcuts to start, stop or restart on the desktop, to which you will answer "y".
With these shortcuts you will be able to start or stop the server. The installation wizard will then close, and a browser window will open with a page describing the next steps for working with the Denwer assembly.
Checking the health of the local server
Next, you go to the desktop and launch Denver by clicking on the "Start" shortcut. At the same time, a DOS window will open for a short time, indicating that the server is running, and then icons in the form of a feather and a black hat will appear in the tray (the area on the right side of the Windows taskbar, next to the clock), indicating that it is running.
Now dial in address bar your browser's localhost , which will take you to a page that says "Hurrah, it worked". This means that the assembly successfully installed on your Windows computer. Scrolling down this page, you will see links to check its performance:
You follow this link, then in the window that opens, enter some text in the "Text" field (better in Russian - check that everything will be in order with the encoding) and click on the "Send via mail" button. If everything worked correctly, then you will receive a message like: OK, the mail () function worked correctly. But you also need to check that the letter really reached.
To do this, you need to go to our virtual disk (remember the letter that you specified when installing this assembly) and follow the following path:
Z:\tmp\!sendmail\
By the way, you can go not to a virtual disk, but to a real one, where you have a local server installed (in my case, this is drive C) along the same path:
C:\tmp\!sendmail\
If everything is in order with sending mail, then in this folder you will have to find the letter you sent. By opening it, you can check if the Russian language encoding is correct.
Setting up and installing Joomla or WordPress on Denver
First you will need to go to the folder where you installed the assembly (for me it is c:\server\) and go to the following path:
c:\server\home\localhost\www\
In this WWW directory, you must create a directory where you will later need to upload the engine files (Joomla, WordPress, etc.). The name of the folder is up to you, for example:
After creating the folder, restart the localhost using the "Restart Denwer" shortcut on the desktop (if it is not already running, then start it). To check if it works, type in the address bar of your browser:
http://localhost/Proba/
If a page opens with the title "http://localhost/Proba/", then everything is in order. If no window opens, then try restarting Denwer again.
Now you need to install the engine (Joomla, WordPress, etc.) in exactly the same way as you did it for real hosting (Joomla installation is described (in details and pictures). I wrote how to install the SMF forum, but it is covered in some detail at the given link.
Those. you need to copy the engine files to the folder created on your computer (it acts as a local host). In my case this is the folder:
C:\server\home\localhost\www\Proba\
This process will differ from installing the engine on a real host () only in that for copying files no need to use FTP manager- an ordinary conductor will also fit perfectly, well, or, like the one described by the link Total Commander.
After you copy the Joomla or WordPress files to the Denver folder, you need to type in the address bar of your browser to install the site or blog:
http://localhost/Proba/
As a result, the window of the installation wizard of one or another engine will open. Then you follow the same scenario as during a normal installation on real hosting, with the only exception that you, as described in the article about installing Joomla (see the link above), but in the way described below.
Creating a database and user using Denwer
In order to get to the phpMyAdmin program included in the local server build kit, you need to type the following URL in the address bar of your browser:
http://localhost/tools/
In the window that opens, click on the link called "phpmyadmin", which will open the main page of this program. On it, in the "Create a new database" area, you enter the desired database name (for simplicity, it can be named the same as the directory for the site in the localhost folder, i.e. "Proba", in my case) and click the "Create" button ".
Now we return to the main page of phpMyAdmin by clicking on the house icon in the left column of the program window. Find the "Privileges" link in the "MySQL" area and click on it.

On the phpMyAdmin page that opens, in the center, you should find the item "Add a new user" and click on it.

In the “Username” area, enter the desired name (for simplicity, I use “Proba” again), in the “Host” area, enter localhost, in the “Password” and “Confirmation” areas, enter some very complex password twice.
In the "Global Privileges" area, click on the "Check All" inscription so that the database user being created has maximum rights.

Everything, the database and the user on Denver are created. Now you can use this information for installing Joomla, WordPress, etc., which will follow the same sequence as when installed on a real hosting. Upon completion of this process, your resource will be available at:
http://localhost/Proba/
You can work with Joomla or WordPress in the usual way, but this greatly simplifies and speeds up the work of editing engine files, installing and uninstalling various extensions, and it also becomes possible to work on your project even there, where there is no internet access.
Website transfer to hosting
After completing the project, you must transfer site from Denwer to hosting in order to make it available to visitors from the Internet. This is done in exactly the same way as if you simply moved from one hosting to another or restored your site from backup(I wrote about creating and restoring from a backup).
To do this, you will need to use the FileZilla program (which I wrote about) to move all the files from the local server folder (in my case, the Proba folder) to the root directory of the remote host (usually either PUBLIC_HTML or HTDOCS).
And then open the configuration file of your engine for editing and change the parameters of the absolute path to the files and folders of this engine, as well as the database name, user and password, to those that you set when creating a new database on the hosting. All this is described in detail in the article about backup and transfer of the site, the link to which you will find by climbing a couple of paragraphs higher).
How to remove Denver from a computer
Quite often the question arises how to remove this assembly from your computer. The main catch of the removal is to disable the virtual disk created during installation. But first things first. First you will need, of course, to stop the local server using the appropriate shortcut on the desktop.
Then remove virtual disk, which was created during installation. Remember what letter you assigned to this virtual disk and go to Windows along the following path "Start" - "Run" (you can press the key combination Win + R instead), enter the command in the window that opens:
Subst z: /d
Instead of the virtual drive letter Z, you will need to enter your choice (Drive Z suggests cz as the default virtual drive letter). Well, to permanently remove the Denwer assembly from your computer, it will be enough to delete the WebServers directory (by default, this is the C: \ WebServers folder) and remove three shortcuts from the desktop of your operating system Windows systems. Everything, we can assume that we managed to remove it with little bloodshed.
Good luck to you! See you soon on the blog pages site
You may be interested
Is it possible to configure the system so that sites located on local computer, were available to all users local network to which I am connected, or even from the Internet? ..
Projects started in Denver by default not available from the local network. This is achieved because all virtual hosts have an IP address of 127.0.0.1 , which always stands for "current local machine".
However, it is still possible to assign an "external" IP address to a particular virtual host, accessible from your local network or even the Internet (if the computer has permanent IP address in the Internet).
Remember: Denver is a developer tool, not a hosting tool. While projects in Denver can be made public, we strongly advise against doing so. The point here is security: Denver, as a rule, starts with Administrator rights, which means that scripts running under its control can do whatever they want on the machine. The slightest "hole" in the security of the script will give a hacker access to your machine.
Determining your IP address
First you need to find out what IP address is assigned to you on the local network or the Internet. The easiest way to do this is to open command line Windows and typing there:ipconfig
You will see something like the following:
Configuring IP for Windows
WIFI- ethernet adapter:
The DNS suffix for this connection. . :
IP address. . . . . . . . . . . . : 192.168.0.49
Subnet mask. . . . . . . . . . : 255.255.255.0
Main gate. . . . . . . . . . : 192.168.0.1
In this case external IP address machines on the local network - 192.168.0.49 . Several network interfaces can be listed in the list at once (if your computer is equipped with several network cards or wireless devices). In this case, you need to determine which of the interfaces is external, accessible from the local network. (IP addresses starting with 192.168 or 10 are reserved for LAN access only, not the Internet. That is, they are "private".)
Make sure your IP address is static, i.e. does not change the next time the machine is turned on or rebooted. If the IP address is issued dynamically, then there is no easy way, allowing you to connect Denver to it.
Configuring a firewall (firewall, firewall) Windows
On most Windows systems, built-in (or manually installed by you) firewall or antivirus blocks connections from external machines to the current one. This is done for security reasons. Of course, if you open the site to the outside, this blocking should be disabled, otherwise no one will see the site.Our goal is to resolve Windows connections to port 80 (HTTP protocol) of your IP address 192.168.0.49 where Apache will hang. Here are instructions on how to do this in Windows XP:
- open Start - Control Panel, select Windows Firewall.
- Go to the tab Exceptions.
Click the button Add port, in field Name enter your IP address, and in the field Port number enter 80.
If you have installed your own firewall or antivirus, then of course you will have to refer to their documentation.
An easy way to open a site to the outside
Let's say your IP address is 192.168.0.49 as in the example above. The easiest way to get Denver to open a specific site at http://192.168.0.49 is to place the site's documents in a directory:/home/192.168.0.49/www
Yes, the directory name contains dots! Don't forget to restart Denver as well.
Moreover: if your ISP gave you not only an IP address, but also an associated Domain name, then the site will be immediately available at this domain name. In the case of a static IP address, the domain is almost always issued, you just need to get it from the provider. For example, if your domain name is equal to abcd.ints.ru (provider Corvette-Telecom NEXT), then the site will be available at http://abcd.ints.ru.
Another way to assign an IP address to a site
If you already have a virtual host in Denver and don't want to rename its documents directory, you can assign your own IP address to the site and make it accessible from the outside. Let's assume that your host is stored in the /home/mysupersite/www directory. To assign it the IP address 192.168.0.49 , you need to create a /home/mysupersite/.htaccess file and add the following lines to it:
## File /home/mysupersite/.htaccess
## Put your external IP address here, not 192.168.0.49!
# dnwr_ip 192.168.0.49
By the way, you can find out what other directives exist by looking in the /home/custom/.htaccess file.
Restart Denver. Check that http://192.168.0.49 (instead of 192.168.0.49 , of course, you need to substitute your own IP address) opens your site /home/mysupersite/www .
Security Warning
Recall again that Denver is not a complete and reliable Web server, it is just tool, which allows you to debug (test) sites without leaving your home. Any attempt to use it for other purposes may not be safe.In general, you can configure anything you like, another thing is - need to whether it. Be aware that a Web server exposed to the outside world represents a potential security vulnerability for your machine. For example, an attacker can penetrate through a script that is not fully debugged. Because Denver is run with Administrator rights (that is, with maximum rights in the system), then any script, even the smallest one, can do whatever it pleases. Let's say you've written a seemingly innocuous test.pl script that does the following:
#!/usr/bin/perl -w
use CGI::WebIn;
use CGI::WebOut;
Header("Content-type: text/plain");
open(F, $IN) or die "Could not open\n";
while(
The program seemingly just prints the contents of the file specified by the fname parameter. For example, http://localhost/cgi/test.pl?fname=test.pl will print the program's source code. However, it is easy to see that calling open in this form is unsafe. For example, visiting the address /cgi/test.pl?fname=|del+/s/q+c:\windows , the program will execute:
Open(F, "|del /s/q c:\\windows") or ...
This will immediately destroy the entire Windows directory!
You might say that localhost is what localhost is for, to work only from the current machine. If you opened access to the outside according to the instructions above, then everything is exactly like that. However, in the event of an incorrect Apache settings it is possible to infiltrate localhost from the outside (if the server is open). This is done very simply:
C:/> telnet server.ru 80
GET /cgi/test.pl?fname=|del+/s/q+c:\windows HTTP/1.1
Host: localhost
here you just need to press Enter
Conclusion: if you don't have much experience in server administration, installing an externally accessible Web server can be dangerous. This is especially true for happy owners of leased Internet channels. One wrong move and you'll wake up one morning with a freshly formatted hard drive(best case scenario).
Projects started in Denver are not accessible from the local network by default. This is achieved because all virtual hosts have an IP address of 127.0.0.1, which always stands for "current local machine".
However, it is still possible to assign a virtual host an "external" IP address accessible from your local network or even the Internet (if the computer has a permanent IP address on the Internet).
Remember: Denver is a developer tool, not a hosting tool. While projects in Denver can be made public, we strongly advise against doing so. The point here is security: Denver, as a rule, starts with Administrator rights, which means that scripts running under its control can do whatever they want on the machine. The slightest "hole" in the security of the script will give a hacker access to your machine.
The authors of Denver are not responsible for any damage caused by hackers to those who opened Denver to the outside and inadvertently allowed a security vulnerability in their scripts.
Determining your IP address
First you need to find out what IP address is assigned to you on the local network or the Internet. The easiest way to do this is to open Command Windows string and typing there:
ipconfig
You will see something like the following:
Configuring IP for Windows
WiFi to Ethernet adapter:
The DNS suffix for this connection. . :
IP address. . . . . . . . . . . . : 192.168.0.49
Subnet mask. . . . . . . . . . : 255.255.255.0
Main gate. . . . . . . . . . : 192.168.0.1
In this case, the external IP address of the machine on the local network is 192.168.0.49. Several network interfaces can be listed in the list at once (if your computer is equipped with several network cards or wireless devices). In this case, you need to determine which of the interfaces is external, accessible from the local network. (IP addresses starting with 192.168 or 10 are reserved for access from the local network only, not from the Internet. That is, they are "private".)
Make sure your IP address is static, i.e. does not change the next time the machine is turned on or rebooted. If the IP address is dynamically assigned, then there is no easy way to connect Denver to it.
Configuring a firewall (firewall, firewall) Windows
In most Windows systems, a built-in (or manually installed by you) firewall or antivirus blocks connections from external machines to the current one. This is done for security reasons. Of course, if you open the site to the outside, this blocking should be disabled, otherwise no one will see the site.
Our goal is to allow Windows connections to port 80 (HTTP protocol) of your IP address 192.168.0.49, where Apache will hang. Here are instructions on how to do this in Windows XP:
Open Start - Control Panel, select Windows Firewall.
Click the Exceptions tab.
Click the Add Port button, in the Name field enter your IP address, and in the Port Number field enter 80.
If you have installed your own firewall or antivirus, then of course you will have to refer to their documentation.
An easy way to open a site to the outside
Let's say your IP address is 192.168.0.49 as in the example above. The easiest way to force Denver to open a specific site at address is to place the site's documents in a directory:
/home/192.168.0.49/www
Yes, the directory name contains dots! Don't forget to restart Denver as well.
Moreover, if your ISP gave you not only an IP address, but also a domain name associated with it, then the site will be immediately accessible by this domain name. In the case of a static IP address, the domain is almost always issued, you just need to get it from the provider. For example, if your domain name is abcd.ints.ru (provider Corvette-Telecom NEXT), then the site will be available at .
Another way to assign an IP address to a site
If you already have a virtual host in Denver and don't want to rename its document directory, you can assign your own IP address to the site and make it accessible from the outside. Let's assume that your host is stored in the /home/mysupersite/www directory. To assign it the IP address 192.168.0.49, you need to create a file /home/mysupersite/.htaccess and add the following lines to it:
## File /home/mysupersite/.htaccess
## Put your external IP address here, not 192.168.0.49!
# dnwr_ip 192.168.0.49
By the way, you can find out what other directives exist by looking at the /home/custom/.htaccess file.
Restart Denver. Check that the address (instead of 192.168.0.49, of course, you need to substitute your own IP address) opens your site /home/mysupersite/www.
Security Warning
Recall once again that Denver is not a complete and reliable Web server, it is just a tool that allows you to debug (test) sites "without leaving your home." Any attempt to use it for other purposes may not be safe.
In general, you can configure anything you want, another thing is whether it is necessary. Be aware that a Web server exposed to the outside world represents a potential security vulnerability for your machine. For example, an attacker can penetrate through a script that is not fully debugged. Because Denver is run with Administrator rights (that is, with maximum rights in the system), then any script, even the smallest one, can do whatever it pleases. Let's say you've written a seemingly innocuous test.pl script that does the following:
#!/usr/bin/perl -w
use CGI::WebIn;
use CGI::WebOut;
Header("Content-type: text/plain");
open(F, $IN) or die "Could not open\n";
while(
The program, it would seem, simply prints the contents of the file specified in the fname parameter. For example, print the source code of the program. However, it is easy to see that calling open in this form is unsafe. For example, visiting the address /cgi/test.pl?fname=|del+/s/q+c:\windows, the program will execute:
open(F, "|del /s/q c:\\windows") or ...
This will immediately destroy the entire Windows directory!
You might say that localhost is what localhost is for, to work only from the current machine. If you opened access to the outside according to the instructions above, then everything is exactly like that. However, if Apache is configured incorrectly, it is possible to infiltrate localhost from the outside (if the server is open). This is done very simply:
C:/> telnet server.ru 80
GET /cgi/test.pl?fname=|del+/s/q+c:\windows HTTP/1.1
Host: localhost
here you just need to press Enter
Conclusion: Unless you have significant server administration experience, installing an externally accessible Web server can be dangerous. This is especially true for happy owners of leased Internet channels. One wrong move and you'll wake up one morning with a freshly formatted hard drive (at best).
This is, of course, a cruel copy-paste, but even so, let a person read it). Material taken from Denwer.ru
It is a software shell that includes the appropriate distributions and modules that allow you to develop, test and debug websites directly on your local computer, without the need to access the Internet.
Denver is traditionally considered one of the most relevant and effective tools for web developers. Powerful tools settings and debugging, possibility comfortable development and testing sites on a local server create ideal conditions for working without risks for your site on the Internet.
Working with Denver - features of the server itself
Before setting up Denver, you need to take into account a few nuances of the server itself. First of all, key feature Denver is getting support for working with several web projects at the same time, with the location of each of them separately on its own virtual host. To do this, a separate folder is created by the server for each project. These hosts are created automatically.
As practice shows, setting up Denwer is not particularly difficult, but it is still important to take into account a number of key parameters for efficient and stable operation. First of all, how to work with Denver, what should be considered for setting up?
All components of this software solution are already provided fully configured, ready to go. Including SSL, MySQL encoding and others software. If desired, the user can independently manually update any of the services included in Denver. To this end, new versions of distributions are simply copied in a folder on top of new ones.
After our installation is completed, a browser window will reappear informing you that the installation has been completed. It can safely be closed. To launch the program, we find the Start Denwer shortcut on the desktop - double-clicking on it will launch our server.

Of course, some time the program needs to run. And after loading the application, two icons will be visible on the panel - if they are available, the launch went fine. When we open "My Computer", we will see the virtual disk Z appear on the computer.

By going to it, we can notice several folders. In this case, we are interested in just the Home folder.

And here we will already notice the presence of several folders - Localhost and test1.ru, which will be the root for two local sites. The first contains a set of utilities for working with the database, the second folder contains a test site with one web page.

Let's focus on working with the database. Here, to work with Denver, launch any browser by typing localhost or http://localhost. After that, we will see a message about the operation of the server.
Then, to configure Denver, we scroll this page down to the "Utilities" heading - we will see a lot of links. Select the line "phpMyAdmin - MySQL DBMS administration", after which we will see a new window.

In Latin, enter the name of your database in the Create new database field, all that remains is to click Create and a new window should appear.

There is no need to do anything here, just click the Privileges tab to move on.
When you click Add a new User, we will see a new window in which you need to specify a number of information:

- User name - mark the user's name.
- Host - here we specify Localhost or you can select Local from the drop-down list.
- Password and Re-type - here you need to specify a password. Or it can be generated using Generate. However, you definitely need to remember, it is better to fix it somewhere, we will definitely need it in the future.
Below we will notice the Global privileges block. Here you need to select all options using the Check All button. Then it just remains to click Go in the right corner, after which we completed the work. It remains only to congratulate you - after going through all these steps, you have successfully completed the creation of your new database. Next, let's move on to its direct use for the efficient and stable operation of your site.
How to work with Denver - proceed to install CMS
There is already quite a serious piece of work behind us, because we managed not only to install and configure the server, but even create our own database. Now it remains to understand how to use the resources received to develop and test the desired site.
To do this, we have to install a specific CMS to choose from, which will be used to run the site. But when installing CMS, we will definitely need certain information, so we will immediately mark them somewhere on a piece of paper or in a file - including the database name, the database user name and its password.
For CMS installations there are no special difficulties on the local server, you just need to follow the following procedure:
- Creating a key folder in which our site will be located.
- Necessary folders and files are transferred to this new directory.
- Reboot our Denver server.
- And it remains just to install CMS.
As an example, consider working with the currently popular WordPress CMS engine. Other CMS, of course, may involve certain nuances, but the general principle is almost always absolutely universal.

Thus, we learned how to install, configure Denver (Denwer) and work with it.
Denver's state-of-the-art capabilities have proven it ideal for stable operation, with the correct development and testing of the site without the need to host it on the network.
In our article, we reviewed the main steps on how to install and work with Denwer. To start most projects, this information is enough - the stages of installation, server launch, its configuration, creation of a database and launch of a full-fledged site have passed. That is, we have considered the entire life cycle to start developing a site - the rest depends only on your patience and talents, we wish you successful development and testing of high-quality and popular Internet resources.