How to set up epo on Android 4.4 2. What to do and what to do if the GPS system does not work on Android - guide. Setting up and adjusting GPS through the engineering menu
Modern smartphones are equipped with a GPS chip, which greatly simplifies our travels or searches for a specific address. However, there are often cases when GPS does not work well. And this is not always the fault of an insufficiently well-built smartphone. You can often improve the functioning of the navigation module by tinkering with the settings.
Many motorists have a full-fledged GPS navigator. Some of these devices have an antenna connector on the back wall or side. This allows you to enhance signal reception several times - you just need to get the appropriate antenna.
As for modern smartphones, we hasten to disappoint you. You will never find a special antenna connector in their composition. You can improve GPS reception on Android only using software methods. If they don't work, then you will have to come to terms with the current state of affairs. As you might guess, budget devices work worst with GPS satellites. This is explained by the fact that they are equipped with the cheapest and oldest navigation chips, which have a low operating speed and a weak signal receiver.
Visiting the settings section
In many smartphones and tablets, the GPS chip is completely disabled by default. In this case, the device determines its location using cell towers and Wi-Fi networks. To enable the navigation chip, you need to configure the device. To do this, do the following:
Step 1. Go to the section " Settings».
Step 2. Here you should be interested in the item “ Location».

Step 3. This item may have a different name on different devices. For example, on Samsung tablets you need to select the “ Connections" and click on the item " Geodata", at the same time activating the corresponding switch.

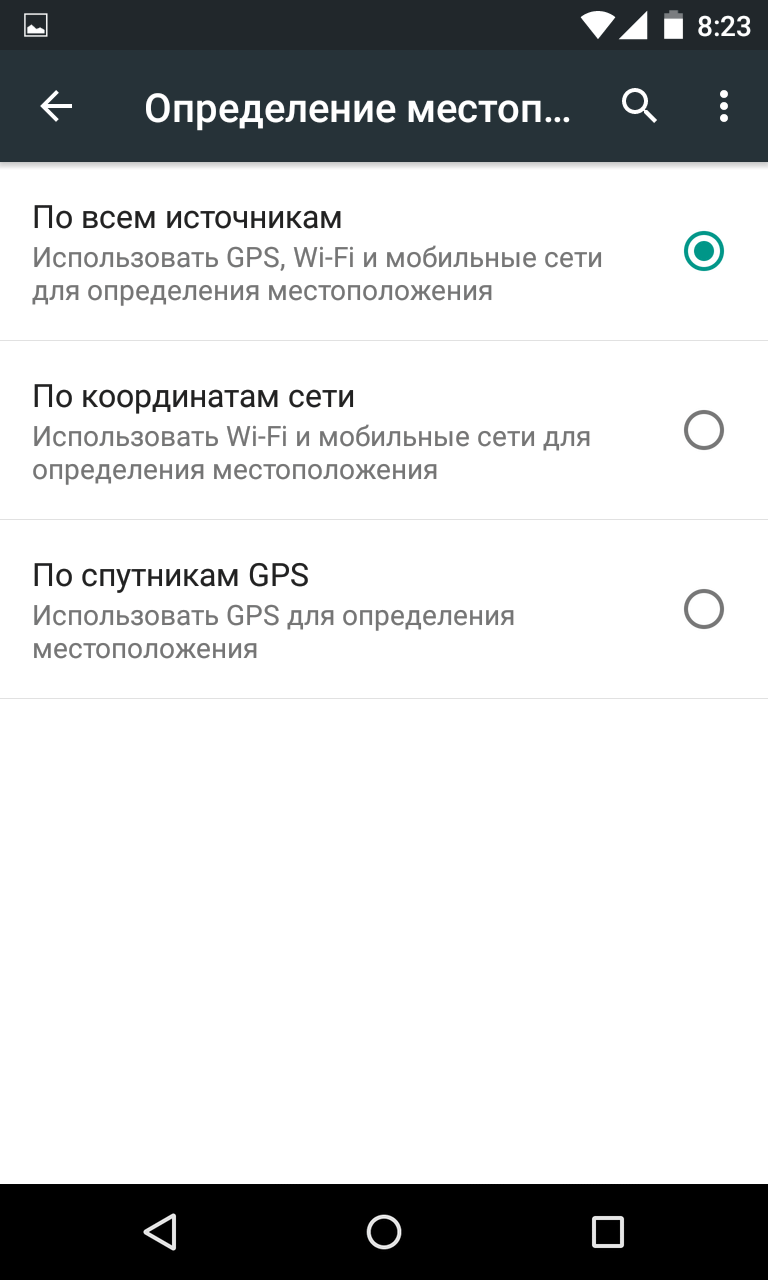
Step 4. In this section, you need to enable high location accuracy. The device must use all sources for this - GPS satellites, Wi-Fi networks and data from cell towers.
It should be noted that in this operating mode, energy consumption increases. And if this is practically not noticeable on new smartphones, then owners of budget and older devices will definitely feel the reduced battery life.
Compass calibration
If it is impossible to enhance the signal reception on smartphones, then no one can stop you from improving the performance of the digital compass. The fact is that on some devices it is not calibrated, as a result of which the navigation program cannot understand in time which direction of the world your smartphone is facing. At this moment it seems to you that the device does not pick up GPS.
To calibrate the compass you will need an app GPS Essentials. Download and install it, then do the following:
Step 1. Launch the program.

Step 2. Enter the mode Compass.

Step 3. If the compass works stably, then the problem is not with it. If the compass refuses to show the cardinal directions correctly, then calibrate it.
Step 4. First, rotate the smartphone around its axis with the screen facing up. Next, turn it over from bottom to top. Well, then turn it over from left to right. This should help. In some versions of the application, you must first select Calibrate in the section settings.
View the number of visible GPS satellites
In the same GPS Essentials you can look at how many satellites your smartphone connects to. If it is large enough, then the navigation chip should not be blamed - the problem is in one of the programs. To view satellites, you need to select the item in the application menu Satellites.

Resetting GPS data
A common problem with some devices is that they take a long time to lock onto specific GPS satellites, even when they have managed to move out of sight. The application can help in this case GPS Status & Toolbox. It will reset the GPS data, after which the connection to satellites will be made from scratch.
Step 1. Download and install the utility.
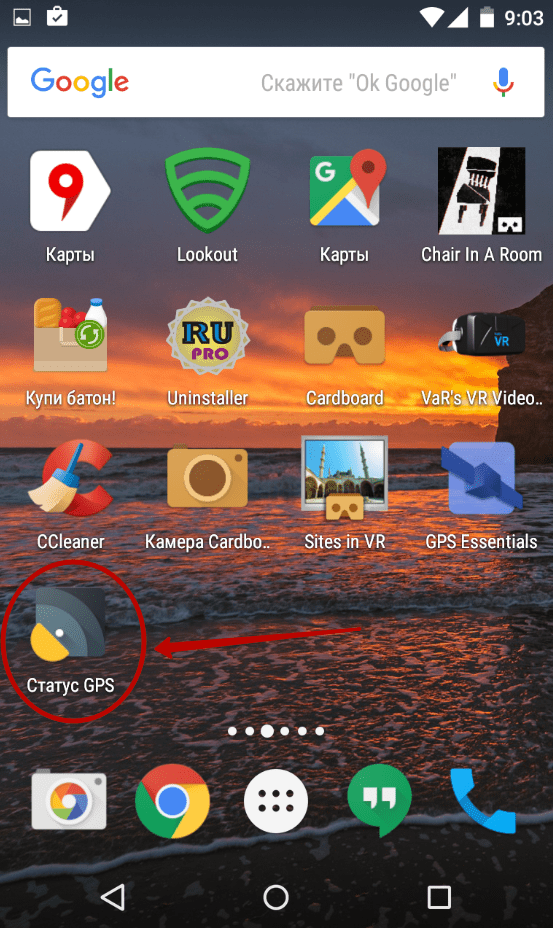
Step 2. Launch the installed application, agreeing to the terms of the license agreement.

Step 3. On the main screen of the program you will see readings from various sensors, as well as information about the number of GPS satellites overhead.

Step 4. Click anywhere on the display, after which you can pull out the curtain with the main menu on the left. Here you can calibrate the compass if this was not possible using the application discussed earlier. But now you need to click on the item “ A-GPS state management».
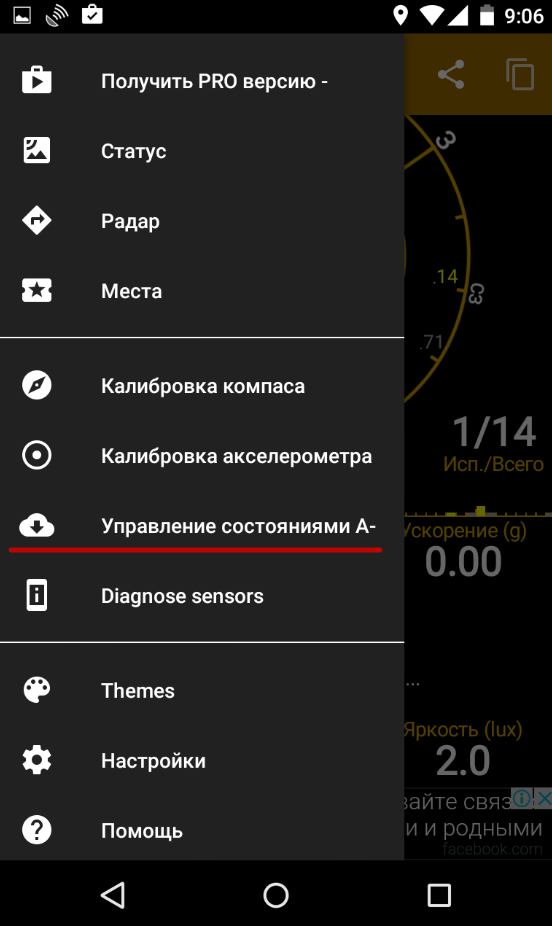
Step 5. In the pop-up menu, click the button " Reset».

Step 6. After the reset is complete, return to this pop-up menu by clicking the " Download».
What to look for when buying a new smartphone?
Now you know the answer to the question “How to set up GPS on Android?” But all this will not help you very much if you want to use your smartphone as a GPS navigator on a regular basis. It is better to get a good modern smartphone for these purposes. When choosing it, be sure to read the full technical specifications. In them you need to find a mention of support for A-GPS technology - it greatly reduces energy consumption. The ideal smartphone for you will be one that also works with GLONASS satellites. Fortunately, almost all devices that have been imported into our country over the past year have support for the Russian navigation system. But, again, you still need to look at the specifications of the device before purchasing it.
Modern gadgets are already so sophisticated that you can determine your location without resorting to GPS navigators anymore. Sometimes this is necessary for applications to work correctly, sometimes to create the correct route. When GPS doesn't work on Android, it becomes difficult. What could be the reason for this and what should be done to solve this problem?
Any device does not receive a satellite signal well or does not receive it at all if it is located indoors. Therefore, it is better to determine your location on the street. Ideally, the space should be free even from tall buildings and trees, so that the sky is completely open, so that nothing prevents the gadget from searching for a working signal and connecting to the necessary satellites.
Incorrect GPS setting
All devices are equipped with two GPS modules. One is a standard receiver, which can be enabled in the settings (General - Location - Mode). When you select mobile networks or Wi-Fi, the device will determine the location using towers without connecting to GPS satellites.
This method is the fastest, but it does not always give an accurate result.
After starting the program, select Update only in the AGPS settings, and Keep Screen On in Settings. Now you need to return to the main program window, the GPS test on your tablet or phone will begin. It is important that Wi-Fi and mobile data should neither be enabled in the Location settings nor currently in use.
If diagnostics show that the device does not find satellites, then you should check whether the GPS settings on Android are correct. How to set up GPS? To do this, you must first download any application that can process the GPS signal. If it does not help, you need to check the settings of the COM port of the communicator.
Unsuccessful flashing
After not the most successful attempts to flash a gadget or specifically a GPS module, not only the system, but also simply its individual parts, for example, geolocation, may stop functioning. It is also common for GPS to stop working on a Chinese device.
To correct this situation, you need to enable AGPS in the location and GPS settings. After this, you need to enter the engineering menu through the dialing window (the combination is different for all phones). If you cannot enter it, you will have to use any special program, but with root rights. Procedure in the Android engineering menu:
- On the Satellites tab of the YGPS tab, check if there is a signal, i.e. does the phone or tablet even try to find satellites;
- go to the Information tab and there, in order, press the buttons full, warm, hot, cold (this is necessary to reset previous settings);
- on the NMEA Log tab, click start;
- return to the Satellites tab and wait from 5 to 15 minutes until the device finds the maximum number of satellites and the GPS signal scales turn green;
- go back to the NMEA Log tab, click stop.
This method is shown in more detail in the video.
Primary binding and calibration
It happens that the device is located in some remote area. In this case, it is advisable to place it in an open area for a long time and wait until the search and binding takes place.
Sometimes navigation may stop working because the compass calibration is incorrect. Such a phone or tablet will be oriented incorrectly, resulting in a problem with the GPS on the device. To calibrate, you need to download a special application, GPS Essentials. After installing and launching it you need:
- Click on the compass icon.
- Choose a smooth, flat surface, place your communicator on it and remove all electrical appliances from it.
- Smoothly rotate the device around each axis 3 times.
After this, you need to try to connect again and, if necessary, repeat the calibration.
Problems with the device itself
If a gadget, tested and configured in accordance with all the rules, still does not pick up satellites, only a service center will help you check the GPS settings and find the reason. It may be that the problem lies in the device itself.
Modern smartphones have navigation modules built in by default. In most cases they work quite accurately. Just turn on GPS in Settings, launch the Maps app, and within minutes the program will determine where you are. And if you didn’t turn off the GPS, the determination will take a few seconds.
But what if GPS doesn't work? How then to determine the route, speed, your location? There is no need to rush to take your smartphone for repair: most often this can be solved by setting up the phone correctly.
Auxiliary services
In addition to the satellite receiver itself, auxiliary settings are sometimes very useful for determining your location. As a rule, they are easily enabled on the phone itself:
- A-GPS. This service downloads your location data from the Internet using data from the cellular networks to which you are connected. Of course, its accuracy is much lower, but it speeds up accurate satellite determination.
- Wi-Fi. Didn’t you know that you can also determine your location using data from Wi-Fi networks?
- EPO. However, more about it below.
When customization is necessary: a Mediatek curiosity
Today, Mediatek (also known as MTK) is one of the leaders in the production of mobile processors. Even such giants as Sony, LG or HTC today create smartphones using MTK processors. But there was a time when the processors of this Taiwanese company were used only in poor iPhone clones or dual-SIM dialers.
In 2012-2014, Mediatek released quite decent chipsets, but they constantly had a problem: GPS did not work correctly. Satellites with such devices behave according to the quote: “I am difficult to find, easy to lose...”
It was all about the settings of the EPO auxiliary service. This service, developed by Mediatek, helps calculate the orbits of navigation satellites in advance. But here’s the problem: the default EPO data in Chinese phones is designed for Asia and fails when used in Europe!
This can be easily fixed in modern models. Let us remind you that all these instructions are only suitable for smartphones with MTK processors:
- Open the Android settings menu
- Go to the “Time” section and set your time zone manually. This is necessary to avoid network location for time.
- Go to the “My location” section, allow the system access to geodata, check the “By GPS satellites” and “By network coordinates” checkboxes.
- Using a file manager, go to the root directory of the memory and delete the GPS.log file and other files with the GPS combination in the name. It's not a fact that they are there.
- Download and install the MTK Engineering Mode Start application, which allows you to log into your smartphone (https://play.google.com/store/apps/details?id=com.themonsterit.EngineerStarter&hl=ru).

- Move to an open area with good visibility. There should be no high-rise buildings or other objects around that would obstruct your direct view of the sky. The Internet must be turned on on the smartphone.
- Launch the application, select MTK Settings, in it - the Location tab, in it - the EPO item. As you may have guessed, we update the EPO data for OUR time zone and time!
- Click the EPO (Download) button. The download should happen in seconds even on a weak connection.
- Return to the Location section, select the YGPS tab. In the Information tab, press the Cold, Warm, Hot and Full buttons in sequence. With their help, information about the location of satellites in orbit is updated, so each time you have to wait for the data to be loaded. Fortunately, it's a matter of seconds.

- In the same tab, click the AGPS Restart button. The AGPS support service will now take into account already downloaded data and more accurately determine the position of the satellites.
- Go to the adjacent NMEA LOG tab and click the Start button. After that, go to the Satellites tab. You will see how the system detects satellites. This process should take 15-20 minutes, during which the satellite icons will turn from red to green. Make sure that the display does not turn off during this time, or better yet, disable sleep mode altogether. When all (or most) satellites turn green, return to the NMEA Log tab and click Stop.
- Restart your smartphone.
Yes, this is far from the easiest procedure. Depending on the version of the MTK processor (we described the steps for the MT6592 platform), the procedure may differ slightly, but essentially remains the same. But after these steps, GPS on your smartphone will work great.
Read all about how to enable GPS on Android, configure it and check its functionality. And also ways to solve problems if GPS does not work. In almost every modern phone you can find a GPS navigation system. It is used in applications for searching addresses, calling taxis and delivering online orders. And these are just a few of the opportunities offered by satellite navigation. If you want to use all the available smartphone options, then using GPS for Android is mandatory.
How to enable GPS location on Android?
If you want to use all navigation features, you must first activate the module. The easiest way to do this is if the “Location” option is placed on the curtain, which is lowered from the top of the screen by swiping. Then you just need to click on the icon to activate the satellite search.
Let's figure out how to turn on GPS on Android:
- Go to the main menu of your smartphone, where all applications are collected. Select the “Settings” icon and click on it.
- From the list, select "Location".
- Go to the "Mode" section. From the options provided, check “By all sources.”
If an approximate determination of coordinates is enough for you, then you can select the item “By GPS satellites”. In some smartphone models, the “Location” utility has been replaced with “Geodata”. Please note that the lever next to this function is in the active state (highlighted).
General navigation settings on Android
We have already briefly mentioned different navigation modes. Now it’s worth taking a closer look at them:
- High accuracy mode (“Across all sources”) is implemented using the A-GPS module. This option can only be found in modern smartphones. When this mode is selected, the space will be constantly monitored for signal presence. Navigation works equally well indoors and outdoors. The phone in this mode quickly communicates with satellites.
- “Battery saving” does not use the GPS module. In this case, you lose accuracy, since indoors the location is determined by the Wi-Fi signal, and outside it by cell towers.
- “By device sensors” - in this case, geolocation will only work in open areas, since the module will only receive a signal from the satellite. This is an accurate, but very inconvenient option. Now they hardly use it.
If you don’t need to navigate the forest or measure physical activity, then just select the battery saving mode. You will get an acceptable result, which is enough to run most applications. For applications that require high precision to operate, you can temporarily enable High Precision mode. Please note that this battery drains excessively.
How to check and configure GPS in a smartphone
If you are not satisfied with the quality of coordinate determination or the receiver does not work at all, then you need to check and configure the module. To do this, first enable the location module and then apply additional features.
Using GPS Test

One of the most accessible debugging methods is special utilities. All actions in them occur automatically. One of the best programs is GPS Test. Let's figure out how to check GPS on Android using it.
- Open the app and look at the status bar at the top. If it says 3D Fix, then the module works fine. If No Fix is written, the module needs to be configured and the location is not determined. A constant change of states occurs when there is a poor signal from the satellite or when you are indoors.
- If the status bar is Off, then you have not turned on the receiver.
You cannot configure the receiver using this program. It only records the received data. The utility allows you to find out:
- exact location coordinates;
- number of visible satellites and information about them;
- provides data on the time zone at the subscriber's location, altitude above sea level at this point, sunrise and sunset times.
This application can be used as an electronic compass. Paired with a navigation module, it will allow you to navigate open areas. Using GPS Test and the settings section, you can enable the module if this could not be done in the standard way. Activate all methods of obtaining coordinates for high geopositioning accuracy.
We use the engineering menu
Use at your own risk. If you are an inexperienced user or value your device very much, then it is better not to call up the settings. You must first obtain Root rights for your smartphone. Then the problem of how to set up GPS for Android is solved as follows:
- Activate GPS and Wi-Fi, go out onto the balcony or sit on the windowsill of an open window. The best option for setting up through the engineering menu is to place the user in an open area, on the street.
- Call the engineering menu of one of the commands *#*#3646633*#*#, or *#15963#*, or *#*#4636#*#*. If the listed combinations do not suit you, you can select the appropriate one using the Mobileuncle ToolHero utility.
- Please note that the engineering menu is in English. Therefore, it will be difficult for those who do not know this language to cope with it. In the window that opens, you will see several sections. Scroll left to the Location option, scroll down to Location Based Service.
- Go to the EPO tab, in it you need to put markers next to the Enable EPO and Auto Download items. If the EPO path is not active in your device, then you need to download the file of the same name so that information about the flight path and satellite location appears in the device.
- Use the arrow to go back. Select YGPS and open the Satellites tab. You will see a diagram of the location of the satellites; they will be inactive and highlighted in red. The device sees them, but cannot connect.
- Go to the Information section and click on the word Full. After 2 seconds, activate AGPS restart.
- Return to the Satellites tab, your device will connect to the satellites and the dots will change color to green. If you are near a window or on a balcony, the color change will not occur for all companions.
- Reboot your device to get a stronger signal.
This completes the GPS setup on Android; after these manipulations, the module should work normally.
What to do if GPS doesn't work?
If the manipulations did not help, and you still could not enable geolocation, then you need to find the cause of the failure and eliminate it. First, check the standard settings, test the device using utilities and the engineering menu.
Causes of failures
If GPS does not work on Android, then the reasons may be:
- Hardware faults - the module has failed due to mechanical impact on the smartphone body or liquid getting on its main board. In rare cases, a hardware failure occurs due to low-quality components.
- Software failures – damage to the module driver due to the device being infected with viruses, problems arising when updating software or firmware of the device.
First you need to understand why the module is not working. Once you have determined the cause of the breakdown, you can begin to fix it.
Problem solving
If you cannot enable “Location”, then first you need to check the module settings and restart the device. Often the problem occurs when RAM is overloaded, which leads to insufficient memory for the module to operate. Try changing the module's operating mode to the "Mobile networks only" option. If geolocation works after this, then the problem is with the driver or hardware. The inability to change the mode of use of the device occurs when flashing fails.
If the module fails after changing the firmware, it is necessary to restore the factory version of the operating system. To do this, hold down the volume and power keys at the same time. After 5-7 seconds, Recovery mode will appear on the screen. From its menu, select the item and confirm your decision with the “Shutdown” key. Then you need to select Reboot system now and wait for the device to turn on.
You can calibrate the module after a failure using the Essential setup utility. It is distributed free of charge through the official application store. Place your smartphone on a flat surface, open the application and press the Test button. Manipulations are performed automatically.
If all the procedures carried out do not help, you will not be able to solve the problem on your own. In this case, contact the service center to replace the module. Now you know everything about setting up and operating the GPS module on smartphones, share the information with your friends. If you have any questions, you can ask them in the comments.
Why is navigation needed?
A couple of decades ago, navigation was not used by ordinary people, but in America, developers figured out how to use it in everyday life. Now ordinary people can use GPS to solve various everyday problems:
- find a way in the forest;
- navigate any city in the world;
- find the necessary addresses and objects near you;
- avoid traffic congestion;
- record your own physical activity and speed of movement.
At the same time, using navigation in applications has a downside - the phone’s battery drains faster. This is especially noticeable in devices using a standard module. Modern smartphones are equipped with the A-GPS add-on, which reduces resources for satellite search. The battery discharges more slowly, and after starting the system quickly determines the location of the device. Using satellite and mobile networks to obtain information allows you to determine coordinates more accurately.
Almost all Android devices have a built-in GPS module. In this case, we are talking about a satellite navigation system, which provides determination of the location of an object on the ground. The use of this tool is quite wide and is not limited solely to navigation, so today we will talk about how to set up GPS on Android.
Mobile gadgets with the Android OS, being the brainchild of Google, have many applications as pre-installed software that need to constantly determine the location of both the smartphone itself and, accordingly, its owner.
For example:
- Using Google Search, you can quickly find the desired object located nearby (cafes, shops, medical institutions, etc.);
- Creating all kinds of “reminders” requires the use of GPS (for example, Google Keep, which can show a corresponding notification if you find yourself at the right point);
- Actually “Navigator”, which will help you not to get lost in an unfamiliar city and get directions to a given point;
- In addition, this tool is necessary when searching for a smartphone, since all applications in this line require activating a module with which it is possible to determine where the device is located;
- Again, coordinates are also attached to photographs thanks to GPS.
How to properly configure the GPS module on Android
So, as follows from what is written above, the subject of our conversation today is a very necessary tool, if not necessary. But, at the same time, using it leads to rapid consumption of battery power and more.
That is why you should pay special attention to the settings of this component. This is done quite simply: go to “ Settings" and in the section " Personal data"go to the sub-item " Location" Here we can activate this function, and then any application to which we have given permission will have access to the relevant information. In line " Latest geo queries"A list of applications that have attempted to determine our location will be shown:

A very important point in the settings is “ Mode" (on some devices it may be " Operating mode», « Location mode"). It will be available when the line " Location" The fact is that modern mobile gadgets, in addition to the GPS module, are equipped with a special A-GPS technology, which helps to quite accurately determine the location in the event of lack of contact with satellites. For this tool to work correctly, several factors are used, including:
- Data obtained by triangulation from mobile radio towers (namely cellular communications);
- Indications of wireless access points (Wi Fi), even if the device is not connected to them.
Modern mobile devices have three operating modes of the GPS module:
- « According to all sources» – all data obtained using A-GPS technology is used to determine location (see above);
- « By network coordinates"—the GPS module is disabled, and the coordinates are determined by Wi-Fi networks and data from mobile operators;
- « By GPS satellites» — A-GPS is inactive, and the location is determined by geopositioning satellites.
Maximum location accuracy will be ensured by activating all modes, however, if you need to increase the battery life of your smartphone, then it makes sense to leave only the first mode. The second mode will provide freedom from the power source, but this option is not relevant for navigation.
Now you can activate the transfer of geodata (either directly in “Settings”, or by lowering the “blind”:

We update satellite almanacs through the engineering menu
Sometimes the GPS connection may be unstable or not work at all. This is due to the fact that the smartphone manufacturer made the settings taking into account the production region, so in our latitudes the module will show incorrect operation. Then it makes sense to set up satellites for your area and make adjustments through the engineering menu. How to do it:
- In the settings we find the section “ date and time", deactivate the item " Network time zone", in point " Timezone“We set ours, and then activate it again “via the network”.
- Next, open “ Settings", go to " Location", activate the AGPS item (" According to all sources"), then, lowering the curtain, turn on " Transfer of geodata"(see above in the screenshot).
- After this, in the dialing line enter the entry code to the engineering menu *#*#3646633#*#* Depending on the gadget model, this code may be different:

If the above methods do not work and you have a MediaTek-based smartphone, you can use a special application MTK Engineering Mode, which will help you get into the engineering menu, but it will require Superuser rights (). After starting the program, click " MTK Settings" and go to the engineering menu, to the item " Telephony».
So, after we got into EngineerMode (engineering menu), and in what way it doesn’t matter, scroll further and go to the “ tab Location", select " Location Based Service", these are the basic settings from which we need to go to the tab AGPS:


Now open the tab EPO and activate (check the boxes) in the field Enable EPO, and Auto Download. To make it clear, EPO is the system file in which data is stored both on the coordinates of all satellites and on their flight path. Now you can go back to " Location" and open " YGPS" Here we will see our GPS module with red satellites, this means that the module “does not see” them:

Now we need to go to the “ Information" Here in the line " Status" (status) written " Unavailable"(unavailable), and the TTFF parameter, indicating the time of determining the coordinates, is in an endless search (" Counting"). In this case, we need to do a complete search reset; to do this, press the button “ Full", and after a couple of seconds we launch AGPS again (button " AGPS Restart"). It turns out that by resetting the frozen process, we get rid of the initial settings and reboot the module, which, as a result of this manipulation, will begin to search for satellites, which is called “from scratch.” We wait a few seconds, and after that you can open the tab “ Satellites", see how the satellite signals appeared, and after some time the GPS module of our smartphone will connect to them:

Important: It is better to carry out manipulations not in an apartment, but in an open space.
If your smartphone has an MTK 6592 processor, I suggest watching a video on what to do in this case:
As an afterword: if you cannot call yourself a confident user, but want to set up GPS on Android through the engineering menu, then it is better to trust a specialist. And with that I say goodbye until the next topic with wishes of good luck.