How to test the camera on a laptop. How to check the camera on a laptop. How to enable the camera on a Lenovo laptop
Today, no laptop can do without a built-in webcam. And although all the necessary drivers for the operation of this device are usually built into the system by default, when purchasing a laptop (especially if you buy it used), it would be a good idea to test the camera for functionality. Below you will find detailed information on how to check the camera on a laptop.
This procedure will be extremely necessary for users who often communicate on Skype or after reinstalling the system. If your case is different, this does not mean that these instructions will not help you. The main thing is to follow all the recommendations described here and you will definitely succeed.
Checking your webcam using Windows
The first thing you need to do is through “Start” to find the program built into the system for working with the camera by entering search bar the word “Camera” (in Windows 8 and 10 you can do this through “Search in Windows” by entering the word “Camera” there, see the screenshot below). Click on the magnifying glass in the control panel and enter the desired object.
As soon as the computer gives you the result, select the very first item. If all is well, the camera will automatically launch and your image will appear on the screen.
In addition, you can also go to the control panel, find the “Scanners and Cameras” section there and double-click on the camera icon. As in the example above, the webcam will start automatically, and the image from it will be broadcast on the screen. Please note that the built-in webcam may not always appear in Control Panel. In this case, one of the methods below will suit you.
Note: Some laptops have special utilities that are used to work with the camera. You may have such programs on your laptop. To check this, go to the control panel and look for the presence of programs for working with the camera. Programs can also be located in “Start” - “All Programs”.
Checking the camera through programs
You can check the functionality of your webcam by downloading and installing one of the following programs on your laptop: Skype, CyberLink, Webmax, Webcam Surveyor, etc.As an example, let's look at testing the camera using Skype (by the way, I talked about downloading and installing this program):
- Download the installer from the official website and install Skype on your laptop.
- Launch it, if you do not have an account, then create one and indicate it in the program.
- IN top menu Find the “Tools” item, click on it.
- In the drop-down menu, click on “Settings”.

- In the program settings window that opens, click on “Video Settings” (fourth line from the left).

- Now, if everything is fine with the camera, you will see your own image on the right.
If you use other programs for testing, then do it by analogy with Skype. Go to the program, find the video settings, go into them and perform the test there.
Checking using online services
There are also many web resources with which you can easily check the performance of the camera. Among them, we can highlight a specialized site where you can check not only your webcam, but also your microphone. This is done very simply, go to the site and click “Check webcam”. Perhaps you will have additional message, where you need to click “Allow”. This is necessary so that the site can gain access to use the camera.
Next, a window will appear containing an image from the webcam. As you understand, this is a fairly simple method and does not require installation additional programs. Therefore, if you have the task of checking your camera, I recommend using this site. Of course, there are a few minutes - if there is no Internet, then the check will not be possible. But I think that users who want to understand how to check the camera on a laptop have the Internet, since it is usually needed to communicate on Skype.
Separately, we can highlight video roulettes, popular among young people, in which the connection with the interlocutor for communication occurs randomly. Among these resources are very popular:
- and correspondingly .
All of them will allow you to easily check your camera online.
If the webcam is not working
As a rule, there is either a driver problem, or the camera is disabled in Device Manager, or is completely broken. And if the last option can only be solved by going to service center, then in the first two cases you can do the following:
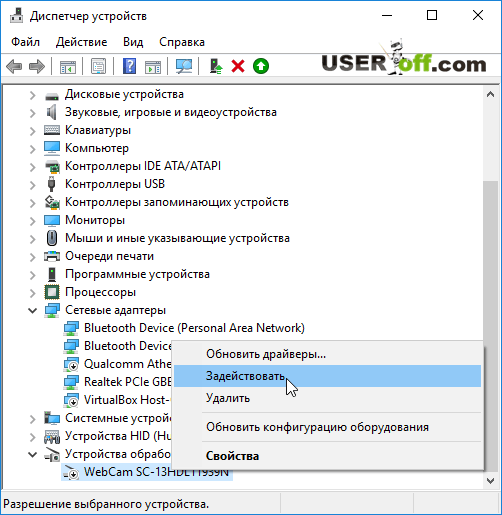
Using the keyboard shortcut "Win" + "R" launch " ". Type devmgmt.msc, press Enter and open the Imaging Devices section. Find the connected webcam, click on it right click mouse and click on the “Enable” button (if it was disabled), then reboot the system.
You can also go to the “Other devices” category (this is done if there is no webcam in the “Image processing devices” section), find a line there with a yellow exclamation mark, right-click on it and click on “Update driver” (note Please note that you must have the Internet turned on for the drivers to update).
Note: if you have several exclamation marks, this means that there are other devices on the laptop for which drivers have not been installed. You need to install them. Often computer technicians do not complete their work, and then regular users correct their inattention on their own.
If this method does not help to turn on the camera, then you can go to the official website of your camera manufacturer and download drivers. I already talked about updating drivers and turning on the camera in the article “”.
What else can you try?
Removing drivers. Go to "Device Manager" (about logging into this utility I said above), find your camera and right-click on it. Select “Delete” from the drop-down menu. Then reboot the system. If this option is unsuccessful, then in the device manager again right-click on your camera and select “Properties”. Next, go to the “Driver” tab (located at the top) and click “Roll Back” (if this button is active).
Change USB connector. If you do not have a built-in camera, you can try inserting it into another USB connector. Sometimes this method helps to “revive” the camera when you have a computer.
Reinstalling Windows or new camera
Unfortunately, computer technicians usually install all sorts of Windows builds for users, and therefore people have various kinds of problems, for example, the camera does not work. It is best if you have an official build of Windows installed on your computer. Then you will have no reason to think that this problem is due to such an assembly. If you suspect that your Windows is buggy, then you should reinstall Windows. For example, you may also have other problems - suspicious windows pop up or if there are other errors in the laptop.
No matter how bad it may sound, equipment tends to break down and usually this happens at the most inopportune moment. Let's say your camera is broken, what can you do in this situation: contact a service center or buy new USB webcam. Of course, before doing this, first do all the recommendations that I gave in this article.
If this instruction was useful to you, then write in the comments what method helped you solve this issue?
Perhaps this video will help you, which tells you how to quickly turn on and test the camera on your laptop:
For almost everyone modern models laptops, the manufacturer provides a built-in camera. And in modern world, given that video communication is becoming increasingly popular, this feature is not at all superfluous. But how can you make sure that the camera on the device you are interested in is really working, and you won’t have to run to service centers in the future?
In general, if you buy a brand new laptop with a camera installed, then it does not need any additional settings. It doesn't need to be activated, the developers had to worry about installing all the necessary drivers and so on.
If this is exactly the case, then when you start any software, which uses a webcam, it should work automatically. A flashing green indicator near the camera will inform you about this.
But what if you want to buy a laptop second-hand? Or they decided to make sure that the camera works fine on the new device. let's consider a few simple ways to help check the functionality of the camera on a laptop.
The first thing you need to do is find a program on your laptop that works with the camera. To do this, go to the Start menu and in the list of programs, find something called Cam, Video, etc. For example, I have an icon in the form of a camera, but the name doesn’t really correspond – AMCap.

Launch the program. If everything is in order with the camera, a normal image will appear and the green indicator mentioned above will light up.

If you have not found such a program, then the second thing you can do to check the camera is to use any video chat, Skype, Odnoklassniki or any other program that uses video calls. I'll check the camera's operation on Skype; if you don't have such a program, you can install Skype on your computer.
I launch the program and now I need to find an item in the menu related to checking video communications. I go to the tab “Tools” - “Settings”.

In the settings, in the “General” section, select the item "Video Settings". A video image appears in the main window. If your camera is working properly, then a picture should also appear.

If you don't find it on your laptop installed program to work with the camera, and it is not possible to use video chat due to the lack of an Internet connection - the third method. You will need to download, for example, to a USB flash drive, a portable version of the program that will capture video from the installed webcam.
Such programs can be found on the Internet, and they are convenient because they do not require installation on a computer: you download the files and launch the application. I used the program My camera Portable 1.0.1, you can download it from Yandex.Disk by following the link.
Open the downloaded folder "Camera Final". Next, go to: “Camera” – “bin” – “Debug” and click on the “Camera” application.

A program window will open in which an image from the camera should appear.

And the fourth point is verification installed drivers. To do this, go to “Start” - "Control Panel" – "Device Manager".

Now on the list installed devices find "Image Processing Devices", expand the item by clicking on the arrow, right-click on the camera and go to “Properties”.

On the "General" tab, in the field "Device Status", should be written "The device is working normally". If this is not the case for you, go to the “Driver” tab.


By using a method that is more suitable for you to check the webcam on a laptop, you can rest assured that it is working. In a store, you can simply not buy a laptop with a non-working or not connected camera - then you will have to go to service centers, and if you buy a laptop from someone else, you can reduce the price.
Rate this article:How to determine the webcam model? This question is asked by many users. In order to find out this information, there are several ways. All of them are effective and efficient. The main thing is to maintain consistency.
Determining the webcam model
The most in a simple way which helps figure out which webcam model is the one that involves reconnecting of this device. That is, you will need to disconnect it from your PC and then connect it again. After this, the OS will scan the new hardware and receive detailed information about it. You just need to click on the icon on the toolbar below that shows the new device. After this, information about the model, as well as about technical specifications of this device will be displayed in a small window.
It is important to note that in some cases the system may write that the connected device is unidentified. And here you should not have a question: how to identify a camera? The fact is that the PC drivers are simply not updated, so you will need to right-click on “My Computer”, then select “Properties” and go to the “Device Manager” tab. Next, you need to right-click on the top line, and then click on the command called “Update hardware configuration.” After this, you will need to select the line “ Unknown device" and right-click, then a menu will appear in which you will need to select "Update driver". After such manipulations, the system will update and the model of your webcam will be recognized.
Determination using Driver Cure
There is also another way to find out which model your PC camera has. It involves the use of software called Driver Cure. Before you can identify a webcam by model using it, you will need to download it. This program is in free access, so you won’t have any problems finding it.
After it is installed, you will need to launch the software. Next, in its menu you will need to select the webcam you connected and click on “Search”. Driver Cure will then carry out automatic scanning. After it is completed, the model name of your device will appear on the panel Windows tools below.
Now you know how to identify the camera. As you can see, this is not at all difficult to implement. In addition, you have the opportunity to use the method that is most convenient for you.
A webcam is an essential attribute of any modern laptop. With its help you can communicate on Skype, create video conferences and take photos. The built-in cameras are turned on by default, and you can check its readiness for work in several ways.
Make sure you have a video camera installed on your laptop. It is located in the upper part above the screen - it is a small peephole and an LED next to it. Most often problems arise due to the fact that mobile camera The external device is simply disabled or has no USB connection. We will use the following methods:
- a combination of pressing the Fn + V buttons (marked with a blue camera icon) on the keyboard. This combination is standard for all mobile PCs. As a result, the camera should appear on the taskbar. If this does not happen, then the problem is in the driver or device malfunction;

- camera check online. To do this, go to the page of any site that provides such a service. Launch the application and the “Allow” button will appear on the screen, turn it on and see. This indicates that the camera is working properly;

- enable the camera in specialized Skype applications or Movie Maker.


Checking the functionality of the system
By opening the device manager, we will see the status of the laptop webcam, the status of its driver and possible malfunctions. It can be accessed like this:

In the device manager we find our camera or the “Image processing devices” tab.

Three options are possible further development events:
- The webcam is not detected by the computer. This happens due to a hardware failure or problems connecting an external camera. We eliminate the flaw and update the page;
- the device is not recognized, but in its place there is unknown equipment that requires connection. Information about this may be duplicated on the taskbar in the lower right corner of the screen. The problem can be solved by installing the necessary driver or updating the old one;
- The webcam is recognized, but there is an exclamation point icon next to it in a yellow triangle - a malfunction. An arrow in a circle means it is disabled in the operating system.
Interesting! The driver is installed from the official website of the laptop manufacturer. There is no separate driver for the webcam; it is installed along with a Windows update.
Typical errors in web camera operation
A disabled camera in the device manager is activated by clicking “Enable” in the menu that appears after right-clicking on the selected camera.
An error in operation can be corrected by clicking “Delete” and rebooting the laptop. If this does not help, then reinstall the driver.
If these measures do not help, you should contact a service center to have the camera repaired.
Most laptops are already equipped at the factory with special programs for. These may be Asus ECam Utility, HP Cyberlink YouCam, Lenovo EasyCapture and others. All of them have a clear interface and are designed for a novice user. Removing them does not lead to loss of functionality of the device’s camera.
Video - How to turn on the video camera on a laptop
One of the most popular elements of a laptop is the webcam. It allows you to make video calls via Skype or other web applications. One of the questions that may arise after purchasing a laptop is how to turn on the webcam on it?
Where is the webcam on the laptop and how to turn it on?
First of all, you should find out whether the camera is built into the this model laptop? If not, then it is possible to connect it as a separate device via a USB connector. However, the camera will be in an inactive state. Therefore, many users are wondering: where to turn on the camera on a laptop?
Most laptops have a set of special utility programs, including a program for working with the camera. It can be launched using the Start menu, as well as the combination shortcut keys. At the same time, for laptops with Windows 7 and Windows 8 installed, a similar sequence of actions is provided to turn on the device.
Instructions for turning on the webcam on a laptop
To turn on the webcam, do the following:
- Check if the camera is working. To do this, launch a program that is responsible for managing its operation. Alternative option the test will be launched, which is done by clicking the menu in the client program window. If no image appears and menu options are not available, connect the camera as a device.
- To control the operation of the webcam, press the Fn key and other keys simultaneously. After performing this manipulation, you will see a picture with a camera on the desktop containing the inscription On. This will indicate that the camera is ready for further use.
- A similar result can be achieved using the Windows operating system. To do this, click the “Start” button, go to the “Control Panel” section and find the “Administration” tab. Next, double-click on this tab to open a window with the “Computer Management” icon. Then a console window opens. In the window that appears on the left, you need to click “Hardware Manager” and launch the webcam.
- A list should appear on the screen listing the laptop devices. You will need to go to the line called “Image processing device” and open the nested list, which is located under the “plus” icon. You will see the name of the webcam. You need to double-click on it and select “Enable” from the menu that appears. Then you need to confirm the switching process by clicking “OK”. If you do not find the webcam icon, you will need to reinstall the driver or configure the webcam.
How to turn on the camera on an Asus laptop?
The Asus laptop contains a software and driver package with three programs that regulate the operation of the built-in camera. These include:
- Virtual Camera Utility;
- Life Frame Utility;
- ECap Camera.
To launch the webcam, use the Fn+V key combination. Then using specified programs configure its parameters.
How to enable the camera on a Lenovo laptop?
On a Lenovo laptop, the Fn+ESC key combination is usually used to turn on the camera. To carry out further settings and manipulations, use the EasyCapture program. It may be included in the standard delivery set. If it is not available, the program can be downloaded from the website technical support Lenovo.
Thus, using a certain algorithm of actions, you can figure out how to turn on the webcam on a laptop.
Related articles:
| How to charge NiMh batteries? The most common type of battery is lithium-ion. They are the ones most often used in a variety of gadgets. But there are other types, in particular nickel-metal hydride batteries. How to charge these correctly - read the article. | How to enable wi-fi on a laptop? The main advantage of a laptop is mobility. And in order not to carry an Internet cable around the apartment with you, it is better to connect your laptop to the network via Wi-Fi. If you don’t know how to turn on Wi-Fi on a laptop, the information from our article will be useful to you. |
| How to turn on the Internet on your phone? Modern Cell phones– not just a device for making and receiving calls – it’s multifunctional gadgets, capable of replacing a good dozen devices. But you can use all the capabilities of the phone only if it is connected to the Internet. | How to charge your phone if the socket is broken? Everyone is familiar with the situation when you have to use your phone even while it is charging. And often a small unfortunate movement is enough for the charging socket to fail. Do you think you won’t be able to charge your gadget now? The article will help you find a solution to the problem. |
WomanAdvice.ru
How to check the camera on a laptop
If you like to communicate with people on the Internet and prefer not only to hear, but also to see, then a computer with a video camera is the ideal solution. How to choose a suitable laptop, turn on and check its camera?
Start over. The image quality in built-in laptop cameras varies on average from 0.3 to 3 megapixels. You can also take photos and videos using a webcam. Naturally, you can connect third party devices- from the simplest via USB to professional equipment with the latest data transfer ports (S-Video, DVI, HDMI, DisplayPort and others). Within a range of up to 5-10 meters, the camera and other portable devices are connected via Bluetooth, FireWire, etc.

So, you already have a laptop with a camera. But where to find it? Open the Start menu and enter the word “camera” in the search bar. If nothing is found, move on to the next point.

From “Start” go to “Control Panel”, from there to “Hardware and Sound” -> “View Devices” -> “Manager”. Open the same window by right-clicking on “My Computer” -> “Properties”.

Having entered the “Manager” in one of the ways, look for the “Image processing devices” item - it should display the desired camera or similar connected devices.

Right-click on the device and select “Enable”. Here you can also disable the camera in the same way, install drivers or update to more new version BY.

By going to the last item of the context menu - Properties, we will see whether the camera is working. Let's look at the picture:

It’s easy to check the camera through any video calling program, for example, Skype and even Odnoklassniki. Launch Skype, go to “Settings” through the top panel, then “General” and “Video Settings”. If the camera is turned on, you will see the image captured by its lens in real time.

How to set up a laptop camera? There are two ways to do this. Some cameras have all control buttons directly on the device (sound, sharpness, zoom, etc.). Just turn all the possible levers on the panel, focusing on the quality of the signal in the same Skype. The second way is to use special programs for configuration. These include SplitCam, LiveWebCam, IP Camera View and many others.

Let's take a look at SplitCam. What can she do:
- add fun effects to your video without interrupting the call;
- change the background in which you are sitting;
- work in several applications at once, sharing the video stream;
- broadcast videos to popular sites like Livestream and similar;
- work with resolutions up to 2048×1536 (HD);
- connection to an IP camera;
- zoom a section of video without interruption
- overlaying audio effects and sound separation.
At the same time, SplitCam is distributed free of charge, without restrictions.

If the video camera does not work, the first thing to do is reinstall the drivers or find a more recent version. The original software is on the disk that came with the laptop. Otherwise, you will have to look for drivers online, on the manufacturer’s official website. For example, for Lenovo t60 laptops it looks like this:

If you buy new laptop and don’t know how to check the camera - be sure to ask the seller or consultant to show how this is done.
SovetClub.ru
Instructions for turning on the camera on a laptop
We often need a camera to communicate on Skype or another messenger, but, as luck would have it, it doesn’t turn on. It may not be configured or even enabled. We offer you several effective methods connection checks and settings, which should help out at such an important moment.
Checking the connection
If you are using a USB camera, you should initially check all connectors and cables. Sometimes you need to additionally press the power button on the gadget itself. For the camera built into the laptop you will need certain programs.
The easiest way is to check the camera online. You just need to go to the site that provides such a service, click “Allow” in the drop-down window, and you will appear on the screen. 
Refer to Device Manager
You can check the camera's operation using Device Manager.

A question mark or exclamation mark next to the name indicates the need to install drivers. They are located on the disk with the operating system. If there is none, they can be found on the official website of the gadget manufacturer.
Choose drivers exclusively for the model of your laptop or USB camera.
When there is a downward arrow opposite the name, you need to right-click and select “Engage” in the context menu.
Turn on the camera
You can turn on the camera using standard programs And special utilities.
Take advantage of special programs
You can turn on the camera using windows programs Movie Maker (film studio) or Skype. If they are not on your laptop, install them.
Everything is clear with the film studio - you just need to open it to start the camera.
With Skype it’s a little more complicated:

You can also turn on the device using any utility or special program for creating photos and videos on your computer. There are many of them on the Internet, just download wisely - do not introduce viruses. To do this, scan files through trusted antivirus programs.
The most difficult situations
In the most difficult cases, you can restart the laptop, move the portable camera to another connector, update or reinstall the official drivers.
When all else fails, you should contact a technician or take the gadget (USB camera or entire laptop) to a service center.
If you have windows 8, 10
On Windows 8 and 10, if the camera is functioning normally, you can enable it in three clicks: click “Start”, then the down arrow and the “Camera” program. 
All programs are listed in alphabetical order, so this should not be a problem.
LookForNotebook.ru
How to turn on the webcam on a laptop
Today, every modern laptop is equipped with a built-in webcam, which plays a very important role in helping us communicate with friends and family in video mode. Quite often, novice users do not know how to turn on the webcam on a laptop and begin to surf the Internet to find the answer to this question. In fact, built-in webcams turn on automatically when you make a video call, so often you just need to open a program with access to the camera, for example, Skype, and the issue will be resolved by itself. However, sometimes the webcam remains inactive even after logging into programs with access to the camera. There are several reasons for this problem and we will look at the most common ones.
Checking the drivers
If nothing happens when you enter applications that work with the laptop's webcam, then it is likely that the cause of this problem is the lack of necessary drivers. To find out whether you have drivers for normal operation of the webcam, you need to launch the device manager (key combination Win + R) and in the “Run” window that opens, enter the command in the “Open” line: devmgmt.msc.


As a rule, several drivers are responsible for the operation of a webcam. If the list contains devices with an exclamation mark and the word “Webcam” in the name, then the problem will be solved by installing the necessary driver. Click on the device marked exclamation point right-click and select “Update Drivers”.
Quite often the system does not find the necessary drivers on its own. In this case, you need to go to the website of your laptop manufacturer and find there necessary drivers. After installing the webcam driver, you need to restart the laptop, after which the webcam should work. If this does not happen, then the reason may be that the camera is disabled in the device manager. How to enable the webcam in Device Manager will be discussed below.
How to enable the webcam on a laptop through Device Manager
If your computer has an operating system windows system 7, then you can turn on the webcam as follows:
Click on the Start menu and select Control Panel.


Now you need to select “Device Manager” from the “Devices and Printers” section.

You can get to Device Manager in other ways, if it’s more convenient for you to do it in another way, then do it your way, it makes no difference. For example, you can right-click on “My Computer” and select “Properties” and in the window that opens on the left, select “Device Manager”. The path you take to enter Device Manager is not important, what matters is the steps you have to perform in this section.
So, look for the Imaging Devices option, where your webcam should appear. You need to look to see if the webcam has any down arrow icons. If there is one, then the webcam is disabled. You can enable it by right-clicking on it and selecting “Enable”.
If the webcam still does not work, then most likely the problem is in the camera itself. Try connecting a webcam to your laptop via USB. In conclusion, it should be said that before you turn on the webcam on your laptop through the device manager or check the drivers, you need to use any program for video calls. It could be Skype or even classmates. Most often happens automatic switching on cameras. If this does not happen, then you should look for the problem and solve it based on these instructions.