Virtualbox shortcut to start a virtual machine. Installation and configuration of the Oracle VM VirtualBox virtualization platform. Starting a virtual machine
This article is devoted to the Oracle VM VirtualBox virtualization platform, its installation, configuration and preparation for work.
VirtualBox is a completely free program and entirely in Russian, which makes it very attractive for use on both home and work computers. The system was first made available in 2007 by InnoTek in two versions - open and closed source, both free for non-commercial use. In 2008, the platform was purchased by Sun Microsystems, which is currently developing it.
The platform is a virtualization system for host systems Windows, Linux and Mac OS and provides interaction with guest operating systems Windows (2000/XP/2003/Vista/Seven), Linux (Ubuntu/Debian/OpenSUSE/Mandriva, etc.), OpenBSD , FreeBSD, OS/2 Warp.
Key features of VirtualBox:
- x86 virtualization (in this case, support for hardware implementation of Intel VT and AMD-V is optional);
- support for multiprocessing and multi-core;
- support for audio device virtualization;
- support for virtualization of network devices;
- USB-host virtualization support;
- high performance and modest consumption of PC resources;
- support various types network interaction (NAT, Host Network, Bridge, Internal);
- ability to save pictures virtual machine(snapshots), which can be rolled back from any state of the guest system;
- setting up and managing the VirtualBox application and virtual system from command line.
To learn more about the Oracle VM VirtualBox platform, you can visit the manufacturer's website Welcome to VirtualBox.org!
Installing the Oracle VM VirtualBox Platform
You can download the platform suitable for your system using the link: http://www.virtualbox.org/wiki/Downloads
In this article, we will consider working with the VirualBox platform version 3.2.8 r64453 (download), the latest at the time of writing.
Once the installation package is on your hard drive, you can begin installing the program. This article discusses the installation and configuration of the VirtualBox platform in the environment operating system Windows Vista Home Premium SP2.
After launching the installer, you will see a welcome window. Click the “Next” button and in the new window, agree to the terms of the license agreement by checking the “I accept the terms in the License Agreement” checkbox. In the next window (Fig. 1) you will be asked to select components to install and specify the location of the executable files. By default, all components are installed on HDD(and we need everything), and the program itself is installed in the “Program Files” folder on the system drive. If you want to specify a different location, click the Browse button and select a new folder to install the application.

Note. When installing an application on the Windows XP operating system, a message may appear stating that the platform has not been tested for compatibility with this OS. You can ignore the warning and continue with the installation - you will not encounter any problems during operation. When installing an application on the Windows Vista/Seven operating system, you should enable compatibility mode after installation is complete. To do this, go to the folder with installed program, find the file VirtualBox.exe, use the right mouse button to call up the context menu, select “Properties” and on the “Compatibility” tab, check the box “Run the program in compatibility mode for”, selecting “Windows XP (Service Pack 2)” as the operating system )".
Creating and initial configuration of a virtual machine
Let's launch the Oracle VM VirtualBox application (when installing the platform, a shortcut is created on the desktop that you can use). A window will open in front of us, and in it (which is very pleasant) everything will be in Russian. To create your first virtual machine, click the “Create” button:
Fig.2: Main window
Note. In my virtualization platform, there are already created virtual machines, and therefore, when you first create yours, you will not see a list of virtual operating systems.
A new window will open in front of you, in which there will be a message about starting the virtual machine creation wizard. Click the “Next” button and see a new window asking you to select the name of the operating system, its family and version. In Fig. 3 shows my choice, but you can choose any of the available systems to your liking.

Fig.3: Initial parameters
After clicking the “Next” button, you will be asked to determine the size random access memory allocated to the virtual machine (Fig. 4). I choose 1024MB, but for stable work with virtual Windows system XP and 512MB will be enough.

Fig.4: Memory allocated
Next you need to create virtual hard disk (Fig. 5). If you have already created virtual disks, you can use them, but we will look at the process of creating a new disk. Let’s confirm that the hard drive we are creating is bootable, check the “Create new hard disk" and click the "Next" button.

Fig.5: Creating a hard drive
Next, a new window will appear, which will inform you that the running wizard will help you create a virtual disk; click the “Next” button to continue working. In a new window (Fig. 6) you will be asked to select the type of disk to be created - “dynamically expanding image” or “fixed size image”. The difference is explained in the help of this window, but I would like to note that it is more convenient to create a boot disk of a fixed size - this will allow you to automatically limit its size, simplify and speed up storage, recovery and creation of backup copies of the disk. In addition, you can create several hard drives and now those that will not be bootable, it is more convenient to create dynamically expanding ones.

Fig.6: Creating a hard drive - selecting the type
In the next window (Fig. 7), you will be required to select the location of the virtual hard disk to be created and its size. For boot hard The default size of a disk with Windows XP (10 GB) is sufficient, but it is better to place it outside your system partition, because You should not overload your real boot disk and create files of this size on it.

Fig.7: Creating a virtual hard disk - selecting size and location
After this, the “Result” window will appear (Fig. 8), which will indicate the type, location and size of the hard drive you are creating. If you agree to create a disk with these parameters, click “Finish” and watch the process of creating a hard disk.

Fig. 8: Creating a hard drive - the creation process
Once the creation of the hard disk is complete, a new “Result” window will appear (Fig. 9), which will indicate the parameters of the virtual machine you are creating. If you have not changed your mind on any of the points described, click “Finish” and proceed to setting up the hardware of your virtual machine.

Fig.9: Creating a hard drive - Finish
Setting up virtual machine hardware
So, you have created a virtual hard disk, now it’s time to assemble our virtual computer fully. To do this, return to the main VirtualBox window (Fig. 10), in it you can already see the newly created WinXP-2 virtual machine, and in the field on the right side its description is presented, which does not yet resemble the description of a full-fledged PC.
Fig. 10: Hardware setup - start
In the column on the left, select our WinXP-2 and open its properties (Fig. 11), where the column on the left side resembles the device manager. On the first tab of the “General” section we see the main parameters of our virtual machine:
Fig. 11: Hardware setup - general, 1
Let's go to the advanced tab (Fig. 12) and see what system settings we can make:
- "Folder for pictures." If you have placed your hard drive in your own location, then it is better to move this folder there too, because pictures have a lot of weight and, again, you should not overload your system disk. My recommendation is to create snapshots before each significant change you want to make in the virtual system, and even for one virtual machine you can create several snapshots containing different settings and installed applications;
- “Shared clipboard” is a definition of how the clipboard will work between your host system and the virtual machine. There are four options for buffer operation - “off”, “only from the guest OS to the main OS”, “only from the main OS to the guest OS”, “bidirectional”. We will choose the last option, because... this will provide us with maximum convenience in our work;
- “Removable storage media remember changes during operation”, here we check the box as a sign of agreement, because This option will allow the system to remember the state of CD\DVD drives;
- “Mini toolbar” is a small console containing virtual machine controls. It is best to use it only in full screen mode, because it is completely duplicated by the main menu of the virtual machine working window. It is really better to place it on top simply because you can accidentally click on some control element when trying, for example, to maximize a window from the taskbar of a virtual machine.
Fig. 12: Hardware setup - general, 2
Let's go to the system section and on the first tab, motherboard (Fig. 13), make the following settings:
- If necessary, we will adjust the size of the RAM of your virtual machine, although you will be able to finally be convinced of the correctness of the selected volume only after starting the virtual machine. You can choose the size based on the amount of available physical memory installed on your PC. For example, if you have 4GB of RAM, the optimal allocation would be 1GB, i.e. one fourth part, which will allow your virtual machine to work without the slightest freeze;
- let's adjust the boot order - the floppy disk drive ("floppy disk") can be completely disabled, and be sure to install the CD/DVD-ROM first to ensure the ability to install the OS with boot disk. In this case, either a CD or an ISO image can act as a boot disk;
- all other settings are described in the dynamic help below, and their application depends on the hardware of your real PC, and if you set settings that are not applicable to your PC, the virtual machine system simply will not start;
Fig. 13: Hardware setup - motherboard
Let's move on to the “Processor” tab (Figure 14), here you can select the number of processors installed on your virtual motherboard. Please note that this option will only be available if AMD-V or VT-x hardware virtualization is supported (Fig. 15), and the OI APIC option is enabled on the previous tab.
Fig. 14: Hardware setup - processor
Here I will again draw your attention to the AMD-V or VT-x hardware rendering settings. Before enabling these settings, you need to find out whether your processor supports these features and whether they are enabled by default in the BIOS (they are often disabled).
Fig. 15: Hardware setup - acceleration
Let's move on to the “Display” section (Fig. 16). IN this section on the "Video" tab you can set the memory size virtual video maps, as well as enable 2D and 3D acceleration, and enabling 2D acceleration is desirable, but 3D is optional. On the “Remote Display” tab, you can enable the option in which your virtual machine will work as a remote desktop server (RDP).
Fig. 16: Hardware setup - display
Let's move on to the media section (Fig. 17). Here you can see the previously created virtual hard disk and the position labeled empty. Select this position and carry out the settings (Fig. 18).
Fig. 17: Hardware setup - media, 1
There are two ways to configure a virtual CD drive:
- first option - in the “Drive” drop-down menu, select your real or virtual CD/DVD-ROM (existing in a real system) and load into it a physical disk with the Windows XP distribution kit or an ISO image if it is an emulator;
- second option - click the icon as shown in the figure below (Fig. 18) and in the window that opens (Fig. 19) add an ISO image of the boot Windows disk XP, this is the way we will go.
Note. At this point, you can no longer select a distribution kit of another operating system, because the OS version was already determined at the very beginning of the virtual machine setup process.
Fig. 18: Hardware setup - media, 2
The figure below shows the procedure for adding ISO images to the Virtual Media Manager. You can add any number of images for various purposes into it, for example, games, application distributions, databases, etc., which you can then quickly switch through the main menu of the VirtualBox virtualization window.
Fig. 19: Hardware setup - media, 3
Fig.20: Hardware setup - media, 4
Next (Fig. 21 and 22) you can configure the drive connection slots; to simplify the description, I provide screenshots from which you can perform the configuration steps. As is my habit, I set the CD drive as the "Primary IDE Master", the hard drive containing the boot partition as the "Secondary IDE Master", and the secondary virtual hard drive as the "Primary IDE Slave".
Fig.21: Hardware setup - media, 5
Fig.22: Hardware setup - media, 6
Setting up a network and network interaction is not covered within the scope of this article, so I will only note that network adapter NAT type (Fig. 23) is enabled by default, and this is already enough to provide your virtual machine with access to the Internet. The type of adapter you select must be “Pcnet-Fast III (Am79C973)”, because Only for this adapter there are drivers in Windows XP.
Fig.23: Hardware setup - network adapter
I do not describe the COM section in detail, because... connect to ports of this type nothing already. If you still need to connect a device with an RS-232C interface, then the most convenient way would be to enable the COM port of the virtual machine in the “host device” mode, and use the name of the actual port of your PC as the “path to the port”, which you you can look in device manager.
Let's move on to USB partition(Fig. 24), here we check both available checkboxes, and then, using the button with the image of a USB “plug” and “plus”, we add all available controllers.
Fig.24: Hardware setup - USB controller
Go to the “Shared Folders” section (Fig. 25) and select the folders that need to be made available to the virtual machine.
Fig.25: Hardware setup - Shared folders
Note. Pay attention to the dynamic help below - this is how, through the command line window, you can connect shared folders to your virtual machine.
This completes the configuration of the hardware of your virtual machine, and you can proceed to installing the operating system.
Setting up the virtual machine operating system
The description of installing the operating system is not described in the article, because The site provides enough information about the methods and intricacies of this operation, so I will indicate the first step - return to the main VirtualBox window and click the “Start” button.
Fig. 26: Setting up the operating system - the first step
After completing the action described above, you will see the following window:

Fig. 27: Setting up the operating system - installation process
This means that you have made all the settings correctly, and all that remains is to install and configure the operating system. This window is most likely familiar to you (if you have ever installed a Windows operating system yourself), and the installation process is no different from installing the OS on your real computer. After the system is installed and loaded (Fig. 28), you can begin setting up the operating system of your virtual machine.

Fig. 28: Setting up the operating system - installed system
First, we need to install drivers for all virtual hardware components of our virtual PC. To do this, in the main menu (Fig. 29) select the item “Devices” - “Drives” optical disks" - "VboxGuestAdditions.iso". Subsequently, in the same way, you can connect a physical CD-ROM to your virtual machine or download an ISO image.
Fig. 29: Setting up the operating system - downloading “VboxGuestAdditions.iso”
After connecting the “VboxGuestAdditions.iso” image in the My Computer folder, you will see that this virtual disk is loaded into the CD drive - all you have to do is launch it by double-clicking the left mouse button.

Fig.30: Setting up the operating system - installing VboxGuestAdditions.iso
The installation process itself occurs practically without your participation and only if you have previously enabled 3D acceleration, then you should select the appropriate component (Fig. 31) for additional installation.

Fig. 31: Setting up the operating system - selecting add-ons
During the installation, you will receive two warnings about the lack of test results for this software in the Windows XP operating system, and both times you can safely continue the installation - installed drivers and additional software will work great. In the last window of the installation process, you will be asked to reboot the virtual machine - agree, after the reboot you will see that the image has become clearer, the size of the virtual machine window changes dynamically, the mouse integration function is enabled and there is Internet access.
Let's now connect shared folders to be able to transfer the files needed for work and install applications to the created virtual machine. This can be done using the command line by following the VirtualBox help, but I'll give a method using Windows Explorer. To do this, open the My Computer folder, in the main menu select “Tools” - “Map network drive” and in the window that opens, in the folder field, enter \\vboxsrv\shared_folder_name, i.e. in our case:
\\vboxsrv\WinXP-2-Share
After these steps, your shared folder will appear in the “My Computer” folder, accessible as a network drive.
Let's now check if you have Internet access. To do this, open: “Start” menu - “Programs” - “Accessories” - “ CMD command line"and in the window that opens (Fig. 32) enter the following command:
Ping ya.ru
If, as a result of running the command, you see that the packets have been sent and received, even partially, then everything has worked out for you, and the virtual machine has access to the Internet.

Fig.32: Setting up the operating system - checking the Internet connection
Quick access and comfortable work
Shortcut for quickly starting a virtual machine
To make it faster and more convenient to launch your virtual machine, we will create a shortcut specifically for it. You can do this as follows:
- By right-clicking on the desktop, call up the context menu and select “Create shortcut”;
- In the window that opens, in the “Specify object placement” field, enter
- In the next window, enter a name for the shortcut, for example, “WinXP” and click the “Finish” button;
- The created “WinXP” shortcut appears on your desktop, right-click on it;
- In the context menu that opens, select “Properties”;
- In the window that appears, select change icon and in the icon source file selection field, enter
- Click OK and then Apply.
After these operations, your shortcut will look like this:

Fig.33: Creating a shortcut for a virtual machine
Display Integration Mode
In display integration mode, you can easily organize access to the desktop and virtual machine controls from your desktop, i.e. all windows you open in the virtual machine will be displayed on your desktop, and not in a separate VirtualBox window. This function significantly simplifies access to the virtual machine, its controls and applications installed on it. To enable this mode, you need to select an item with the appropriate name in the main menu of the VirtualBox visualization window or press the key combination “HOST + L”, where the “HOST” key is the left “Ctrl” (by default).
Fig.34: Display integration mode
Conclusion
In this article, we reviewed the main points in installing and configuring the Oracle VM VirtualBox virtualization platform; I would also like to note the ease of setup and ease of use of the platform, as well as many additional functions, For example:
- built-in proxy module;
- custom launch;
- automatic collection of statistics;
- management and configuration using the command line;
- the ability to save and quickly apply various configuration options;
- various ways to organize network interfaces.
In addition to these advantages, I’ll add that the efficiency of using system resources by the VirtualBox application is beyond praise - on my home laptop (2.5 Hz 2-core CPU, 4GB of RAM) I can simultaneously run up to three virtual machines without any freezes (simply because they have different operating systems installed).
The material presented above will allow you to create your own virtual machine without any difficulties, but nevertheless, if you have questions or difficulties, do not forget to refer to the help of this software - it is quite complete and detailed. Moreover, you can always refer to the “online help” for this platform UserManual, located on the official VirtualBox website.
How to install a virtual machine to your computer and most importantly, which virtual machine to choose? Before asking you this question, I surfed the Internet and realized that the easiest to install and configure are VirtualBox and Virtual PC, but there is also Hyper-V and VMWare. I understand that now you will ask me: “Why do I need a virtual machine?” My answer: “I want to install different operating systems and experiment with them, I’m very interested: Windows XP, Windows 7, but especially Windows 8!” The Windows 7 I have installed works fine with all the applications installed on it, but the hype around new Windows 8 is only growing and I don’t want to stay on the sidelines, so you have already written two dozen articles about the eight on your website and keep writing. So I’m thinking about installing a virtual machine (I just can’t choose which one), install Windows 8 into it and slowly study it, and then you look in October when the final one comes out Windows version 8.1, I will install it as the second operating system. Mark.
Hello admin! on the Microsoft website and wanted to install it on my VirtualBox virtual machine, but the installation received the error “ VT-x/AMD-V hardware virtualization features are enabled but not functioning" What to do?
How to install a virtual machine
Friends, if you have never dealt with a virtual machine, then I will explain to you in a nutshell what it is. A virtual machine is a real computer created inside your main operating system and on this computer you can install other operating systems (several!) and not just Windows. You can experiment as you wish with the operating system installed in the virtual machine, go online from it, install various software, without fear of infecting your computer with a virus, in short, use your imagination and you will find a use for it.
For example, one of my friends learned how to reinstall the operating system and divide the hard drive into several partitions only using a virtual machine.
As for choosing a virtual machine, an article will be written on our website about each of the existing ones. I recommend it to you install virtual machine VirtualBox, its capabilities are enough not only for a beginner, but also for an experienced user, and besides, it is free. Start with her. Simple and intuitive settings, stable operation, made it one of the most popular.
What types of virtual machines are there?
Virtual PC is free, very easy to install in Windows 7, follow the link to the Microsoft website, download and install.http://www.microsoft.com/ru-ru/download/details.aspx?id=3702
paid, costs 222.53 €, but there is a 30-day trial period. This virtual machine is needed primarily for system administrators and software developers.
So it’s decided, let’s install the VirtualBox virtual machine. Go to the website https://www.virtualbox.org/, click "Downloads", select
VirtualBox 4.2.16 for Windows hosts x86/amd64.

The virtual machine installer is downloaded; we must run it as an administrator, otherwise in the future you will be plagued by various errors when working with the virtual machine. Right-click on the installer and select "Run as administrator"

The program is very easy to install on our computer.


We launch the virtual machine as administrator.

Click on the “Create” button.

First of all, I would like to draw your attention to the fact that if you decide to install Windows 7 64-bit on a virtual machine, choose Windows list 7 64-bit. If you decide to install another operating system, for example Windows 8.1 64-bit, then be sure to select Windows 8.1 64-bit in the drop-down list and enter the invented name of the virtual machine, for example Windows 8.1, then click Next.


In this window you need to specify the amount of memory that you can allocate to the virtual machine. Friends, you must understand that the RAM allocated to the virtual machine will not be available to the operating system installed on your computer. If you only have 2 GB of RAM, then you cannot allocate more than 1024 MB to a virtual machine; your operating system will be very slow when working with a virtual machine. If you are installing Windows 8, then the optimal size for it is exactly 1024 MB. As you can see, my computer has 8 GB of RAM, which means I can allocate more than 1 GB, for example 2 GB.

Create a new virtual hard disk.

File type select VDI

At this stage we need to specify the format of the virtual hard drive. If you check “Dynamic virtual hard disk”, this means that the space on your hard drive allocated for the needs of the virtual machine will not be used immediately, but as files accumulate in your virtual machine. I recommend that you use this option.

Specify the size of the virtual hard disk. If you are creating a virtual machine for the first time, specify 50 GB, this is for Windows installations 8 is quite enough. But I personally will indicate a larger volume for myself. Why? While working with the virtual machine, I will be installing many operating systems, so I will specify the capacity as 240 GB.
You can create a virtual disk on something other than system disk, it’s very simple, click on the yellow folder and Explorer will open, in it specify any partition on your hard drive to place the virtual hard disk.

We see the result. So, we have created a virtual machine, now we need to configure it and finally install Windows 8 into it.
Select our virtual machine and click “Configure”.

System. Uncheck the “Floppy Disk” box. We leave the first boot device as CD/DVD-ROM, since we will boot the virtual machine from installation disk or a Windows 8 image, leave the Hard Drive as the second device.

The “Processor” parameter is left as it is.

“Acceleration” Hardware virtualization must be enabled; you will probably be installing a 64-bit operating system.

Display. Video. "Enable 3D acceleration" and "Enable 2D acceleration"
Video memory 128 MB

Carriers. A little of your attention!
Your physical disk drive will be available in the virtual machine, in my case Drive “I” and if you have a Windows disk, you can use it to install the operating system, check the Live CD/DVD box.
There is also a virtual disk drive; let’s connect to it the image with the Windows 8 operating system, which we downloaded in yesterday’s article. In the "Media" option, select "Drive" and "Select optical disk image"

An explorer will open in which you can select the downloaded Windows image 8, then click Open.

The Windows 8 image will be attached to the virtual drive.


What is a USB filter? Imagine this situation: all USB devices connected to your computer will be detected in the operating system that is installed on your virtual machine. Naturally you don't need this. USB filters will determine which USB device should be detected in the virtual machine and which in your main system. To see how all this works in practice, you must first install the Windows 8.1 operating system in our virtual machine, and then everything will become clear to you, read on.

To ensure that all connected USB-2.0 flash drives work normally in your virtual machine, install the plugin VirtualBox 4.2.16 Oracle VM VirtualBox Extension Pack, download it from. website https://www.virtualbox.org/
In this article we will figure out how to install virtualbox and how to add new virtual machines. First, I’ll tell you for those who don’t know what these virtual machines actually are.
Imagine this situation - at work you have to work in a program that only works under the Windows XP operating system, and you have Windows 7 (or Windows 8/8.1) installed. How do you get out of this situation? Someone will humble himself and set himself on windows computer xp (for which security updates are no longer issued), and someone more intelligent will install a virtual machine on their computer and install Windows XP in it with the ability to work in the desired program.
That is, to put it briefly, a virtual machine is a full-fledged computer (with a processor, RAM, hard drive and even BIOS), which runs inside your computer using an emulator program.
Virtualization technologies, which were very expensive and resource-intensive just a few years ago, have already entered homes today ordinary users and take up space in most ordinary home computers. Here is a sample list of what virtual machines are used for:
- Application testing
- Testing network programs in closed virtual networks
- Testing applications with various PC configuration parameters
- Lack of funds for additional computers
- Consolidation of servers on one physical computer
- Training on various operating systems
and much more…
My experience with virtual machines began with virtualbox, but after working with virtualization giants such as VMware and the mega giant Hyper-V, I felt how much cooler they were. But for this coolness they ask a lot of money.
So if you are just interested in tinkering with other operating systems without reinstalling yours, or you need, for example, to run windows applications on a Linux computer, then Virtualbox should satisfy you completely.
If you are going to run serious network infrastructure projects that must work 24/7/365, then you are better off looking towards Hyper-V, which comes with Windows Server 2008/2012. Believe me, it's really worth the money.
This was a little background, and now about Virtualbox itself.
Download and install virtualbox
You can download Virtualbox from the official website, the most latest version at the time of writing - 4.3.14, we will install it. 
Run the downloaded installer and click “Next”  In the next window, leave everything as default and click “Next”
  In the options window, leave all the checkboxes as default
  In the next window, the installer will warn you that during installation a new network connection will be created, which will lead to a temporary disconnection of your active network connection. Click “Yes”, and in the next window “Install”
  We wait a few minutes for the program to install. After a message appears indicating that the installation was successful, click “Finish”
  If everything went well, the program “ VirtualBox Manager“
 The “Manager” itself is just a shell with the help of which work will be carried out between the virtual machine and the physical computer.
The program settings are quite sparse, you don’t even have to pay attention to them, since everything is configured there by default, which should satisfy the vast majority of users.
Adding a virtual machine
To add a new virtual machine, click the “ Create“, enter the name of the virtual machine, select the type of operating system and its version.  In the next window, select the amount of RAM for the virtual machine. I would like to draw your attention to the fact that you cannot select more RAM than is installed on your physical computer.
  In the next window you are asked to select a virtual hard disk or create a new one. Since we are launching the program for the first time, we will create a new hard disk by selecting “Create a new virtual hard disk”
  In the window for selecting the type of hard drive, I advise you to leave the type VDI, by choosing this type your virtual hard disk will be 100% compatible with virtualbox and its operating speed will be equal to the speed of a real hard disk
  In the next window you should select the type of virtual hard disk:
- Dynamic virtual disk– the size of the virtual disk will grow as it is filled with data. It is created faster, works slower.
- Fixed virtual disk– the size of the virtual disk will be the size that will be specified when creating it. It takes longer to create, it works faster.
I think you can decide for yourself which type suits you best, but I will choose the Dynamic disk type.  In the next window you will be asked to select the name of the disk, its size, as well as the location where the disk itself will be stored
  After selecting this data, click “Create”. At this point, the preparatory work can be considered complete.
Now a program with an added virtual machine has opened in front of you  In this case, a virtual machine is a “bare” computer, without an operating system. If you need to have a disk with the operating system or bootable USB flash drive, then you can use disk images to install the operating system in virtualbox (as in other virtual machines). It is very convenient and practical.
Setting up a virtual machine
Let's move on to the settings of the virtual machine we added. Click the “Configure” button and examine the virtual machine settings window.

After setting up the virtual machine, click “OK” and click “Launch”. If you did everything correctly, then when you start the machine you should start booting from the disk image  Then everything is the same as in a regular computer!
As you can see, there is nothing complicated and you now also know how to work with virtual machines! If you have any questions or suggestions, I’m ready to discuss them in the comments.
Did you like the review? Click like and subscribe to our website updates!
In I talked about the main capabilities and features of this wonderful virtual machine. If you decide that this is exactly what you need, then you can safely proceed to install VirtualBox. Next, I will tell you how to install VirtualBox on Windows.
Let's get started. First of all, open any browser and go to the official website of the program. For this purpose in address bar browser, enter the address of the official website http://virtualbox.org. Next, go to the Downloads link, which is located in the site menu and download the program from there VirtualBox installations. Select the version for Windows and save it to your computer. In order not to return to this again, I recommend immediately downloading the Extension Pack.
When both files are saved on your computer, you can begin installing the program. Open the folder in which you saved the downloaded files and run the installation of the program as an administrator.
The start screen of the installer shows the full name and version number of the program being installed. Next, follow the program prompts. Click “Next”.
 In this installation program window, you can disable program components and also change the program installation path. The program also warns us that to install we need to have 161 MB free space on disk.
In this case, we leave all settings at default. Click “Next”.
 Next, the program by default prompts us to create a shortcut on the desktop and on the panel quick launch, and also offers to associate files and virtual hard disks with this program. If you don't need this, you can uncheck the boxes. Click “Next” again.
 In the next window, the installer warns us that during installation the connection to the Internet or your local network. No problem, click “Yes”.
 Let's start installing the program. Click the “Install” button and wait for the installation to complete.
 During installation, the program will prompt you to install more drivers. USB controllers. Click “Install”.
 That's all! The installation of VirtualBox is complete. As you can see, this can be done quite quickly and does not cause any difficulties. Click “Finish” to complete the installation.
 How to set up VirtualBox
Next, we can begin preliminary configuration of the program. If you did not uncheck the “Start Oracle VM VirtualBox...” item, the program will start automatically. If you removed it, then launch the program by double-clicking on the icon on the desktop.
When you launch it for the first time, and no virtual machines have been created yet, the program greets you. In the future, this start screen will display a list of virtual machines you have created and their settings.
 Before you create your first virtual machine, you need to configure the program. To do this, press Ctrl + G to open the settings window or through the menu File > Settings.
 In the “General” tab, you can change the path to the folder where your virtual machines will be stored. When choosing a place where machine images will be placed, you need to take into account the fact that they take up quite a lot of space on your hard drive. Therefore, you need to select a folder on a disk that has a lot of free space. However, this path can be changed when creating a virtual machine, so if you leave this default setting, nothing bad will happen.
We leave the VRDP authentication library as default.
 In the “Input” tab, you can conveniently configure key combinations for controlling the VirtualBox manager and the virtual machine itself. It is advisable to remember the Host key (right Ctrl by default) and other control combinations. But if you forget, it’s not a big deal. In the lower right corner of the virtual machine window you will see Current state this setting. The host key is needed to switch keyboard and mouse controls between the guest and host systems.
 In the program settings you can also enable or disable checking for updates of the VirtualBox program, and you can also select the interface language that is convenient for you.

 The display and network settings can be left at default, because they can always be changed as you wish for each virtual machine separately.

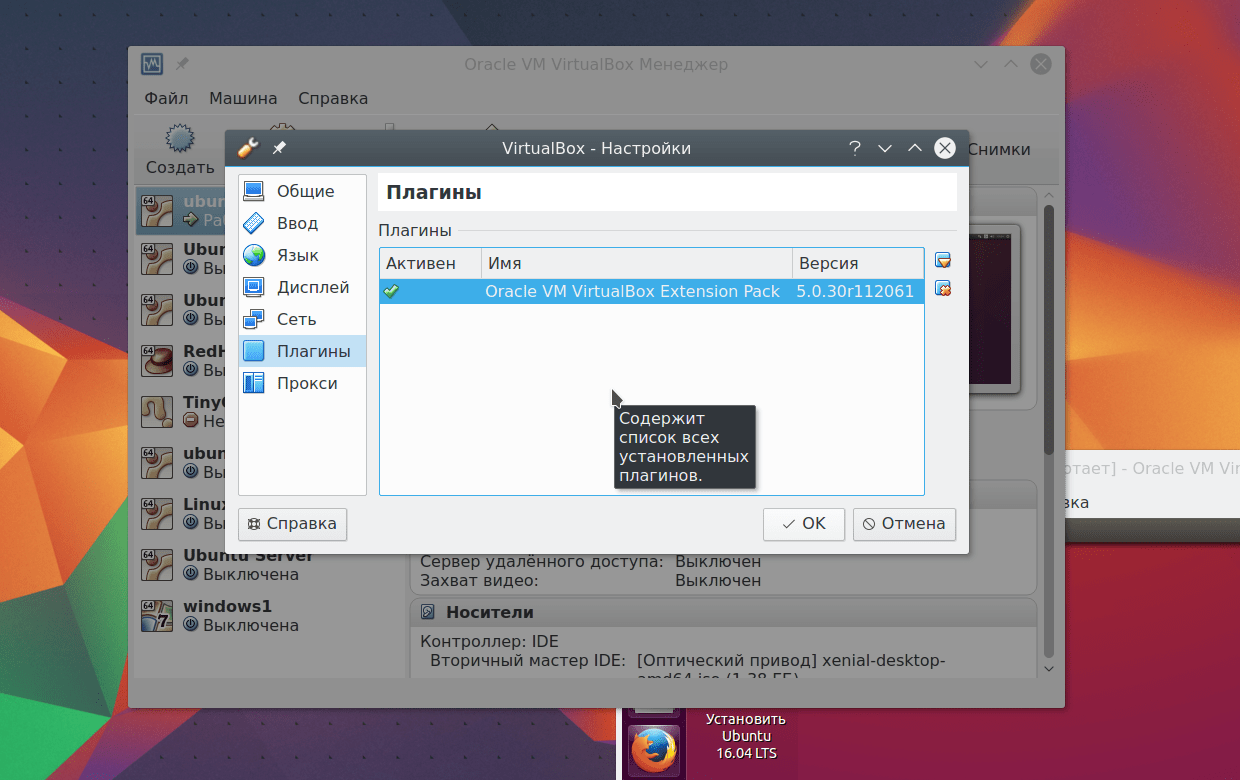
 In the “Plugins” tab, you can install the add-on package for the program, which I mentioned above and which we downloaded along with the program. In order to install these add-ons, you need to click on the “Add plugin” button and select the add-on file.
Please note that the plugin version must match the version of the program itself.
 If you are going to use a proxy server, then in the program settings in the “Proxy” tab you can specify the proxy server address.
 This completes the basic setup of VirtualBox. If you forgot or missed something, it’s not a big deal. All settings can be easily changed at any time.
I hope this article will help you quickly install and easily configure VirtualBox before creating a virtual machine.
VirtualBox is virtualization software personal computer from Oracle. The program has two versions - open source and closed. With VirtualBox, you can run different operating systems simultaneously, set up a network between them, share files, and much more.
You can run VirtualBox on Linux, Solaris, Mac OS X and Microsoft Windows, and also install most well-known operating systems on it. In this article we will look at how to use VirtualBox. Let's talk about installing and configuring VirtualBox, as well as some of the subtleties of working with virtual machines that can help you a lot. For ordinary users, this software is available completely free of charge.
The VirtualBox virtual machine is installed like most other programs. On Windows you can download installation file from the official website. And on Linux, the program is available through official repositories. For example, in Ubuntu it is executed with the command:
sudo apt install virtualbox
We will not dwell on this issue in detail, since there are more interesting problems. After installation, you will find the program shortcut in the main menu. In terms of virtual machines, the main computer where Virtualbox runs is called the host, and all running machines are called guests.
2. Create a virtual machine
Before you can start your first guest machine, you need to create a new virtual machine in the program. To do this, click the button Create in the main window:
In the first step, you need to select the type of operating system, for example, Linux -> Ubuntu this will enable some optimizations needed for this system:

If you are working on a 64-bit system, you can run both 32-bit and 64-bit systems. bit programs. At the next step of the wizard, select the required amount of RAM. This is a very important parameter, so if you have enough of it, it’s better not to regret it, 2 gigabytes will be quite enough.


And at the last stage you just have to choose the size for the new disk, as well as its name:

3. Processor settings
Select the created virtual machine and click Settings.

Select System, then go to the tab CPU:

Here you can select how many processor cores the virtual machine can use, as well as enable PAE to support more than 4 GB of RAM on 32-bit systems and EFI emulation mode. Then go to the tab Acceleration.
Here you can select the hardware virtualization mode, as well as enable such additional features, like AMD-V and Intel-VT. This will increase the speed of the system.
4. Graphics settings
By default, 18 MB of video memory is available for the virtual machine. This is very little for modern systems. Select an item Display, then drag the slider Video memory, so as to give the machine at least 128 MB of memory:

For 2 GB video cards, 256 MB will be available. Also, here you can configure the number of screens.
5. Network setup
By default, the virtual machine uses a network via NAT, which is convenient if you need to access the Internet from the machine. But if you want to set up communication between the machines themselves, or between a guest and a host over a network, you'll need a different method. Close the machine setup menu. Then open the menu File -> Settings.
There, select the network item and go to the tab Virtual Host Adapter:

Here you will need to create a new virtual adapter using the green button with a plus sign:

There is no need to change the settings, after that click OK. Next, open the machine settings again, go to the network item and select the adapter type - virtual host adapter, and the name - the one that was created for your adapter, for example, vboxnet0:

Now there will be a virtual network between all virtual machines connected to vboxnet0 and the host.
6. Cloning
You can do backup copy machine so that you can use it later or transfer it to another computer. To do this, use the option Clone. Just select it in the menu for the car:

7. Starting the machine
When you first start, you will have to select the media from which to install new system, it could be a DVD-ROM or ISO image systems:

You can change this image from the Devices -> menu Optical discs for an already running machine:


8. Additional plugins
Additional VirtualBox extensions allow you to access USB devices from a virtual machine, webcam, configure remote access and other. To install, first download the VirtualBox-Extension-Pack file from the official website:

Then open the menu File -> Settings, go to the plugins tab and click the green button:

Confirm installation and accept the license:


Done, the official plugin is installed and now you can work with USB devices 3.0 in your virtual machine.
9. Snapshots
You could create a copy of the virtual machine every time you need to test something. But this is not at all necessary. It supports such a great feature as snapshots. You simply take a snapshot, or you can then restore the system to a saved state at any time. You can create a snapshot of a running machine from the menu Car -> Take a snapshot of the state:

You can create pictures for a switched off machine on the tab Pictures:

To do this, select the item context menu Create a photo. All created images are available here:

10. Video recording
You can capture video directly into the virtual machine screen. To do this in the menu View check the box Capture video. The video will be saved in the virtual machine folder:

11. Guest Additions
Guest Additions enable features such as a shared clipboard, shared folders, drag-and-drop file integration, screen integration, virtual machine resolution adaptation, and more. This is an indispensable thing when working with virtual machines. Add-ons are installed on every guest system and make using VirtualBox easier.
To install add-ons in the menu Devices select Mount the guest additions image:

12. Real disk in VirtualBox
We have already almost covered everything about how to use VirtualBox Linux, but we will also focus on working with disks. Sometimes there is a need to work with a real disk. You can create a link file to a real disk using the VBoxManage command:
sudo VBoxManage internalcommands createrawvmdk -filename ~/realdisk.vdmk -rawdisk /dev/sda
Here we create a disk called ~/realdisk.vdmk, which points to our /dev/sda disk. You can link to any other drive. Just to start the machine, you will have to run VirtualBox as superuser. You can also create a copy of a real disk by converting it to VDI, just make sure you have enough space:
sudo VBoxManage internalcommands converthd ./realdisk.vmdk newdisk.vdi
On Windows, the command will look like this:
"C:\Program Files\Oracle\VirtualBox\VBoxManage.exe" internalcommands createrawvmdk -filename C:\drive.vmdk -rawdisk \\.\PHYSICALDRIVE1
13. Access to virtual disk
Sometimes the opposite need arises - to access the virtual disk and its contents from the real system. And this is also possible. First, look where the data starts on your disk:
VBoxManage internalcommands dumphdinfo storage.vdi | grep "offData"
Here storage.vdi needs to be replaced with the address of your disk, then mount it:
sudo mount -t ext4 -o rw,noatime,noexec,loop,offset=2097152 ~/VirtualBox\ VMs/storage.vdi /mnt/
Now you have full access to disk and you can even make changes that will be saved. This way, working with Virtualbox will be much easier.
conclusions
In this article we looked at how to use virtual virtualbox machine. Despite the fact that this free product Open source, it has everything you need and more. What virtualization software do you prefer? Write in the comments!
Related posts:

15 ratings, average: 4,60
out of 5)