How to make a beautiful inscription in html. How to make a beautiful font in html: sizes, colors, html font tags. By default, text is aligned left
I instruct the gentlemen senators to keep the speech unwritten,
but in your own words, so that the nonsense is visible to everyone!
Peter the First.
Currently, text to HTML is the main way of presenting information. The vast majority of sites on the Internet consist of text content. This means that if you have the ability, you can, at a minimum, read, and, at a maximum, write (there is some truth in every joke).
Let’s say you typed text in an editor, formatted it (highlighted some words bold or italics), or did something else with it. Then I copied and pasted the text into my html code. You open an html page in , and all your formatting has disappeared somewhere. This happens because the text editor uses its own special characters to format the text (essentially the same tags, only used in text editors), which you don’t see by default.
In the editor window you only see text. But in fact, there are also special control characters with the help of which the editor “understands” how to display this or that piece of text. That is, I repeat, this is the same as, only “tailored” for use in text editors.
But, despite this, there is a way to transfer text from the editor and paste it into the html code in its original form. And since we’re talking about this, let’s start studying text formatting with this tag. So let's get started.
§ 2. The formatting tags themselves
Pre-formatted text can be inserted into an HTML page using the and tags. The browser will display the text enclosed between these tags as it appeared in text editor. To be honest, I have never used this tag in practice, so I can’t say anything else about it.
The most popular tags for formatting text are:
- - used to highlight text bold.
- - used to receive italic text. It is recommended to use the tag instead of this tag.
- - will allow emphasize text. The main thing here is that the user does not confuse the underlined text with a link.
- - makes the text crossed out.
- - designed to highlight subscript text (subscript). This tag can be useful, for example, for writing chemical formulas. Here is the code
H2O
Gives us this formula
- - needed to highlight superscript text (superscript). For example, to write exponentiation: we write
(a+b)2,
We get
(a+b) 2.
All of these tags can be used to format text either one at a time or several together. This is achieved by nesting tags within each other. For example, the following html code:
H2O is the formula for water.
when watching
H2O- This water formula.
§ 3. Paragraphs
In HTML, paragraphs are created using the . Using this tag inserts one blank line and places the visible HTML page element behind it on the next line. For example, if we write:
So it will look like this:
And it is not necessary to use a closing tag, since the browser considers that the beginning of the next paragraph means the end of the previous one, but it is advisable to avoid confusion.
§ 4. Text alignment
To align the text, use the attribute align with possible values center, left, right And justify. It, accordingly, aligns the text to the center, to the left, to the right, and at the same time to two edges at once. For example, html code:
align="center">Text centered
will align the text to the center:
Center text
And this code:
right">
will align the text to the right
Align text to the right
If the attribute align is not used, the text will be left aligned. This happens by default. Example code:
will align the text to the left
By default, text is aligned left
§ 5. Line break and horizontal bar
If you need to ensure a transition to a new line without inserting an empty line (this happens when you press Enter in a text editor), then use the tag
. For example, html code
1. First line.
2. Second line.
in the browser it will look like this:
1. First line.
2. Second line.
U
no closing tag. You probably already guessed that to insert several empty lines, you need to write the tag
several times in a row.
You can also visually separate parts of the text using the tag. This tag creates a separator bar on the page (for example, like the green one at the beginning of this article). The tag has the following attributes:
- size- strip thickness;
- width- The width of the line;
- align- alignment;
- color- stripe color;
- noshade- an attribute that has no values. If specified, a solid black bar without a shadow is created.
For example, html code:
align="center" size="5" width="50%" color="#3399ff">
in the browser it will look like
The width and thickness can be specified both in pixels (then the value will be constant) and as a percentage (then the value will change depending on the screen resolution).
§ 6. Headings
To set the names of sections and subsections in HTML, use title tags. There are six levels of headings and they are designated as follows:
- - first level heading
- - second level heading
- - third level heading
- - fourth level heading
- - fifth level heading
- - sixth level heading
Headings are bold and separated from the rest of the text. empty line. The largest title is (the title of this lesson is highlighted by it), and the smallest is . Heading tags have the following attributes:
- align- alignment of title text on the page (the values are the same as for alignment of regular text);
- title- a tooltip that appears when you hover the mouse over the title.
For example, the HTML code:
align="center" title="Tooltip. Hover your mouse over the title to see it.">Заголовок 4 уровня !}
in the browser it will look like this:
Level 4 header
§ 7. Working with fonts
To format fonts directly, HTML has a tag. This tag has the following attributes:
- color- font text color;
- face- font typeface;
- size- font text size. Can be specified absolute (from 1 to 6) or relative value(from +1 to +6 and from -1 to -6). By default, text size is 3. If you specify size="+1"
§ 8. Creating lists in HTML
In HTML, lists are created using and tags. In the first case, ordered (numbered) lists are created, in the second, unordered (bulleted) lists. Each list element is highlighted with a tag. The browser displays list items with new line in the form of a column with indentation and markers. The type of marker is determined by the attribute type.
In a numbered list, the markers (type attribute values) are as follows:
- 1 - numbering Arabic numerals(default);
- A- in capital Latin letters in alphabetical order;
- a- small Latin letters;
- I- large Roman numerals;
- i- small Roman numerals.
For example, HTML code
First element.
Second element.
Third element.
The browser will show it like this.
It happens that you need to display a picture and add a title (short phrase). There are the following parameters for this:
Align="top" – aligns the text to the top of the image.
align="bottom" – aligns the text to the bottom.
align="middle" – aligns the text to the center.
Below is code that demonstrates the operation of the above described parameters.
Beautiful bee
 Very cute bee
 Nothing too.
Now let's see how to display an image when large quantities text.
There are two options:
Align="left" – the image "wraps the text" on the left.
align="right" – the image “wraps the text” to the right.
For clarity, write the following code:
<html > <head > <title > HTML image left – text righttitle > head > <body > <img src="images/htmlsun.jpg" align= "left" width= "140" height= "124" /> <big > Sunbig > <br> <p>> There may be text here containing information about the Sun.p> <br><br> <img src="images/htmlmoon.jpg" align= "right" width= "140" height= "124" /> <big > Moonbig > <br> <p> Here you can insert a scientific article about the Moon.p> body > html > Sun
Sun The shape of the Sun is close to an ideal sphere with a diameter of 1,392,000 km. It fits within the Moon's orbit and still has plenty of room left. In fact, more than a million planets like Earth would fit comfortably inside the Sun. Plus, if you could drive a car across its surface at 88 km/h, it would take you 5 and a half years to go around the Sun once (without stopping). But the size of the Sun is not constant. Modern research show that the diameter of the Sun decreases by approximately 1 meter per hour. If this phenomenon took place in the last century, then the Sun that we see now is 800 km less than the one that our ancestors saw. Perhaps this solar contraction is part of a long-term wobble that helps stabilize the enormous energy release.
 Moon
Moon
It is the only natural satellite of the Earth. The Moon's mass is 0.0123 Earth's mass (approximately 1/81) or 7.6.1022 kg. The diameter of the Moon is slightly more than a quarter of the Earth's (0.273) or 3,476 km. The Moon illuminates the Earth 500,000 times weaker than the Sun). On the Moon there is no atmosphere familiar to us, there are no rivers and lakes, vegetation and living organisms. The gravity on the Moon is six times less than on Earth. Day and night with temperature changes of up to 300 degrees last for two weeks.
But as you can see, it may be that the text and the picture are too close to each other. To fix this, you just need to set some desired value for the frame thickness and a color like the background.
<html > <head > <title > Displaying the image on HTML page title > head > <body > <img src="images//htmleclipse.jpg" alt=align= "left" width= "160" height= "130" style="border: 8px solid #ffffff;"/> <big >big > <br> <p> Article about the Solar Eclipse.p> body > html >
An astronomical phenomenon in which the Moon covers (eclipses) all or part of the Sun from an observer on Earth. A solar eclipse is only possible during a new moon, when the side of the Moon facing the Earth is not illuminated and the Moon itself is not visible. Eclipses are only possible if the new moon occurs near one of the two lunar nodes (the point where the visible orbits of the Moon and the Sun intersect), no more than about 12 degrees from one of them.
The appearance of text on the screen depends only on tags, it does not depend on spaces or line breaks.
All design elements of HTML documents are divided into two types: inline and block.
Inline elements can be part of a line, but block elements always occupy their own space on a web page and always start on a new line. Naturally, block elements can include other block elements and inline elements.
For obvious reasons, inline elements cannot include block elements.
Combining elements of a web page into blocks allows you to apply a single design to them and carry out layout. ... .
It will be enough to change the location of the block by changing one unifying tag. Naturally, this is more convenient than changing the location of each element of the web page individually. Inline elements are surrounded by tags To frame elements
block type
a pair is used
Block
First block of text
Block
Basic text formatting tags
Headings and paragraphs
Heading
first level
Second level heading
Third level heading
Fourth level heading
Fifth level heading
Level six heading Paragraph test Create text file.
, as in the example. Save it with extension
html
Block
Double-clicking on its name in the folder will launch the default browser, and your HTML document will already be loaded into it.. Highlighting in textText may be bold
The text can be underlined. The text can be crossed out. The text may be superscript.
. The text may be
| ... |
subscript |
| Quotes, variables, addresses | |
| ... | Serves to provide the author of the document with contact information so that anyone can contact the author of the material. Typically displayed in italics. Block element. |
...
|
Display text in a fixed width font. It is used, as a rule, to display a small piece of program code (for large listings the tag ). |
| ... | Highlighting important text fragments. Typically displayed in italics. |
| ... | |
| ... | Display text in a fixed width font. |
| ... | Strong highlighting of important text fragments. Typically displayed in bold font. |
| ... | Used to mark variable names. Typically displayed in italics. |
How to insert text into an HTML page? For this there are special HTML tags for text.
There are six levels of headings in HTML. They are added using tags
- . Wherein This is the first level heading, it is the largest.
This is the first level heading, it is the largest.
Example of creating headers:
Headings do not depend on each other in any way. You can add a heading of any level wherever you need it.
Beginners sometimes cannot figure out the question of how many first-level headings can be on a page. On the Internet, I have repeatedly come across incomplete and unreliable information on this topic. Therefore, I decided to consider this issue in detail.
Number of tags per page work
doesn't have any effect. You can add as many of them as you like. And here search engines have a negative attitude towards the fact that there is more than one first-level heading on a page. Therefore, if you are going to promote your site in search engines, then there should be only one first-level heading on each page. Conclusion: it’s better to immediately get used to not putting more than one tag to the page. After all, HTML has whole levels of headings. For any page layout, this is quite enough to highlight the tag for one header only.
Paragraph
for one header only.
Paragraph
Tag
Creates a paragraph of text. It has padding at the top and bottom to separate one paragraph from another. In addition, it is possible to set the first line indentation. All this is controlled using CSS.
Tag
Tag This is a line tag for inserting text. It is usually used when you need to highlight part of the text in a certain way.
For example, let's highlight part of the text in red.
The required part of the text is inside the tag . To make it red, the tag has the style attribute set, which specifies styles. Since working with styles is covered in the CSS tutorial, I won't explain how this attribute works here. Just add it to the tag as written in the example.
Tag
Tag
Used for special types of text in which it is important to preserve formatting. The text inside this tag is displayed on the page exactly as it appears in the page code. It preserves all spaces and line breaks. The text appears in a monospaced font, but this can be changed using styles.Text selection
HTML has tags to highlight text. Tags And create bold font. Although these tags have some differences, they generally look the same on the page. Tags And highlight the text in italics. There is a tag , which makes the text underlined, but its use is not recommended.
Example of text selection:
21 |
Bold font Bold font Italic font Italic font |
Text can be highlighted using styles. Everyone decides for themselves how to highlight text, using tags or styles.
Other tags
We looked at special HTML tags for text. But the text can also contain many other tags that add content to the page. You can even paste text outside of any tags and it will still appear on the screen. But in practice, no one does this, because text cannot be manipulated outside of tags. Therefore, all text must of course be contained within tags. And once you learn CSS, you'll be able to define the appearance of text.
In general, the question itself is simple. There is nothing tricky about placing one block on top of another. But still, there are several points in this issue that are worthy of discussion. I think there will be people who will be interested in this.
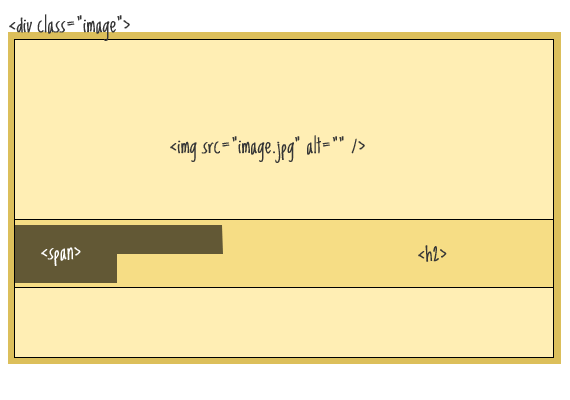
The idea is to simply overlay some text on an image. The text is presented in blocks of variable length, it is assumed that it will be located on the left side, with an even fill around the text. For example, like in this image:
Document outline
HTML markup

A Movie in the Park:
Kung Fu Panda
Of course, it would be easier to use a div element to display an image as a background, but in this case I'm assuming that the image is the content of the document, and therefore it belongs in the HTML. We will use the div element as a container for absolute positioning of the text in it.
CSS
.image ( position: relative; width: 100%; /* for IE 6 */ ) h2 ( position: absolute; top: 200px; left: 0; width: 100%; )So we placed the text directly on top of the image. Our next task is to create a background for the text. Since the element
is a block element, we cannot use it for these purposes. Let's use an inline element . Let's wrap the text inside the title in it.
A Movie in the Park:
Kung Fu Panda
We will use this span to decorate the text and background:
H2 span ( color: white; font: bold 24px/45px Helvetica, Sans-Serif; letter-spacing: -1px; background: rgb(0, 0, 0); /* in case the next line doesn't work */ background : rgba(0, 0, 0, 0.7); padding: 10px;
Problems

As you can see from the figure, at the end of a line, the block of text ends immediately after the last character on the line, and begins immediately to the left on the next line. The padding property for a span will not help us in this case.
To solve the problem, you need to use additional spans on both sides of the tag
, in this case we can already use padding.
A Movie in the Park:
Kung Fu Panda
We will set the padding property to these new spans:
H2 span.spacer ( padding: 0 5px; )
What about semantics?
At this stage the design is complete, but one problem remains. Namely, a huge number of additional HTML elements added for design purposes only. I mean spans. To solve this problem, we'll use jQuery. To do this, delete all spans in the markup and dynamically add them:
A Movie in the Park:
Kung Fu Panda
$(function() ( $("h2").wrapInner(" "); $("h2 br").before(" ").after(" ");
});
Kung Fu Panda
, in this case we can already use padding.
Kung Fu Panda
Kung Fu Panda