How to screenshot only the active window. How to take a screenshot of the screen on a computer: all the ways. Screenshot in Windows using third-party programs
One way or another, but every person who uses a computer or any other modern gadget, be it a mobile phone, tablet or laptop, eventually faces certain problems: the inability to configure necessary program; the desire to do away with the annoying error message that pops up on the screen every now and then; incorrect display of your favorite site, and so on. The list of "computer" troubles that cause difficulties for inexperienced users can be continued indefinitely.
In solving the difficulties that have arisen, people are forced to resort to the help of friends, specialists or regulars of thematic forums, for whom it is sometimes not enough just to talk about the problem.
Just the same, for a more efficient and prompt decision problems, its description, sent to a familiar computer scientist or IT people-forum users, should be backed up with a screenshot.
What is a screenshot?
In fact, the meaning of the word screenshot is hidden in its constituent parts: screen (from the English screen - screen) and shot (shot - snapshot). That is, a screenshot is nothing more than a screenshot of the user's device. And this means that the image obtained using the screenshot will contain everything that the author of the screenshot saw at the time of its creation.
Put down your camera
In most cases, a screenshot is a digital image taken using the built-in capabilities of the operating system or additional programs products. In this case, the screenshot is saved to the specified location on the computer or other device, or simply copied to the clipboard for further use.
It is worth noting that quite often people resort to an "alternative" method of taking a screenshot using external recording devices - for example, a camera or camcorder. Screenshots obtained in this way are of relatively low quality. Agree, is it stupid to take a screenshot of one phone with another?
It should be noted that, despite the development computer technology and general technological progress, many people, due to their ignorance and inexperience, continue to take screenshots of their devices in this way.
How to take a screenshot
The number of ways to take screenshots is comparable to the number of operating systems and software platforms, thanks to which one or another user digital device (computer, laptop, netbook, tablet or mobile phone) functions.
All existing operating systems have similar, but with a number of minor differences, mechanisms for creating screenshots. Next, we will consider this issue in more detail.
How to take a screenshot in Windows
For the most popular operating system among users - Windows, a huge number of options for creating screenshots are available. Each of them is good in its own way, and the decision which one to give preference to is entirely on the shoulders of the user.
Screenshot in Windows using standard tools
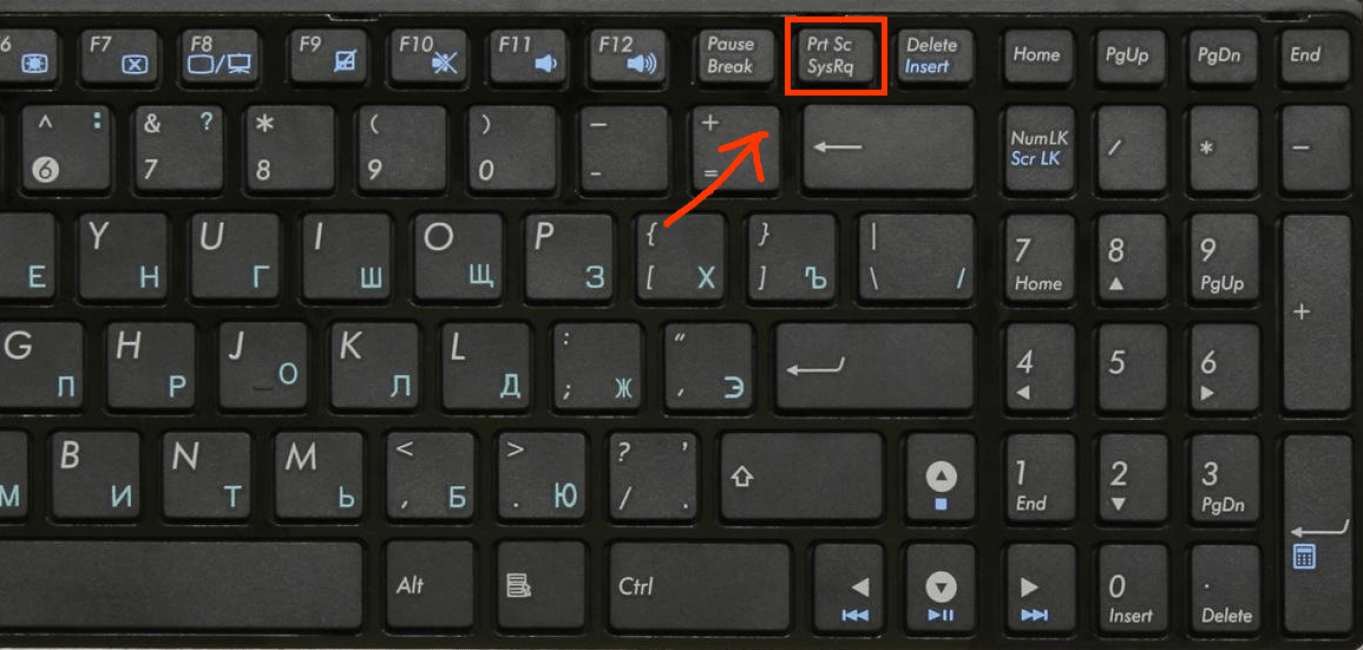
The easiest and perhaps the most famous way to take screenshots in operating system Windows is to press a key Print Screen(sometimes - Prt Scr, PrtSc, etc.) on the keyboard. This key is located on the right side of the keyboard directly above the so-called "arrows".

After pressing this key, the system will copy a full-screen image of the computer screen status to the clipboard.
Important! Notebook and netbook owners should generally press the Print Screen key in conjunction with the Fn key due to fewer buttons on laptop keyboards.

The resulting image can be saved using the popular Paint editor. To do this, after pressing the Print Screen key, you need to open Paint program(Start - All Programs - Accessories - Paint) and click the Paste button at the top of the screen.

A screenshot obtained in this way can also be used bypassing the Paint program. For example, you can paste the resulting image into Microsoft program Office Word or in a VKontakte message.
When you press the Print Screen key in combination with the Alt key, the system will take a screenshot of only the active window. This is convenient when there is no need to take a huge and bulky screenshot of the entire screen.
Scissors toolThe Scissors program is a tool included in the set of standard Windows applications Vista, Windows 7, Windows 8 and Windows 10, which allows you to take and save a screenshot of a specific area or the entire screen.

The screenshot obtained using the "Scissors" can be saved in PNG, JPEG, GIF, HTML formats, or simply sent by mail. It is also convenient to create notes on the resulting screenshot using the built-in Pen and Marker tools.

To start the program, go to the address (Start - All applications - Accessories - Scissors). For the convenience of further use, the running program can be pinned to the taskbar or placed as a shortcut on the desktop.

Screenshot in Windows using third-party programs
There are many programs for taking and saving screenshots in the Windows operating system. Consider the most popular of them.
Service access program cloud storage files from the giant of the domestic IT industry, in addition to its main functionality, it allows you to create screenshots of part or all of the screen.
Using built-in functions, the program allows you to add a note immediately after taking a snapshot.
A distinctive feature of Yandex.Disk similar programs is the ability to instantly add a file to the cloud and provide other people with access to it via a link.
LightShot is a free and intuitive program for taking screenshots of a computer or laptop screen. The program allows the user to select an area of the screen to take a screenshot of.

The resulting screenshot can be edited, add labels and marks to it. It is also available to upload a screenshot to the cloud to provide access to other people.
JoxiJoxi is another free screenshot tool with the ability to edit and save screenshots to the cloud. By functionality this application very similar to LightShot, however, Joxi has one important feature - the ability to share received screenshots on social networks.

How to take a screenshot in Mac OS X
A Mac OS X user can create several types of screenshots using the capabilities of the operating system alone:
Full screen screenshot on the desktop.
The key combination for creating such screenshots is as follows: Cmd+Shift+3. The screenshot will be saved on the computer desktop with a name like "Screenshot 2016-04-06 at 17.23.04.png".
Fullscreen screenshot to clipboard.
To create this kind of screenshot, you must press the key combination Cmd + Ctrl + Shift + 3. The resulting screenshot will be saved to the clipboard, after which it can be pasted, for example, in any graphics editor.
Screenshot of part of the screen.
A screenshot of a separate part of the screen is perhaps the most requested type of screenshots. After pressing the Cmd + Shift + 4 key combination, the user should select the desired screen area. The finished screenshot will be available on the desktop.
Screenshot of the active program window.
In this case, the finished screenshot will also be saved to the desktop. To create such a screenshot, press the key combination Cmd + Shift + 4 + Space. Not very convenient, right?
It is for this reason that in the operating room Mac system OS X, like Windows, recommends the use of third-party software.
Important! The Yandex.Disk, LightShot and Joxi programs already familiar to the reader are cross-platform, which means they are available in the Mac OS X operating system.
How to take a screenshot in Linux
Essentially, Linux is not a standalone operating system. This is a kind of foundation on the basis of which dozens of other similar and completely different operating systems are built, Linux distributions. However, it is very common for all distributions to use the same shells.
There are no standard tools for creating screenshots in operating systems of the Linux family, but working environments provide their own utilities for these purposes. Consider the most common Linux desktop environments:
Pressing the Print Screen key in the KDE workspace will open the KSnapshot program, which will allow you to take and save a screenshot to disk or to the clipboard, as well as transfer it to a graphics editor for further processing.
The GNOME Shell allows you to take a screenshot of the entire screen (by pressing the Print Screen key) or part of it (by pressing the Alt+Print Screen combination) using the gnome-screenshot utility. The resulting image can be saved or dragged to the desktop or to a graphics editor.
In Xfce, screenshots are created in a similar way to GNOME and KDE, but with one difference - the xfce4-screenshooter utility is used for this purpose.
X Window System.
Important! The user does not have to depend on a utility specific to a particular Linux desktop environment. You can always take a screenshot using third-party programs - LightShot or Joxi, for example.
How to take a screenshot on a mobile device
Among the most common mobile platforms allocate:
Happy iPhone and iPad owners can take screenshots of their devices by simultaneously pressing the Home button (center key) and the screen lock button. The screen will blink, a characteristic sound will be emitted, the screenshot on iOS is ready.
On all modern smartphones and tablets running android version 4 and above, a screenshot is created by pressing the power and volume down keys at the same time.
However, there are exceptions. So, for example, on some HTC and Samsung models, you need to hold down the power key and press the Home button.
On Windows phone 8, you can take a screenshot by pressing the power key and the Windows key at the same time. Starting with Windows Phone 8.1, the keyboard shortcut has changed to pressing the power button and the volume up button at the same time.
In both cases, the resulting image will be saved in the Photo Gallery.
Also for taking screenshots on mobile devices you can use one of the many applications available in Play market, App Store and the Windows Store.
Other types of screenshots
How to take a screenshot in the game
Usually, you can use the built-in tools to create this kind of screenshots. computer game or third party software.
You can find out which key is used to take a screenshot in the control settings in the game. Usually this is the F12 key or the same Print Screen.
Fraps is the most famous program for taking screenshots and recording videos from games. The program is notable for its ability to fine tuning, which makes the use of this utility very simple and convenient.

Fraps is not limited to just games. With this program, you can also take a regular full-screen screenshot of the desktop.
How to take a screenshot in the browser
In order to take a screenshot of a page opened in Chrome, Opera, Firefox or Yandex.Browser, it is best to use special extension Lightshot for browsers. This extension is free and available for installation on the browser add-ons page.
How to take a screenshot in the video player
Want to take a freeze frame of your favorite movie but don't know how? Very simple. All you need to do is use one of the many video players.
So, for example, to get a freeze frame in Windows Media Player Classic, you need to pause the video at the right moment and click "File - Save Image" or use the Alt + I key combination.
Taking a screenshot in VLC Player is provided by pressing "Video - Take a Snapshot" or by pressing Shift + S.
In KMPlayer, click right click click on the video and select the "Capture" menu item. You can also use the keyboard shortcut Ctrl+E (screenshot with the ability to select a name and save location), Ctrl+A (the screenshot will be saved in the default folder) or Ctrl+C (the screenshot will be saved to the clipboard).
How to take a screenshot from a YouTube video
For these purposes, it is most convenient to use the AnyFrame service. To receive frames, you must specify the address of the source video on YouTube, after which the service will download it and break it into frames with the possibility of saving them later.

How to take a long screenshot
Sometimes people have the opportunity to take a screenshot of an entire page of a particular website. There can be many reasons for this: analysis of a competitor's website, drafting a technical task for a programmer, revising the design of your own website, and so on. It is recommended to use one of online services to take long screenshots:
- http://www.capturefullpage.com/
- http://ctrlq.org/screenshots/
- http://snapito.com/
It is worth noting that in addition to online versions, the above-mentioned services exist as extensions for Chrome browsers, Opera and Firefox.
Hello, dear readers of the blog site. Everyone or a laptop at one time or another is faced with the question: how to take a screenshot (or in other words, a snapshot - read more) of the screen, for example, in order to send it to someone later. Sometimes it does not appear on the computer special programs helping to implement all this quickly and efficiently.
It doesn't matter, because the built-in capabilities of Windows (even in the old XP) will be enough to implement this task. If you use Windows 7, 8 or Vista, then they even have a special built-in program called Scissors for this purpose. So be sure to do it if you read the relevant section of this publication.
The second frequently asked question is: how to take screenshot on phone running Android, Ios (this operating system is used on the iPhone and iPad), Windows Phone (used, for example, on Nokia Lumiya), Sinbain and other operating systems. If you are faced with this for the first time, then the answers will not be obvious to you.
And finally, I want to spend some time describing specialized programs, allowing not only to make all conceivable screenshots on a computer and laptop, but also automatically upload them to the Internet so that the one to whom you give the link can view them and download them if desired. I hope it will be interesting.
How to take a screenshot on a computer or laptop in Windows XP, 7 and 8
The most ancient and proven way to take screenshots on a computer is still the key "Print Screen". It is usually located at the top right of the keyboard, as shown in the following figure:

True, on different types of keyboards (depending on its size and purpose), instead of “Print Screen”, it can be written: PrntScrn, PrtSc, PrtScn, PrtScr or something else like that.
On laptops However, to take a screenshot, you may need to press not just one key, but a combination of them: Fn + Print Screen. The fact is that laptops (of a particularly small size) use a truncated keyboard, some of the keys of which are available only when you hold additional key Fn, usually located at the bottom of the clave (these firtual keys will be written in the same color as Fn).
When you press the Print Screen key (or Fn + PrtScn in the case of a laptop), a screenshot of everything that was displayed on the screen of your computer or laptop at that moment will be copied. If you need to take a screenshot of only the currently active program window (which currently has focus), then you should use the keyboard shortcut Alt + PrintScreen.
Okay, we can assume that we have learned how to make screenshots. Now is the time to learn how to use them, i.e. save them as graphic files, which can then, for example, be sent to someone, inserted on the site (as I do) or stored in a secluded place. To do this, you will need to paste the screenshots from the clipboard of your computer into any program for working with graphics on your computer or laptop (I can take Photoshop, IrfanView, and dozens of others as an example).
If there is nothing like this (you didn’t install it, or you are working on someone else’s computer), then the Windows operating system itself has a built-in free Paint editor. Even if it is not perfect (rather, even simply miserable), but for the "manifestation" of the made screen will fit quite well. So, in order to get the Point out of the wilds of the software built into Windows, you will need to do the following manipulations: "Start" - "Programs" - "Standard" - "Paint".
Now in an open graphic editor (Point or any other) choose from top menu"File" - "Create" (or press the combination Ctrl + N), and then type the key combination Ctrl + V (or select "Edit" - "Paste" from the top menu). The screenshot copied earlier to the clipboard will be inserted into the editor window, and you can properly process it if necessary (crop, add captions, highlights, etc.).

At this stage, we have achieved that we finally saw the screen we made with our own eyes and even managed to mock (process) it, but this is not enough. It still needs to be saved as graphic file(most often used for this). To do this, you can use the keyboard shortcut Ctrl + S, or select "File" - "Save As" from the top menu. It remains only to choose desired format and give the file a name. Everybody. Now you can do whatever your heart desires with it.
How to take screenshots in the Scissors program from Windows 7 and 8
There is one obvious drawback in the method of taking screenshots described above - the process itself does not proceed in an explicit form, and for those who have encountered this for the first time, it may seem that nothing happened at all after pressing the “Print Screen” button. However, Windows Vista, 7 and 8 have a new tool called Snipping Tool that allows you to take screenshots in a much clearer and more visual way. In the same program, they can be processed and saved as a graphic file.
The “Scissors” program lives in the same place as the Point discussed a little above: “Start” - “Programs” - “Standard” - “Scissors”. As a result, you will see a tiny window of the program, and the rest of the screen will appear as if overexposed.

It is assumed that you are already ready to select the desired area of the screen on your computer or laptop in order to take a screenshot of it. If so, then holding left button select a snippet. If not what you wanted to “shoot” is open at the moment, then click on the “Create” button in the “Scissors” program window (or click on Escape) so that it is wrung out. After that, open what you want to screenshot, and again click on the "Create" button, and then select the desired area of the screen.

Default using a selection of a rectangular area, but if you click on the arrow to the right of the "Create" button, you can choose one of four options:

- Free form - you are free to circle the desired area with the mouse cursor, or with a graphic pen (if you use it)
- Rectangle - default
- Window - a screen will be taken of the window of the program that will be under the mouse cursor (for clarity, it will be circled in red)
- Whole screen - in this case, the program takes a screenshot of everything that is currently displayed on the screen (except for the mouse cursor)
Than this method better than that when the “Print Screen” button is used, this is because you will immediately see the screenshot made in the window built into the “Scissors” graphic editor, where you can paint on something using the three available tools: pen, marker and eraser.

The functionality of the "Scissors" editor does not even reach Point, but it will be possible to quickly paint something on the screen (I "got drunk" in this regard, because I use it to work with screenshots professional program, which will be discussed below). In general, when you make the necessary notes, you can safely press the button with the floppy disk to save screen as a graphic file in Gif, Png or Jpg format, and it is also possible to do this as a separate Html file (it's not very clear, however, for what purpose).
There is also a button on the program panel for sending a screenshot as an attachment to e-mail, for example, when you took a screenshot to show it to someone. There are again options for third-party programs for a computer and laptop that allow you to automatically upload the screenshots taken to the network and give access to them to everyone, but we will talk about them a little lower.
And finally, by selecting “Tools” - “Options” from the top menu, you will get access to the poor settings of this program.

In my opinion, the developers of Windows 7 and 8 could really add a bit of functionality to this built-in program so that it does not look so unpresentable in terms of editing screenshots. .
Yes, I forgot to say that "Scissors" allows you to make a screen, for example, a drop-down menu. To do this, you will need to open this menu and press the key combination "Ctrl + Print Screen". A screenshot of the desired menu will be taken, which can then be cropped and saved.
Screenshot programs for Windows
First, I will tell you a little more about the programs that I use myself, and then I will give a list of other popular applications for working with screenshots.
One of the most popular softins on my computer is . It has a lot of features and can be useful not only for a webmaster, but also just in the household for solving a number of everyday tasks, one way or another related to taking a screenshot or recording a video from the screen.

The program has powerful functionality both for taking screenshots and for processing them. For example, it easily allows you to take a screenshot of a web page that takes up more than one screen (you have to scroll to the end for a long time).
For this purpose, there is a universal and convenient All-in-One mode of operation, when by pressing the red button or the Print Screen key (when Snagit is running, this key starts working for this application, and not for copying the screen to the clipboard) do whatever pleases you.

For example, if you press the "Print Screen" button and move the mouse cursor over the application window from which you would like to take a picture, magic happens. By moving the cursor over different places in the window, you will see that either the entire window, or the menu, or some other internal subdivisions of it will be automatically selected. Those. you don't have to aim accurately to frame the part you want to capture.
But you can also work in normal mode, highlighting the desired area while holding down the left mouse button, and at the same time you can aim accurately, because a magnifying glass appears under the cursor, increasing the point of contact of the cursor with the screen.

With the help of Snagit, you can capture video from the screen, and do much more. And already about the ability to process screenshots on your computer or laptop in general, songs can be added. Here it will probably be easiest to bring a few screenshots so that all the greatness of this creation is clear:


There are a number of other programs that are about the same as Snagit:
- FastStone Capture- a good screenshoter for a laptop or computer, not overloaded with anything superfluous.
- PicPick- allows you to quickly take a screenshot of the computer screen or any of its selected areas, including scrolling windows. In terms of functionality, it is very close to Snagit, except that only video cannot capture. The built-in editor allows you to actually professionally process the resulting image.
Programs for taking and uploading screenshots from a computer to the Internet
Clip2net can not only take screenshots and record video from the screen, but also allows you to instantly upload this whole thing to the Internet (the link to the screenshot will be automatically copied to the clipboard and it only remains to be pasted into a letter, website, forum or blog). As a result, you will not need to use your own hosting or one of Yandex Disk, Dropbox, etc.
After taking a screenshot, the program will open a window for editing the captured image. If you do not need this operation, then in the Clip2net settings, check the box "Immediate download". In the editing window, you can use standard tools (insert labels, selections, arrows):

Clip2net is not unique in its kind and there are several good ones on the market. screenshot sharing software:
- Joxi— a good screenshoter with the possibility of instant publication. They are edited directly when the desired area of the screen is selected, i.e. without switching to the editor window.
- Lightshot- allows you to quickly take a screenshot, add notes to it, draw arrows and other shapes with a pencil. When saving a file on a computer, a unique name is immediately assigned, or you can immediately send it to the developers' server and instantly get a link to it, which is very convenient.
- - It's ridiculously simple and easy to use. There is, as it were, nothing superfluous in it, but everything that is - hits right in the bull's-eye (in my sophisticated opinion). Actually, the idea, as far as I understand, was just taken from the "apple" (macovods) - you activate the keyboard shortcut and the picture with the screenshot will immediately fall on the desktop.
- , which recently learned how to take screenshots and upload them to its own Yandex cloud with a link to them. The program has a pretty handy graphics editor that allows you to add arrows, frames, lines, etc. to the screenshot. things.
- Monosnap is also a very good service that allows you to shoot, process and upload to the network not only screenshots, but also screencasts (video captures from the screen). It also allows you to organize access to your desktop or webcam in real time.
- Skitch- a simple screenshoter and screencaster, but with somewhat poorer functionality than the services described above. However, it allows you to send screenshots from your computer or laptop to Evernote, of which it is a part.
- Jet Screenshot- allows you to capture the entire screen, active window or selected area, and then crop the resulting screen, add arrows, circle the desired area or insert an inscription. In the program settings, you can specify where the final file will be saved - on a computer (laptop) or on the developer's server with a link to it.
How to take screenshots on the phone (Android, Ios and other platforms)
Also quite an interesting question. If everything is more or less clear about a computer or laptop, the problem is not how to do it, but how to do it in the most optimal and convenient way. But a screenshot of a mobile phone or smartphone - it’s a little more difficult to understand how to do it, because there is no special button for this purpose, but a combination of control keys is used, which will be different for various types mobile operating systems.
Let's start with iOS, on which and phones from the Apple campaign ( iPad and iPhone). In order to take a screenshot, you will need to hold down two buttons for a few seconds: “Power on” (sleep / wake up) and “Home”. The resulting pictures are saved in the Photos application on your device from the operating system.


How to take a screenshot on android
The Android operating system has several versions for which the method of taking screenshots varies. In addition, phone manufacturers also sometimes make their own adjustments (for example, on my old Samsung Galaxy S3, a screenshot is taken by swiping the edge of the palm across the screen from left to right). Actually, I will try to summarize the information I have on different types devices:
- Android 1 and 2- in devices running on this OS there was no built-in ability to take screenshots, so you had to install third party application helping to make this happen. The methods for taking screenshots in this case depended on the application you chose.
- Android 3.2- starting from this version and before the appearance of the four, to create a screenshot of the screen, it was enough to hold the "Recent programs" button for a while.
- Android 4- A screenshot is taken after briefly holding down the "Volume Down" and "Power" keys.
- Samsung under Android control - most often, this phone manufacturer allows you to take screenshots by holding a couple of buttons "Home" and "Power", or "Back" and "Home".
- HTC running Android- hold down the Home and Power buttons for a few seconds
The screenshots obtained in this way from an Android phone are stored in the Gallery application that comes with the OS.
There is another operating system for mobile phones, How Windows phone, on which, for example, quite popular nokia phones Lumiya. AT Windows versions Phone 8 to take a screenshot, it will be enough to press the "Power" button (on the right side of the phone) and the "Win" button (at the bottom of the phone screen). But in Windows Phone 8.1, everything has changed a bit - you need to click on "Power" and "Volume Up".
Good luck to you! See you soon on the blog pages site
You may be interested
 Screenshot - what is it and how to take a screenshot
  How to install Viber (viber) on a computer?
  Skype - what is it, how to install it, create an account and start using Skype
  FAQ and FAQ - what is it? What's happened computer program
 AdvertApp - earnings in mobile application Advert App
  Where can I download Photoshop for free - how to get and activate PhotoShop CS2 for free from the official Adobe website Official site - how to find an official site through a search engine
If you urgently need to show something to your interlocutor or save it, the user may not know how to take a screenshot on a computer. It's time to learn it!
Why take a screenshot
Read also: How to set a password on a Windows folder? | 7 Best Ways and Programs to Encrypt | 2019

It often happens that a screenshot is simply necessary.
For example, if you need to show your screen to the interlocutor or send this data somewhere, if you need to save something that is not saved by pressing the right mouse button, or if you just want to catch a good moment in the video.
And these are just some of the reasons to use such useful feature your personal computer or laptop.
For example, you are in a not very pleasant situation, for example, when using a virtual wallet.
And in order to prove to the administration that you are right, you will have to provide them with evidence. And here, well, you just can’t do without a screenshot.
Or you have to contact the support service of your hardware or software with a problem.
Again, it’s impossible to explain in words, and what remains to be done? Of course, take the opportunity to show your screen.
It even happens that you want to capture messages like memories, and “Ctrl + C” alone is clearly not enough.
A lot of little things that, it would seem, are easy to leave as an image on your personal computer or laptops, but it is simply physically impossible to do this without creating a screenshot.
In fact, the ability to take screenshots can be useful at any time, and therefore it is important to know how to properly take a screenshot of your screen or a selected window, or maybe just some part of it. Yes, you can choose even one phrase or picture.
Well, to do this, in fact, is quite simple, and in order to take a screenshot, you need to make a minimum of effort. It is very simple, done in a few clicks, and even a child can do it.
Printscreen with a button
Read also: [Instruction] How to reinstall Windows (7/8/10) on a computer or laptop | 2019
For starters, the printscreen is the same, only with different letters. The name, by the way, comes from the first way to create screenshots - the PrintScreen button.
This button may also sometimes be called PrtScr , and is usually on the right side. Its location depends on the type.
So, this button is the fastest and easiest way to take a screenshot of your screen in seconds.
Just press it to save the screen image to the clipboard. That is, so that you can insert it literally anywhere.
Nothing extra, just one button, and then you can edit the screenshot in any image editor.
You can do this with Paint, Paint.net, GIMP, or any other editor you have.
It is important to remember that a screenshot taken using the PrintScreen button captures the entire screen, and if you send a screenshot to someone, that person will see all your browser tabs, running programs, absolutely everything. Therefore, editing the print screen can be very important if you do not want others to see more than they need.
How to take a screenshot on a laptop
Read also:

As with any keyboard, the PrintScreen button on a laptop does not go anywhere. It is in its place, which depends on the type of keyboard, and yet it performs the same functions.
But it happens that the user presses the button again and again, but nothing happens. And what then? Can't take a screenshot on a laptop?
Not at all! This simply means that in addition to the key already known to the user, if you have a laptop, you need to use . And it looks like Fn+PrintScreen .
The button is signed, “Fn”, and it is located at the bottom left, not far from the space bar.
It's so easy and simple, just two buttons. Well, the screen, again, will be saved for further editing.
And if you are sure that you did everything right, and the screenshot still turned out, then it's time to edit it. How to do it right?
How to edit printscreen
Read also: Windows Task Scheduler - how to configure and what can be disabled without harming the system?

The easiest way is to call the Paint program and cut off everything unnecessary with its help.
As you know, this is the simplest “drawing tool”, and it is just as easy to use it to adjust the size of the screenshot.
All you need is:
- Open the "Start" menu, you can do this with the "Win" key or by opening the menu on the left;
- Select a folder called "Standard";
- From there run the program
- Pressing Ctrl+V will paste the screenshot into a new canvas.
- Then you need to select the tool "Select", with which you will mark the desired area, and "Crop".
- It remains only to save the image.
And the screenshot is ready!
Nothing complicated at all, just a few clicks, and you can send it anywhere.
Similarly, you can edit any affordable program that you have on hand. Using the keyboard shortcut "insert" the resulting screen can be placed in absolutely any application.
And if, for example, something is wrong with the printscreen button? Or is it just not clear here? What to do in this case?
Printscreen with scissors
Read also: [Instruction] How to connect a printer to a computer on Windows 10 and Mac OS

In Windows 7, the PrintScreen button can be omitted altogether. Instead, there is a very handy tool called "Scissors".
It is designed to create a screen without further processing, that is, you can make a print screen of absolutely any size and anywhere on the screen.
It is easy to both find and use, and it only takes a few steps:
- All the same "Start", then in "Standard" you need to find a program called "Scissors".
- It opens instantly, it remains only to click on the tab called "Create" and select the size and shape of the field, that is, the future print screen.
- Then it remains only to click on the "Save" button, or add an inscription to the print screen using the "Marker" tool.
Actually, nothing complicated, right?
Indeed, both ways to make a printscreen are very easy and affordable.
True, in different versions of the operating system screenshots do not always work out the same way.
Printscreen on Windows 10
Read also: TOP 5 Ways to Take a Screenshot on a Computer Running Windows 10

In the "ten" there are many more ways to create and save a screenshot.
Firstly, in some cases, screenshots are saved automatically, in a folder specially designated for this. By the way, it is located on a local disk.
Well, and secondly, there are more built-in tools that allow you to take a screen without any problems.
And not only a screen, but even a video recording without additional programs, all this is provided for in the operating system.
There are several tricks with the PrintScreen key. When you click on it, a screenshot (desktop, running programs etc.) will be automatically transferred to the clipboard, from where it can be pasted into a document or any graphics editor.
If you press the key combination Alt + PrintScreen , you can make a print screen of only the working window.
For instance, open folder, browser or any windowed or even full screen mode. In order for everything to work out as it should, you must first make this window active, that is, click on it.
And finally, with the Win + PrintScreen key combination, screenshots will be saved automatically.
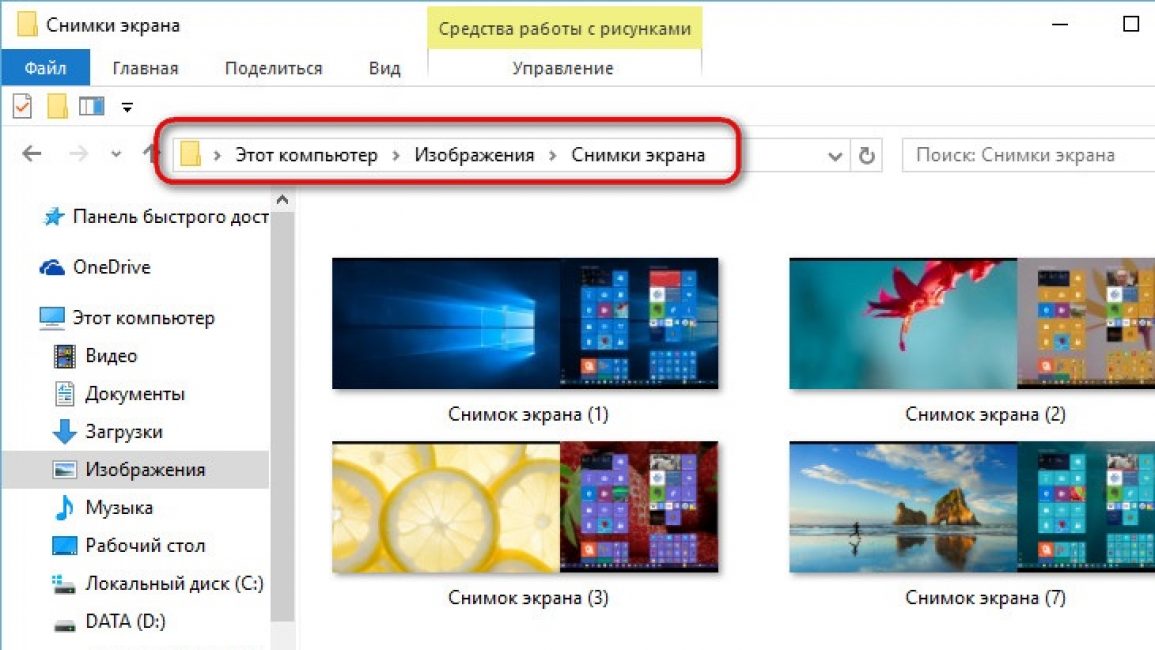
That is, they will immediately appear in the system. When you click on these buttons, the printscreen will not move to the clipboard, but will already be in the form of an image in standard folder, which is called "Screenshots" and is in the folder "Images".
But these are only keyboard shortcuts, what about other ways then?
Are there other possibilities?
CreatorsUpdate: Game Bar and Scissors
Read also: TOP 4 Easy Ways to Change Any File Extension in Windows 7/10
operating room Windows system 10, like its previous versions, is equipped with a tool called "Scissors". Yes, yes, exactly, in addition to key combinations, there are many more built-in ways to take a screenshot.
This is a standard program, so finding it is very, very easy. You can find it through "All Programs" or just type the name in the search bar, and then run the program.
In principle, the algorithm of actions does not change; it is very easy to make a print screen using this program.
As mentioned above, you just need to select the area and shape of the desired screenshot, mark this place on the screen, cut it out, add a caption if you wish, and save. Ready!
By the way, you can choose any folder for saving, and a delay function has appeared in the top ten, that is, the program can count the required amount of time before taking a screen.
Another innovation was the CreatorsUpdate system, that is, improved and expanded keyboard shortcuts and minor improvements to the operating system. One of these combinations can just make a screen, and this is Win + Shift + S .
Often the user gets lost when looking for a key called “Win”.
In fact, this is just a button with which you can go to the desktop or launch "Start", and a checkbox is drawn on it.
And finally, the game panel. This is another way to take a screenshot on Windows 10 without using third-party programs or applications.
Game bar is a pre-installed program that is very easy to launch, especially when using various applications.
It was originally designed to record videos from open applications and programs, but with its help you can also capture a print screen.
To do this, first open any program you need for the print screen, and then press the key combination Win + G.
Desktop print screen - Ask Ubuntu
Probably, many already know how different these operating systems are from each other.
And if in Windows it’s easier to make a screen, then in the case of Linux, you may have to try more than one method until the right one works.
The thing is that not in all versions of this operating system the already known PrintScreen button works as it should.
And sometimes it does not work at all, and even the key combinations that are common for the same “windows” simply do not work.
But it’s still worth trying this key, because sometimes when you press it, the system even automatically offers to save a screenshot. That is, it opens a window for selecting the save folder.
Similarly, you can try the key combination Alt+PrintScreen , which will allow you to take a screenshot of the active window, or Shift+PrintScreen , to pre-select the area of \u200b\u200byour future print screen.
Sometimes it works, sometimes it doesn't, but either way it's worth a try. Here you don’t even need to use third-party editors or the clipboard, the system will save everything for you.
But what if the button and key combination don't get a response? In this case, you should use the built-in utility Gnome Screenshot.
It is in the folder “Accessories”, and called by double-clicking the left .
With this program, you can pre-select the size and area of the future screen, turn the pointer on or off, or even activate a delay to prepare the perfect print screen.
All this is very easy and convenient, and will not take much time or your efforts.
True, using the printscreen button is not always convenient, or the user may simply not have the opportunity to do so.
And the same "Scissors" or "Gnome Screenshot" may not be at hand, not to mention remembering key combinations.
Then third-party programs that you can use will be very useful, and which are not inferior to the ease of working with the PrintScreen button.
Printscreen on a computer without a button
Read also: [Instructions] How to reset Windows 10 to factory settings: All methods | 2019
It would seem that making screenshots with the help of a button is the easiest. So I took it, clicked it, clicked it again, inserted it, edited it ... But it also happens that it doesn’t work out.
Therefore, various programs and applications will come to the rescue.
With their help, you can take a screenshot in a few clicks, save it in a predefined folder or select a location, edit immediately or select an area of the print screen.
Most programs are free and take up very little space., are easy to install and are as easy to use as a button, and the choice of them is very, very large.
You can download a program that combines the functions of a photo and video editor, you can find an application from a manufacturer or from a developer who has put into it functions not only for creating a print screen, but also for recording video.
It all depends on the user, and, of course, on the choice of programs that are best suited for creating a screen.
The list of such most suitable programs includes Snagit, Greenshot, Snippy, Jing and others, which allow even the most inexperienced user to intuitively understand the work and easily take a screen.
You can find them using a search engine, there are different versions and program options. But how to use such programs correctly?
When creating abstracts or reports, you need to copy a screenshot into the document. This screen capture procedure is called Print Screen. . Every computer user who constantly deals with the execution of any documents should know how to make a printscreen. This process is very simple and fast.
How to make a screen print
To take a picture of the screen, you need to perform only one simple step. They will be pressing a button on the keyboard called "Print Screen".

After pressing the button, the image is copied to the clipboard. During this time, there are no visible changes in the operation of the computer: new windows do not appear, notifications are not displayed. From you can insert your image into any program that supports processing graphic information. There are many programs that specialize in creating and editing printscreens. These include HyperSnap and WinSnap.
But most often used to insert pictures Microsoft Word, Rhotoshop or regular Paint.
How to print a page
If you want to take a picture of not everything that is visible on the monitor, but only one open window, you can do it with a keyboard shortcut. To do this, hold down the key alt, do Print Screen the active window on the monitor. Such a function is very effective when you need to insert only a certain part of the monitor workspace into the document. The combination will save time on editing pictures.
How to Insert a Print Screen into a Microsoft Word Document
If you want to insert a printscreen into word document, then you can simply press the key combination "Ctrl" + "Alt". Before inserting a snapshot, you must specify the location of its location by placing the cursor on it. You can also insert a graphic object by using the context menu. To do this, right-click on the insertion site of the printscreen and select the “paste” function.

In the case when you need to change it before inserting a screenshot into a document, first insert it into any graphics editor and perform any operations on it.
How to insert a printscreen in Paint
Program Paint is present in any operating system as a standard graphical editor. Using this application, you can save the Print Screen as a picture to your computer. To insert a screen shot in Paint, you need to follow a series of simple steps:

How to work with Print Screen in Photoshop
- Opening the program Adobe Photoshop and create in it new document by executing the File and New commands.
- Now we take a screenshot of the active window, which will be on the clipboard.
- Use the Edit-Paste command to paste the image from random access memory into the working window of Adobe Photoshop.
- Having done with graphic object Everybody necessary actions, save it in any format to the computer's memory.
On the topic, you can also watch a video:
Screenshot - useful option and is a normal screenshot. It can be done at any time and saved to your hard drive.
Taking a quick snapshot of Windows 8
In order to capture the entire desktop, you need to use a combination Windows keys+PrintScreen.
In this case, an image of the entire screen will be created. It will be automatically saved in the package "Screenshots" located on the tab "Images" .
The saved file will have a JPEG extension. Each subsequent picture will have its own numbering.
You can change the name assigned to the screenshot at any time.
If you need to create a screenshot of a certain area of the screen or make it an arbitrary shape, use standard program "Scissors".
Working with it was described in the previous section.
To find this program - enter the START menu and select the item to display all applications.
Right click on the program "Scissors" and pin it to your home screen.

If necessary, you can pin its shortcut to the taskbar.
You can also place the program icon on the desktop.
To do this, right-click on the icon "Scissors" and select the item "Open file location" .
After that, a window with standard programs will open.
Click on the scissors icon and in the list that appears, select "Send to desktop (create shortcut)" .
This software is at your disposal at any time.
Windows 10 Screenshot Options
Ten has big functionality both in the normal plan and in the creation of screen shots.
They can be done using the already familiar Windows key combination + Print Screen.
In this case, the system will automatically save the PNG file in the folder "Screenshots" .
To open it, go to the tab "My computer" , and then - "Images" .
Another way is to use the Windows + H keys. In this case, the picture will be saved in "".
A sidebar will open on the right side of the screen, where you can select the option to use the screenshot you took.
This list contains the following options:

You can take and edit a screenshot by pressing the key Print Screen.
In this case, the image will be on the clipboard.
Open the standard editor and use the keyboard shortcut Ctrl + V to paste it into the working window of the program.
If necessary, edit and save it.
You can also take a screenshot of the active window using the Alt + Print Screen combination.
If you press these keys at the same time, a screenshot of the active window will be created at the time of pressing. Highly convenient way, don't take a screenshot of the whole screen.

In Windows 10, you can use the keyboard shortcut Win + G . In this case, a special game panel will open.
It allows you to record videos and take screenshots during gameplay.
To do this, you need to simultaneously press Win + Alt + Print Screen.

To create a screen, you can also use the standard program "Scissors". Working with it has been previously described.
There are a lot of options for taking screenshots. However, the list does not end with standard instruments.
Additional programs for creating screenshots
Microsoft Snap
This screenshot manager is free. It can be downloaded from the official Microsoft website.
It allows you to take snapshots of both individual windows and the entire screen, as well as selective fragments.
with it, you can even record videos with the display of various notes.
This is very useful when creating training videos and various kinds of presentations.
You can also add soundtracks to them.

Lightshot
