How to repair a scratched SD disk. Restoring scratched discs. Data recovery utility from damaged media
They brought a DVD from the kindergarten with a recording of the matinee. Which, as luck would have it, but why be surprised, almost immediately began to “stutter” in several places. It was Friday evening, so there was no one to quarrel with or sort things out with. I really wanted to watch the matinee, but I had no desire to wait for Monday.
The topic of restoring scratched and/or unreadable disks is not new and has been relevant since their inception. But over the past three years, CDs and DVDs have almost completely gone out of use. The Internet and flash drives did their job. Therefore, I had to practically rediscover the world of everything related to optical storage media.
So, what do we have? DVD-R Printable with the UDF file system on which information is recorded in DVD video format.
Which “stutters” at certain time intervals when played on DVD player e and completely refuses to be copied through DVD drive computer. A quick glance at the work surface showed several scratches. Which most likely led to such sad results.
Differences in the principles of reading a DVD player and a computer
The player must produce a time-stable picture. And therefore it “swallows” faulty areas. That is, if something is not readable, then the player moves on. Therefore, on “worn out” discs, an unstable, crumbling picture and missing sound are possible. It is believed that a short-term loss of image or sound quality is less evil than a complete stop in the video presentation. That is, you as a viewer will not lose the essence.
The computer reads the disk not as a stream of information, but absolutely down to every byte. And the loss of any byte is critical for it and is considered an error. Which of course is true for programs and databases. But for images and sound this is not always possible. After all, even if there is no sound in the film for a couple of seconds, you most likely will not notice anything. And if you notice, it is unlikely to spoil the overall viewing experience.
Mechanical and software method of data recovery
The mechanical method involves influencing the media itself, that is, the CD. As a rule, this is grinding the surface to hide scratches and restore the correct angle of laser reflection. I myself witnessed how a “stuttering” disk, after washing in warm water, began to work like new. I will not dwell on this method in detail, since I have never resorted to it, and I have nothing to recommend. I'll just say that this method restoration of disk performance is a temporary phenomenon. Therefore, immediately after grinding it is necessary to create backup copy.
The software method is more suitable for recovering data from music and video discs. When 100% reliability is not important. And it is produced with the help of programs and utilities that read the disk using special algorithms, trying to extract as much information as possible from it.
Ideally, both methods should be used. Software from the beginning. If it didn’t work out 100%, then mechanical and again software.
Programs for reading bad CDs
In this article I will only talk about free solutions. Since for one damaged DVD there is no point in buying paid program. And free solutions may be less convenient and less functional, but for one-time recovery they bring the same result. Which is exactly what I need.
Recovery ToolBox for CD Free
The Recovery Toolbox for CD Free utility (official website) is designed to recover data from damaged media of the most common types today: CD, DVD, HD-DVD, Blu-Ray, etc. The program allows you to recover files of any type. The utility performs a full scan of damaged disks and saves as much information as possible. In progress Recovery Toolbox for CD Free applies big number various algorithms, which seriously increases the quantity and quality of recovered data. And most importantly, the program is completely free!
Insert the CD and launch the program Recovery Toolbox for CD Free and we see the interface for housewives. Which is undoubtedly a plus, since everything is clear and understandable without words. First of all, select a drive with an unreadable disk.
Next, select a location on the computer’s hard drive where we will copy data from the optical drive. 
Now select the folders and files that need to be copied from the DVD. In my case, select all, since I need to copy the entire disk. Click the “Save” button... 
And the copying process itself will begin, which can take a long time, up to several hours. 
When the utility finishes running in the destination folder on your hard drive, you will get the maximum of what you were able to copy from the CD. 
Non-Stop Copy
Non-Stop Copy is a utility for copying files from any damaged media. The program allows you to copy damaged files from any media, and information from unreadable sectors is replaced with zero bytes. It also tries to read information from poorly readable sectors in several attempts.
The program does not use any low-level methods for reading information, and thanks to this it works correctly on any type of media and on any file systems supported operating system.
The latest version is dated 2006. But don’t be scared and look for something fresher. And now in 2013 she is doing an excellent job with her tasks. The Non-Stop Copy utility was tested by me personally on Lenovo laptop from the operating room Windows system 7 Ultimate x32 and showed excellent results.
You can download the program from the official website. There's also detailed instructions on its application. I noticed only one drawback in the interface functionality: you can only copy one file at a time. But this misunderstanding is easily resolved by the batch file that the author provides as part of the program distribution. By the way, the program does not require installation and, accordingly, does not damage the operating system.
We launch the program and select the unreadable file and the location where we will save it. Then press the “Start” button. 
At first, the program performs a quick copy of the entire file, without stopping at problem areas. Approximately the same way we do a DVD player. The picture below clearly shows the unreadable data. 
Then all the computing power of the program's algorithms is turned on to minimize the presence of red sectors. This process can take several hours and in the end you will get something like the following picture. 
As you can see, instead of solid red fields, there are only lonely red lines. That is, data loss is quite insignificant and quite acceptable when copying video data.
I would especially like to dwell on the program control buttons. During the copying process, two buttons become available to you: “Stop” and “Cancel”. The functionality is not entirely clear from their name. The “Stop” button completely stops the copying process, while all data about the state of the process at the time the copying was stopped is saved. The final file after stopping is the same size as the original file. It contains everything that was copied, and parts of the file that were not copied or that could not be copied are replaced with zero bytes.
The “Cancel” button completely cancels the copying process, and everything that was copied is deleted. In general, this button is provided in case you need to quickly stop the process and at the same time you are no longer interested in its result. For example, pressing the “Stop” button at the very beginning of copying is quite large file may lead to some delay in stopping due to “overwriting” the uncopied part of the file with zero bytes. The “Cancel” button in this case will stop the process immediately.
That is, if you are tired of waiting, but you need the data, then click “Stop”, and if you don’t need it, then “Cancel”. And the best part is, if you clicked “Stop”, you can subsequently continue copying from the same place.
Results of data recovery programs
I’ll say right away that I liked the program better Non-Stop Copy. The reason for this preference is the visibility of the data recovery process. For some reason, it’s nice to the eye when you watch the process and see for yourself how much has been done, how much is left and what is happening now. Utility Non-Stop Copy I recovered approximately 99% of the information, which turned out to be quite acceptable for me.
Subsequently, I converted the recovered DVD video into a familiar AVI file. But that's a completely different story.
What scratches can be removed? The game disc has two types of data surfaces: surface plastic, which covers the disc from the bottom, and aluminum storage, which is the reflective part. If the plastic is slightly scratched, it may be difficult to read data from the aluminum part and errors will occur. In this situation, the problem can be solved by filling the scratches with a thick solution like Vaseline.
- If the aluminum surface is scratched, it is impossible to repair the disc. This happens with deep scratches.
- Deep circular scratches cannot be repaired. This game needs to be returned or purchased a new copy.
Make sure the problem is with the disk. If the same error message appears when you run another drive on your computer or console, the problem may not be with the drives.
- If the disc is scratched but works without problems, do not attempt to repair the disc.
- Read errors can be caused by anything from outdated drivers to software incompatibility.
- It should be understood that if a PC or console drive scratches one disk, it can also scratch other disks.
Gather the necessary materials. To repair your drive with minimal risk of damage, you will need the following:
- towel and flat surface;
- microfiber cloth (do not use paper napkins and towels, scarves or rags);
- medical alcohol;
- Vaseline, toothpaste with baking soda, or a disc repair kit (available at some supermarkets and hypermarkets).
Rinse the disc with cold water. It will remove dust, dirt and foreign substances from the surface, which during processing can scratch the disc even more. Cold water will not damage the disc.
- Do not use hot water to avoid damaging the disc.
Dry the disc. Wave the disc in the air to dry it.
- Do not wipe the disc with a cloth to prevent new scratches.
Place the disc on a towel on a flat surface. The bottom of the disc (reflective side) should face up.
Spray the disc with a small amount of isopropyl alcohol. It will help remove stubborn stains like stains.
Leave the disc to dry. Isopropyl alcohol evaporates on its own, so you just need to wait 20-30 minutes.
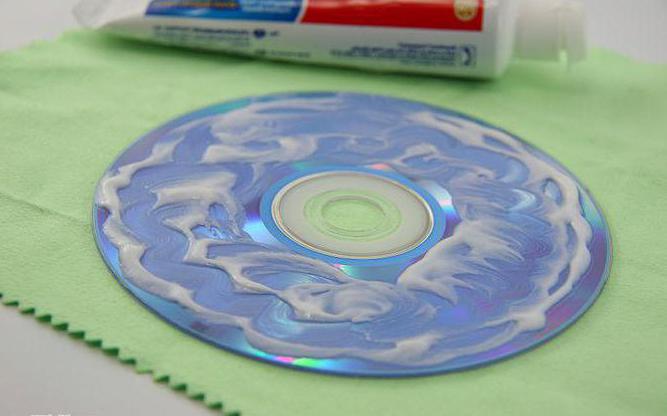
Apply a small amount of Vaseline to a microfiber cloth. This is how Vaseline should be applied to a damaged disc.
- Instead of Vaseline, you can use a suitable toothpaste.
- When using a repair kit, the solution can be applied directly to the disc.
Gently polish the scratched parts of the disc. Using straight (not circular) movements, begin rubbing Vaseline into the surface of the disc from the center to the edges and try to cover all the scratches on the disc.
- If the disc is severely scratched, try covering the entire surface with Vaseline.
Wipe up excess Vaseline with a microfiber cloth. If there are clumps of Vaseline or toothpaste on the surface of the disc, remove them with a microfiber cloth.
- The surface of the disc must be smooth before use in the drive.
Check the disk. Insert the disc into your computer or console and try starting the game again. If everything works, then you have successfully repaired the disk.
- If the disk does not work, then try repeating all the steps several times. Check the game after each try.
- A badly scratched disc that cannot be read will need to be replaced with a new one.
EXPERT ADVICE
Despite the emergence of a number of portable media used to store large amounts of information, CDs are still considered one of the most durable and reliable in this group. They are less prone to causeless breakdowns, but are not protected from physical impacts and, as a result, mechanical damage. A couple of scratches on the surface of a CD are enough for the media to stop working correctly or be readable altogether, “burying” a significant part of the data important to the user.
But there is no need to despair: there is still a chance to repair the equipment. For this purpose, there are special commercial kits available for sale and a lot of advice on the Internet designed to help restore the original state of the disk.
CD/DVD preparation
Before removing scratches from a disc, its surface should be cleaned of dust and fingerprints, since dirt could be the root cause of the breakdown.
This can be done in several ways:
- Using non-abrasive products.
- Wipe heavily soiled media carefully with a soft cloth.
- Hold under running slightly warm water.
After shaking off the water from the CD, you need to dry it by placing it on a paper towel without getting wet. This is done in order to understand the extent of the damage: if the depth of the damage reaches the metal layer, the media cannot be saved on its own.
Removing defects on the CD/DVD surface
It is possible to cope with this task at home, the main thing is to know how. It is easy to remove scratches from a disc; various household products are used for this - from Vaseline to toothpaste.
Waxing with polish, car wax or other creamy texture works well when the polycarbonate coating shows signs of heavy wear. In this case, the carrier is covered with one of the listed products, the excess of which is then removed with a lint-free cloth. This method will help temporarily, since it does not help remove defects, but only fills in abrasions. After successfully using it, you should make a backup copy of the information from the damaged CD, the further use of which will remain in doubt.

The following method (how to remove scratches from a disc with toothpaste) is very simple. It consists of polishing the top layer of the CD, thinning it and thereby reducing the depth of damage. You should resort to it at the very last moment, if more gentle options do not work.
It is advisable to use a paste based on baking soda as it is the most effective. The substance is applied to a smooth cloth (a napkin for glasses is suitable) and with its help it is distributed over the scratch perpendicular to the digital tracks. This will protect the media from the appearance of new, more dangerous flaws.
It will take about 2-5 minutes to polish the disc in a similar way, then the paste is carefully washed off under warm water and the CD is allowed to dry in the open air on its own.
Both methods are equally effective in dealing with the task described (how to remove scratches from an Xbox disk).
Damage to Xbox CD
If you find a defect on a disc for a game console, you should make sure that it is not the culprit of the problem. Xbox sometimes has a similar flaw, and if it was purchased recently, there is a chance that the unusable media will be replaced with a new one by technical support.
If exchange and compensation for damage are not possible, then the main methods for removing scratches from an Xbox 360 disk are those already described using toothpaste or polish.
Caring for portable media
The best way to solve a problem is to prevent it from occurring. To delay the confrontation with the question of how to remove scratches from a disk, you should provide it with proper operating conditions:
- It is necessary to clean heavy stains with specialized means, using gentle movements in the direction away from central hole to the edge of the CD. Under no circumstances should you wipe the surface of the disk in a circle - this creates a risk of data loss.
- The media must be stored away from direct sunlight in a CD/DVD folder. This method will provide fragile disks with the proper level of security and take up minimal space.
- Remove media from optical drive you need to hold it by the edges or the inner ring.

By following these instructions, the user will protect himself from unexpected loss of information and may never face the problem of how to remove scratches from a disk.
Scratched your CD/DVD disc? Not readable by the drive? Why are you so careless about storing it? We will restore the disk, or rather the data from it.
Surprised? Are you taking the disc to the trash can already? Stop! You can get most of the information back from it. How to recover a scratched unreadable disk?
There are many ways. I'll tell you about some now. We will be helped by a wonderful program for recovering data from damaged disks - AnyReader. She is one of the best in this field.
The first thing I advise is to lower the read speed of the drive. Sometimes it helps. If the CD/DVD disc is still not readable, then we move on to harsh actions.
I have brought more than one data carrier back to life, simply by polishing it with ordinary toothpaste and a handkerchief. A little water and paste, plus patience for 30-40 minutes and the result is amazing.
The only important thing is that the movements should not be too fast, but always from the center of the disk to the outer edge and back. Otherwise, only lengthen the scratches. After all, the drive reads disks in a circle. A flat surface under a suffering round plastic product is important. At the end of the torture, rinse thoroughly under running water and wipe dry.
When preparing the material, I saw several ways to restore damaged, worn-out disks. Who, for what...
USEFUL VIDEO
Some polish jeans, without paste. Others rub scratches with teaspoons and treat them with felt. Still others, they cover the damaged areas with green paint so that the laser does not go astray. They will go to great lengths just to save the data.
We use a utility specifically designed for this mission - to repair a scratched, unreadable CD/DVD disc.
Download AnyReader
You can download the program from manufacturer's official website. Or using the search.
Unpack archive and copy the file...

...to a previously created folder (do not move it anywhere). Click on the shortcut and another one appears in the new folder...


Don't worry - that's how it should be. You can look into it, but there is nothing interesting there. AnyReader program started...


Choose the appropriate option and press the button indicated by your finger...


We mark the file that you want to extract from the damaged media (I show the example of the first point)...

Specify the location where to save the recovered file...


...I chose the wrong location in the previous action - no problem...


Now you know how to restore a scratched, unreadable CD/DVD disc (data from it).


Disc with vital information in a single copy it is so scratched that the drive refuses to read it! Common situation? But the thought of copying data to backup storage has crossed my mind so many times... Such cries of the soul over a disk covered with a network of scratches are familiar to many.
There is no perfection in the world, and such a seemingly reliable form of data storage as optical CDs, DVDs and Blu-ray discs has a rather serious weak point - sensitivity to scratches. What to do if the desired disk is already scratched?
Determining the severity of damage
I must say that the scratches on optical disks can be divided into two large groups - scratches on the working surface and on the external surface. The working surface is the surface on which the disc is placed in the drive, and the external surface is the one on which the inscriptions are located. The most dangerous are scratches on the outside of the disc. If the metal layer is damaged (in this case the scratch will be visible right through), only one thing can be said - the disc cannot be restored.
However, defects are much more common on the working side, that is, the one with which the disk is placed down. Radial (going from the center to the edges) scratches are usually not as dangerous. Longitudinal and annular scratches – located parallel to the edge – are much more insidious. If they are present, then the reason that the disk is unreadable is most likely in them.
Other drive
Just because your drive refuses to read the disc is not a reason to think that others will do the same. If there are still suitable reading devices in the house (office), then we take the damaged item to them. If there are no such people nearby, go to your friends, and if your friends are out of reach, go to the nearest computer Club or just a store. In general, in our age of advanced technology, finding a drive is not such a big problem. The fact is that there is some possibility that a disk that one drive could not read may well be too tough for another.
In addition, limiting the speed of the drive may be useful. There are quite a few programs that can do this (for example, CDSlow). If they didn’t help, don’t despair – maybe everything can still be fixed.
We resort to folk wisdom
Information from the disk is read using a laser beam that is reflected from the recording surface. Scratches change the angle of reflection, making it impossible to read the data. But if you fill the voids with a material that transmits light in much the same way as transparent plastic, you can gain access to the disk, albeit short-term.
First, wash the disc thoroughly with soap (do not touch the working surface with your hands). Then we wipe: both here and in subsequent operations involving mechanical impact on the disk, we always work from the center to the edges. Even if you are unlucky enough to cause a scratch, it will be radial and, accordingly, as we already know, less harmful.
After this simple procedure, many disks come back to life. If this does not happen, we proceed to directly filling the scratches. A special paste purchased in a store is best suited for this, but you can also make do with improvised means.
On the Internet you can find an interesting list of things that helped those hungry to read their CDs: car (or furniture) wax, paraffin from a candle, a combination of toothpaste and banana (the first layer is paste, the second is banana pulp), sunflower or Vaseline oil...
I will only note that in any case, excess substance must be removed from the disk as much as possible, and also, in the case of oil, again use a program to slow down the disk reading speed, otherwise it will simply be pulled off the surface by centrifugal force (in general, to be honest, I would refrain from using oil).
More exotic methods include placing the disc in the freezer for 40 minutes (filling the voids with ice crystals) and covering the scratches with brilliant green (supposedly absorbs part of the spectrum, which improves reading).
But all these methods are not long-term, and if you realize that the disk has been read, immediately start copying. Well, if traditional methods have not brought any benefit, we move on to the next stage.
Heavy artillery
Since the scratch could not be repaired, we will remove it. Various abrasive pastes purchased in the store are most suitable for this purpose. But even at home, everyone has something to do this kind of work.
Toothpaste and furniture polish are excellent substitutes. Apply a small amount to a cotton swab and rub (from the center to the edges!) until the scratch disappears completely. On the Internet they write that you can also use women’s nail polish, but then you need to add a little oil to it (to be honest, I don’t fully understand how this substance will work).
“Professional” products include a special disc polishing paste, which is sometimes found in computer stores. Paste for polishing scratches on plastic, which can be found in automotive stores, as well as GOI paste.
It must be remembered that in the case of both folk and professional means, polishing the media manually will most likely take a very long time. Here again, there are two ways - buy a device for polishing discs (and a serious one, and not a flimsy “stuff” for 300 rubles). Or use a drill with a polishing attachment. In the end, the following option worked for me: I took a drill and also a polishing attachment similar in diameter to a CD. The nozzle was felt, so I additionally tied it with soft fabric on top. After that, I turned on the drill and carefully applied GOI paste to the already rotating attachment. And then with his signet hand he pressed the disk against it. The result was achieved quite quickly, but if you decide to follow in my footsteps, I recommend being extremely careful - the method is quite dangerous, you can “kill” the disk completely, damage your hands, etc.
There are more radical methods, they involve boiling the disc in water and then (when the plastic melts a little) smoothing out the scratches. Or smoothing them out with a hot spoon. This option requires a lot of experience and good skill. And if the information on the disk is really very important and valuable, perhaps you shouldn’t tempt fate and try turning to specialists - there are quite a few companies involved in data recovery from various media, and they often work with optical disks, among other things.