Design for corners and frames using CSS. Design for corners and frames using CSS Comment frame with corner css
Vlad Merzhevich
On websites, triangles are often used as part of the design of elements; for example, they serve as a pointer to some object, directing the reader’s attention to the right place. Triangles also perform decorative functions, making the blocks where they are used more elegant and modern. In Fig. Figure 1 shows an example of using a triangle in a design.
Rice. 1. Triangles in web design
You can't directly create a triangle using CSS, so there are two methods available to add it - through border and transform .
Using border
Although borders created through the border property are not directly related to triangles, border is the most commonly used border for this purpose. If we set the element's width and height to zero, and also set a sufficiently thick border, we will see a set of four triangles (Fig. 2). For clarity, the borders on all sides are set to different colors.
Rice. 2. Adding a border to an element
Leaving only the desired border and making the rest transparent, we will get a triangle of the desired color (Fig. 3).
Rice. 3. Element with transparent borders
Example 1 shows how to add a triangle to a block using the ::after pseudo-element.
Example 1. Block with a triangle
For absolutely positioned elements, zero width and height are not required.
By combining boundaries, you can get four more types of triangles, which, in combination with those already mentioned, gives us eight options. Their type and required code are given in table. 1.
| View | Style |
|---|---|
| border: 20px solid transparent; | |
| border-top: 20px solid green; | |
| border: 20px solid transparent; | |
| border-right: 20px solid green; | |
| border: 20px solid transparent; | |
| border-bottom: 20px solid green; | |
| border: 20px solid transparent; | |
| border-left: 20px solid green; |
The table shows that invisible borders take up space, take this into account when positioning elements. The style must also be supplemented with zero width and height or use the position property, as was done in example 1.
The triangle can be made into other shapes if you set different border thicknesses. Thus, the code for creating the block shown in Fig. 4, shown in example 2.

Rice. 4. Sharp triangle
Example 2. Acute triangle
Using border we get solid colored triangles to create the frame shown in Fig. 5 you have to use a trick and put one element on top of the other with a slight offset. Again, the :before and :after pseudo-elements will help us here (example 3).
Rice. 5. Frame with corner
Example 3: Triangle Overlay
Because we are layering one solid color element on top of another, this method is only suitable for solid color fills and is not suitable for gradients or background images.
Using Transformation
Using transformation, we can rotate a square element by 45º and get a rhombus from it. This is not yet a triangle as such, so we leave the protruding part we need in plain sight, and hide the rest behind another element (example 4).
Example 3: Transformation
The result of this example is shown in Fig. 6.

Rice. 6. Triangle with shadow
Here is a beautiful selection of corners and frames that are intended for information blocks that are used using HTML and CSS. Also in this note you can choose the design style that is made on the corners, that comes with an effect when you hover over a click and the default setting without any effects, just a stylish design.As an example, you can take one variation, where the block has curved corners, and it looks completely different from the standard one. Some have an option for placing various ribbons or installing an image that is installed inside the block.
All material presented is in an adaptive form under different resolution, which is for a large monitor or the smallest screen. After installation, a change will occur on the site, where they are mainly placed to attract attention, because initially there is only a structure that can complement the main style.
First option:

Key phrase
CSS
Ugoinsa_utomatio_npones (
display: inline-block;
width: 295px;
position: relative;
border: 1.5px solid #1b629e;
transition: all .3s ease;
margin: 5px;
cursor:pointer;
}
.ugoinsa_utomatio_npones:before, .ugoinsa_utomatio_npones:after (
content: "";
z-index: -1;
display: block;
position: absolute;
background: #FFF;
top: 50%;
left: 50%;
transform: translate(-50%, -50%);
animation-iteration-count: 1;
transform-origin: 50% 50%;
}
.ugoinsa_utomatio_npones:before (
width: calc(100% + 4px);
height: 75%;
z-index: 1;
transition: height 0.6s;
}
.ugoinsa_utomatio_npones:after (
height: calc(100% + 4px);
width: 85%;
z-index: 1;
transition: width 0.7s;
}
.ugoinsa_utomatio_npones:hover:before, .ugoinsa_utomatio_npones:focus:before (
height: 50%;
}
.ugoinsa_utomatio_npones:hover:after, .ugoinsa_utomatio_npones:focus:after (
width: 74%;
}
.sequpok_egulaned_demob (
padding: 29px;
z-index: 2;
position: relative;
text-align: center;
}
Here we independently create an installation for our resource and make it more noticeable, depending on what action.
Second option:

ZorNet - portal for webmasters
CSS
Pvobamoco-mpagensive (
position: relative;
display: inline-block;
width: 283px;
margin: 7px 0 37px 0;
padding: 28px;
color: #f3eaea;
text-align: center;
background: #2b22a0;
background: linear-gradient(to left bottom, transparent 50%, rgba(16, 16, 16, 0.4) 0) no-repeat 100% 0 / 30px 30px, linear-gradient(-135deg, rgba(0, 0, 0 , 0) 20px, #334ab9 0);
filter: drop-shadow(18px 28px rgba(14, 14, 14, 0.1));
}
.pvobamoco-mpagensive::before (
content: " ";
position: absolute;
top: 30px;
right: 0;
background: linear-gradient(to left bottom, rgba(0, 0, 0, 0) 50%, rgba(14, 14, 14, 0.1) 0) 100% 0 no-repeat;
width: 28px;
height: 28px;
transform: rotate(180deg);
}
Here the effect is not initially specified, but a beautiful shadow is made that you can increase and change the color gamut yourself.
Third option:

Zornet.Ru
Zornet.Ru
Set the description
CSS
Keculosubes_aspectsiveb (
position: relative;
display: inline-block;
width: 295px;
padding: 30px;
margin: 9px;
min-height: 91px;
border: 2px solid #BFE2FF;
text-align: center;
}
.malugeke_deculos (
width: 148px;
height: 148px;
overflow: hidden;
position: absolute;
}
.malugeke_deculos::before, .malugeke_deculos::after (
position: absolute;
z-index: -1;
content: "";
display: block;
border: 5px solid #2980b9;
}
.malugeke_deculos span (
position: absolute;
display: block;
width: 223px;
padding: 15px 0;
background-color: #337AB7;
box-shadow: 0 5px 10px rgba(12, 12, 12, 0.1);
color: #f3f0f0;
font: 700 18px/1 "Lato", sans-serif;
text-shadow: 0 1px 1px rgba(8, 8, 8, 0.1);
text-transform: uppercase;
text-align: center;
}
.malugeke_deculos-top-left (
top: -10px;
left: -10px;
}
.malugeke_deculos-top-left::before, .malugeke_deculos-top-left::after (
border-left-color: transparent;
}
.malugeke_deculos-top-left::before (
top: 0;
right: 0;
}
.malugeke_deculos-top-left::after (
left: 0;
bottom: 0;
}
.malugeke_deculos-top-left span (
right: -25px;
top: 30px;
transform: rotate(-45deg);
}
.malugeke_deculos-top-right (
top: -10px;
right: -10px;
}
.malugeke_deculos-top-right::before, .malugeke_deculos-top-right::after (
border-top-color: transparent;
border-right-color: transparent;
}
.malugeke_deculos-top-right::before (
top: 0;
left: 0;
}
.malugeke_deculos-top-right::after (
right: 0;
bottom: 0;
}
.malugeke_deculos-top-right span (
left: -25px;
top: 30px;
transform: rotate(45deg);
}
All that remains is to choose the right or left tape in order to install it on the block, where the tape itself will serve to write a title on it. Also change the color or initially set the default block that is installed under the ribbons.
Here a web developer can design it beautifully, because for this there is already a complete frame, some people put shadows, it all depends on the color palette of the Internet resource and in general where you will be and for what purpose you will place such an original frame.
CSS3 frame complements the ability to format element borders with properties that allow round the corners element, and also use Images to design the borders of the element.
Rounded corners and picture frames
1. Rounding corners with border-radius
Browser support
IE: 9.0
Firefox: 4.0
Chrome: 4.0
Safari: 5.0, 3.1 -webkit-
Opera: 10.5
iOS Safari: 7.1
Opera Mini: —
Android Browser: 4.1
Chrome for Android: 44
The property allows you to round the corners of lowercase and block elements. The curve for each angle is defined using one or two radii defining its shape − circle or ellipse. The radius applies to the entire background, even if the element has no border, the exact position of the secant is determined using the background-clip property.
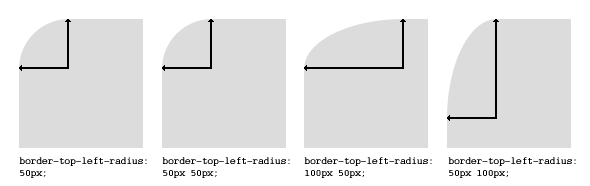
The border-radius property allows you to round all corners at once, and using the border-top-left-radius , border-top-right-radius , border-bottom-right-radius , border-bottom-left-radius properties you can round each corner separately .
If you set two values for the border-radius property, the first value will round the top left And lower right corner, and the second - top right And bottom left.
Values specified through / determine horizontal And vertical radii. The property is not inherited.
Options
Div (width: 100px; height: 100px; border: 5px solid;).r1 (border-radius: 0 0 20px 20px;).r2 (border-radius: 0 10px 20px;).r3 (border-radius: 10px 20px ;) .r4 (border-radius: 10px/20px;) .r5 (border-radius: 5px 10px 15px 30px/30px 15px 10px 5px;).r6 (border-radius: 10px 20px 30px 40px/30px;) .r7 ( border-radius: 50%;).r8 (border-top: none; border-bottom: none; border-radius: 30px/90px;).r9 (border-bottom-left-radius: 100px;).r10 (border -radius: 0 100%;).r11 (border-radius: 0 50% 50% 50%;).r12 (border-top-left-radius: 100% 20px; border-bottom-right-radius: 100% 20px ;)
Rice. 1. Examples various options rounding block corners
2. Border-image
Browser support
IE: 11.0
Firefox: 15.0, 3.5 -moz-
Chrome: 16.0, 7.0 -webkit-
Safari: 6.0, 3.0 -webkit-
Opera: 15.0, 11.0 -o-
iOS Safari: 7.1
Opera Mini: 8 -o-
Android Browser: 4.4, 4.1 -webkit-
Chrome for Android: 42
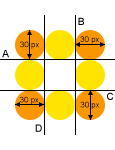
The property allows you to set an image as the element's frame. The main requirement for the image is that it must be symmetrical. The property includes the following values: (border-image: width source slice repeat outset;) .
Using such a simple image you can get frames like this for an element.
/* Example 1 */ div ( width: 260px; height: 100px; border-style: solid; border-image-width: 15px; border-image-source: url(border_round.png); border-image-slice: 30 ; border-image-repeat: stretch; ) /* Example 2 */ div ( width: 260px; height: 100px; border-style: solid; border-image-width: 15px; border-image-source: url(border_round. png); border-image-slice: 30; border-image-repeat: round); 


 Rice. 2. An example of designing block boundaries using an image
Cuts A - B - C - D form the corners of the frame, and the part of the design located between them fills the remaining space of the frame in accordance with given value border-image-repeat properties. Corner size (in in this example this is the number 30) is specified using the value of the border-image-slice property.
2.1. border-image-width
The property specifies the width of the image for the element's border. If the width is not specified, it defaults to 1.
| border-image-width | |
|---|---|
| Values: | |
| length | Sets the border width in length units - px / em . You can set from one to four values at a time. If one value is specified, then the width of all sides of the frame is the same, two values specify the width of the top-bottom and right-left, etc. |
| number | The numeric value by which the border-width value is multiplied. |
| % | The element's border width is calculated relative to the image size. Horizontal relative to width, vertical - relative to height. |
| auto | Corresponds to the border-image-slice value. |
| initial | |
| inherit | |
Syntax
Div (border-image-width: 30px;) Fig. 3. An example of setting the width of an image frame using various types values
2.2. border-image-source
The property specifies the path to the image that will be used to decorate the borders of the block.
Syntax
Div (border-image-source: url(border.png);)
2.3. border-image-slice elements
The property determines the size of the image parts used to define the borders of the element and divides the image into nine parts: four corners, four edges between the corners, and a central part.
| Values: | |
| number | The size of the frame parts can be set using one, two, three or four values. One value sets the borders to be the same size on each side of the element. Two values: the first determines the size of the top and bottom borders, the second - the right and left ones. Three values: the first determines the size of the top border, the second - the right and left, and the third - the bottom border. Four values: Defines the sizes of the top, right, bottom, and left borders. The numeric value represents the number of px. |
| % | Border sizes are calculated relative to the image size. Horizontal relative to width, vertical - relative to height. |
| fill | The value is indicated along with the number or percentage value. If specified, the image is not cut off by the inner edge of the frame, but also fills the area inside the frame. |
| initial | Sets this property to its default value. |
| inherit | Inherits the value of this property from the parent element. |
Syntax
Div (border-image-slice: 50 20;) 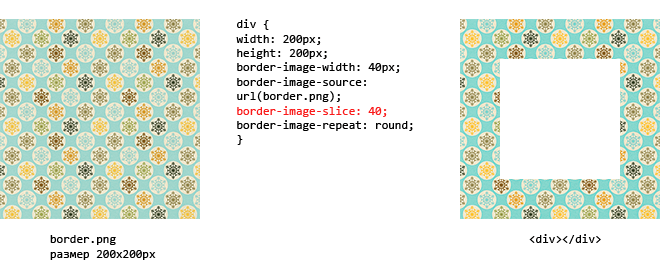 Rice. 4. An example of specifying image frame slices
2.4. border-image-repeat
Property controls padding background image space between the corners of the frame. Can be specified using either a single value or a pair of values.
Syntax
Div (border-image-repeat: repeat;) Fig. 5. Example of repeating the central part of an image frame using different types of values
2.5. border-image-outset
The property allows you to move the image frame beyond the borders of the element by a specified length. Can be specified using either one or four values.
Syntax
Div (border-image-outset: 10px;) 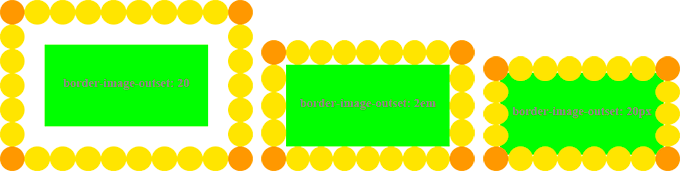 Rice. 6. An example of shifting an image frame using different types of values
3. Gradient frame
The value of border-image can be not only an image, but also a gradient fill.
Translucent frame
Transparent is one of the colors. In this way, you can set boundaries for all sides of an element at once or separately for each side. The thickness of the border is controlled by the border-width property.
Postal envelope
, , - CSS properties - (Transparent) - CSS property. Responsible for creating a diagonal frame
- "px" - value in pixels
In this article we will talk to you about creating frames, but not ordinary square ones, but rounded ones. They have more beautiful view than ordinary square frames without rounding.
Property
In this article we will take a closer look at creating round frames and more. There is such a thing in CSS as triangular frames, but more on that below.
Rounding frames using
 html( margin: 0; padding: 15vh 0 0 0; ) #content( border: 5px solid red; height: 70vh; width: 80%; border-radius: 15px; margin: 0 auto )
 This CSS property allows you to round the borders of an element. Some developers use it, without creating visible borders, to create layouts on a rounded "body" container.
Using standard radii, you can create rounded shapes, such as a circle or an oval.
To track your work of this property, it is enough to set the property
The property itself
Simple property
Rounding can be applied to all HTML elements, but not in all cases. Some browsers do not accept it when loading frames that have the property
You can use different values to determine the curvature radius, but most often the value is specified in pixels. This is because they are best suited for detailing small sized features.
In addition to the usual rounding, you can use an additional radius, for example, to create an ellipse.
To do this, you need to divide the values by a fraction.
Property - examples:


Now we'll show a couple of examples of creating a rounded border. To study them in more detail, download our sources.
Creating triangles using

To create triangles you need to use the property
First, set the triangle element's width and height to zero.
After that, write down a few properties. The first is the main thing, the property of the frame. It is created almost the same as usual. Set the width, line type and enter the value "transparent". It is responsible for creating a triangle.

In order to create a straight side of the triangle, you need to create a separate frame line for this side.
Conclusion
Now you know everything about the property
It may seem very difficult at first, but if you practice, it will be easier than you think. Download our sources and study their code to better understand how the property works. We wish you good luck in your studies!
Tags:To create various beautiful things around it, and the first such beautiful thing will be the frame.
First, let's look at the simplest frameworks. To create them, CSS uses the border property, which can be set to the following values:
solid – solid frame;
dashed – dotted frame;
dotted – dotted frame;
double – double line frame;
groove – frame with shadow;
ridge - with relief;
Two more properties needed to create simple frames are
widht – frame thickness;
color – frame color;
According to the abbreviation technique, values are written in one line, separated by spaces.
p(
border : 2px solid #ffff00 ;
}
padding – internal (frame indent from content);
margin — external (margin of the frame from external objects);
Directions are also specified for indentations (from which side and how much to retreat). These properties are used when there is a need to place content off-center in the frame, or the frame itself is offset in some way.
top – top indent;
right – right indentation;
bottom – bottom indent;
left – left indent
The values of these properties are written in an abbreviated version one after another (padding: 10px 30px 15px 20px), and the top value is set first, and then the rest in a clockwise direction.
If you set only one value, this will mean that the indentation on all sides will be the same.
p(
border : 2px solid #ffff00 ;
margin: 20px;
}
If you need to place text or an image in the center of the frame, then you can add the text-align: center property to the “p” selector;
Next, let's look at how the height and frame width. The height of the frame is set automatically by the browser, and is selected in such a way that the content fits in it, taking into account the specified indents. But we will set the width ourselves.
It is set by the width property, and its value indicates the desired size in pixels, or other length measures accepted on the web.
p(
border : 2px solid #ffff00 ;
padding: 10px 20px 10px 20px;
margin: 20px;
width: 400px;
}
By the way, remember that when you set the width, the browser understands this value as the width of the content only. It then adds the specified padding and border thickness to this value, and displays the final size on the page.
The last thing to do is position the frame on the page. This is done using the already existing margin property.
And if you just need to position the frame block in the center of the page, then the value auto is added to the margin property.
p(
border : 2px solid #ffff00 ;
padding: 10px 20px 10px 20px;
margin: 20px auto;
width: 400px;
}
For the first example, let's create html document, and create solid frames for the body block (the body of the document), and one paragraph.
In the following examples, only the CSS (what is enclosed in the style tag) will change.
Здравствуйте уважаемые будущие веб-мастера!
Мне 55 лет и я рад приветствовать Вас на своём сайте.
Результат:
Следующая рамка dashed (пунктир).
p{
text-indent
: 30px
;
border
: 2px dashed #ff4f00
;
padding
: 10px 20px 10px 20px
;
margin
: 20px auto
;
width
: 400px
;
}
Результат:

Рамка dotted :
p
{
text-indent
: 30px
;
border
: 3px dotted #ff4f00
;
padding
: 10px 20px 10px 20px
;
margin
: 20px auto
;
width
: 400px
;
}

Рамка double :
p
{
text-indent
: 30px
;
border
: 5px double #ff4f00
;
padding
: 10px 20px 10px 20px
;
margin
: 20px auto
;
width
: 400px
;
}

Рамка groove :
p
{
text-indent
: 30px
;
border
: 7px groove #ff4f00
;
padding
: 10px 20px 10px 20px
;
margin
: 20px auto
;
width
: 400px
;
}

Рамка ridge :
p
{
text-indent
: 30px
;
border
: 10px ridge #ff4f00
;
padding
: 10px 20px 10px 20px
;
margin
: 20px auto
;
width
: 400px
;
}

Для этого уберём border , и добавим border-radius и box-shadow .
p
{
border-radius
: 10px
;
box-shadow
: 0 0 0 3px #ff4f00
;
text-indent
: 30px
;
padding
: 10px 20px 10px 20px
;
margin
: 20px auto
;
width
: 400px
;
}

Размоем внешний край рамки. Для этого в свойстве box-shadow , увеличим третью цифру.
p
{
border-radius
: 10px
;
box-shadow
: 0 0 7px 3px #ff4f00
;
text-indent
: 30px
;
padding
: 10px 20px 10px 20px
;
margin
: 20px auto
;
width
: 400px
;
}

Сделаем разноцветную рамку. Для этого в свойство box-shadow , через запятую, добавим ещё несколько комплектов значений с разными цветами.
p
{
border-radius
: 10px
;
0 0 0 7px #ffdb00
,
0 0 0 10px #00ffa2
;
text-indent
: 30px
;
padding
: 10px 20px 10px 20px
;
margin
: 20px auto
;
width
: 400px
;
}

Можно сделать круг в рамке. Для этого зададим абзацу одинаковую высоту и ширину, то есть сделаем квадрат, изменим значение border-radius
p
{
border-radius
: 50%/50%
;
box-shadow
: 0 0 0 3px #ff4f00
,
0 0 0 7px #ffdb00
,
0 0 0 10px #00ffa2
;
padding
: 40px
;
margin
: 20px auto
;
width
: 130px
;
height
: 130px
;
text-align
: center;
}

Если поиграть с дробным значением border-radius , можно сделать эллипс любого вида.
Первое число в дроби — это изгиб вертикальной составляющей угла, второе — горизонтальной.
И последнее, что мы сегодня сделаем — рамка с изменяющимся цветом. Изменяться он будет при наведении курсора.
Реализуется эта опция при помощи псевдокласса :hover .
p
{
border-radius
: 10px
;
box-shadow
: 0 0 0 4px #ff4f00
;
text-indent
: 30px
;
padding
: 10px 20px 10px 20px
;
margin
: 20px auto
;
width
: 400px
;
}
p:hover
{
border-radius
: 10px
;
box-shadow
: 0 0 0 4px #00ff62
;
text-indent
: 30px
;
padding
: 10px 20px 10px 20px
;
margin
: 20px auto
;
width
: 400px
;
}
В спокойном состоянии:

При наведении курсора:

Этот же метод можно применить к разноцветной рамке, и менять при наведении курсора, какой нибудь один цвет.
Желаю творческих успехов.
Перемена
На улице Дублина двое ирландцев дерутся. К ним подходит еще один, снимает шляпу и спрашивает:
— Простите, это частная драка или любой может вмешаться?..