Where to save the cache on Android. Where to install game cache on Android? Application system requirements
This is one file in a folder or a whole set of folders with subfolders and other files. Usually developers make a cache so that the APK file with the game itself does not weigh so much. At the moment, you can upload apk files to Google Play that weigh no more than 100 MB. If more, then developers will have to make a cache. Also, cache is present not only for these reasons, but for a hundred other factors that are convenient for a particular developer.How to install a game with cache?
There are two types of caches. One of them is a folder with .obb files. It is always unpacked to the following path sdcard/Android/obb. You should simply extract the folder from the downloaded archive and place it in the path that I just indicated.The second type of cache is the type that is often used in games from GameLoft. If you unpack the archive, go to the folder and do not find .obb files there, then this is definitely the second type and it needs to be unpacked along the path sdcard/Android/data. There are individual cases when caches have to be placed in other places, but this is very rare and this will always be written about in the description
Cache- the main component of the game: a set of files and folders that are responsible for textures, videos, music. All this is necessary for the game to function properly. For different phones cache may be different. It all depends on the graphics engine, processor, display resolution and other parameters, which you can find out using the application. Before installation cache needs to be unpacked.
If you want to install the game with cache, then in this post you will find a detailed description of the process.
1. Download the game (.apk file) and cache(zip file).
2. Connect your phone to your PC and copy it to any folder on your phone, for example, to "Downloads".

3. Open the Downloads folder from your phone using the file manager. This can be either a system application or ES File Explorer which you can find at .

4. Install .apk file.

5. Unpack cache to the folder specified in the source from which you downloaded cache. To do this, click on the zip file and select the archiver (for example, ES Zip Viewer), show the path to the required folder (in this case it is sdcard/Android/obb).

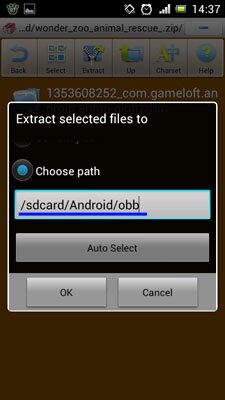
6. Open the obb folder. There you will find another folder (1353608252_com.gameloft.android.anmp.gloftzrhm), which will contain a subfolder (com.gameloft.android.ANMP.GloftZRHM). The latter must be moved to obb, and the empty one (1353608252_com.gameloft.android.anmp.gloftzrhm) must be deleted.

7. After this you can start the game.
If you indicated the correct path, then everything should work the first time, although there is a possibility that you will have to go through verification. Therefore, games released since fall 2011 will require a Wi-Fi connection.
To create a folder for cache in automatic mode (so you definitely won’t make a mistake about where to send the unpacked files), you need to use the following algorithm:
- Download apk file and install the game.
- Launch the game and let it download automatically cache. After 10-15 minutes, we cancel the process, resulting in a ready-made empty folder, where the archive should be unpacked.
There is also an alternative way to install games with cache, which requires a WiFi connection:
- Download and install apk.
- We launch the game and allow it to download all the missing files via the Internet.
- Cache automatically ends up in the right place.
If this method minimizes user participation in the installation process, then for the first method you need to know the correct path:
- Cache games from Gameloft must be unpacked into sdcard/gameloft/games/ (unpacked game cache).
- For games with Google Play the path is: sdcard/Android/data/(unpacked game cache).
- Games from Electronic Arts (E.A.) use the same path as in the previous case.
- Cache For Glu must be located in sdcard/glu/ (unpacked game cache)
- Two other possible options are sdcard/Android/data/obb(unpacked game cache) and sdcard/(unpacked game cache)
- Please also take into account that cache saved on the memory card when on Android The device does not have a large internal memory.
Now let’s spend a little time on the installation itself. apk files. There are several simple methods that require installation permission from unknown sources (Unknown Sources). For Android 4.x we open Settings, go to point Safety, put a checkmark next to the previously mentioned option. For earlier OS versions, also go to Settings, but instead of the point Safety, select Applications (Application Settings) and vice versa unknown sources (Unknown Sources) put a tick. Now yours Android the device is ready for installation apk files. We will describe several installation methods:
1. Place apk file to the device's memory card. We launch the file manager and find the same installation file and open it. Install the application.
2. Place the file name.apk to a memory card Android smartphone/tablet. Open the browser and enter the following command in the address bar: content://com.android.htmlfileprovider/sdcard/name.apk. The installation begins. If nothing happens, then instead of the specified command you need to enter file:///sdcard/name.apk.
3. Loading apk file using browser Android devices. At the end of the process, the system will prompt you to install the application.
4. For owners HTC There is a separate and much simpler method, the essence of which is to install on your PC InstallAPK and using this program install apk to the device.
The main problems that arise when installing apk files and cache
- Can't install apk: Most likely you have not activated the Unknown Sources option or the file you are installing is not suitable for your Android device.
- The game cannot find the cache (it finds it, but not all of it): most likely, you unpacked the archive in the wrong place or did not pass verification (the game should automatically download the missing files).
- The textures in the game are white, the image does not fit the screen size: The installed cache is not suitable for your device. Try finding and installing another one.
- Also note to yourself that The cache is not always deleted along with the game. Often this has to be done manually.
Android from A to Z: Installing Android games with cache:
rating 80 out of 80 based on 80 ratings.
There are 80 reviews in total.
Very often, owners of smartphones and tablets running Android OS have problems installing programs or games, as well as their performance, simply because the application does not find the cache folder necessary for correct operation. Let's try to figure out how to install the cache on Android. I would like to say right away that this is not such a complicated procedure as it might seem at first.
What is cache on Android?
First of all, you need to clearly understand what a cache (or cache folder) is. As a rule, this is a special place on the internal storage or removable memory card where some elements of programs or games are saved. This can be anything: textures, graphic objects, software components, system files, sound data or sets of audio libraries for virtual synthesizers and much more.
It is probably already clear that during the startup and operation process, the installed application accesses precisely such data, selectively (as used) loading it into the device’s RAM.
Why is it necessary to install a cache on Android?
As is already clear from the above, the answer to the question of why you need to install a cache is obvious. Essentially, it is a database used for the normal functioning of the application. Another thing is that the cache must be installed in a strictly defined location, since the executable file of the program itself or its additional components are created in such a way as to access exactly a given location, and not search for the necessary data, files or folders across all storage devices installed in the gadget.
Preparing to install the application
Before solving the problem of how to install a cache on Android, let’s look at some basic points related to the installation of the programs and applications themselves. There are a few key points to note here.
First of all (if the program is not installed from the Play Market), you must give permission to install from unknown sources.

Activation of this setting is accessed from the settings menu, where you first select the “Security” item, and then the “Device Administration” tab. Let’s immediately make a reservation that, depending on the version of Android OS or the gadget itself, there may be additional tabs (for example, “Settings” / “Personal”).

That's not the point. Having received such permission, the system will be able to install the application from the desired file with the .apk extension.
The second point is a sometimes encountered condition related to how to install a cache on Android or the problem of installing the application itself, which implies the use of exclusively root rights (without this, not only will the program not work, it simply will not even be installed on the device ).

To obtain such rights today there are quite a lot of special utilities. Among them, the simplest and most functional are applications like Framaroot, DingDong Root, etc. Most of them allow you to get root rights in a few touches of the screen with minimal time and effort. In addition, some utilities of this type also require the use of a special super user mode, which can sometimes be very useful.
Application system requirements
Now let's move on to the system requirements. The fact is that the solution to the problem of how to install a cache on Android is inextricably linked with what type of device and its hardware components we have in each specific case. For example, it is especially worth paying attention to the architecture of processors (ARM6, ARM7), types of graphics accelerators (Adreno, Tegra 2/3, PowerVR, etc.).
In some cases, each type of equipment may require a cache tailored to the use of that particular device. Otherwise, there is no need to talk about successful installation of the program and its cache.
How and where to install the cache: extracting, installing, copying
Now we are getting very close to the question of where to throw the cache on Android. But first, let's note the fact that sometimes (especially when downloading applications not from official sources) the program installation file and its cache can be presented in the form of archives.
By analogy with conventional computer systems, conventional archivers can be used for unpacking. Here, in solving the problem of how to unpack the cache on Android, you can do it in two ways: either unpack the cache folder on a stationary computer terminal and then transfer it to the gadget to the specified location, or install the archiver on a mobile device (Android RAR), and then unzip the data to the desired location indicating the final extraction path.

When extracting to the default folder, you will have to copy or move the data where needed. To do this, you can use any type of file manager (for example, X-plore, ES Explorer, etc.).
Each manufacturer of software products for mobile systems, as a rule, indicates in advance the path showing where to throw the cache on Android. It is believed that by default the internal storage is used for the cache, and not the SD card. As for the standard folders where it is mandatory to install the cache on Android, there are usually two of them: data and obb (they are located in the root directory of Android on the internal drive).

In some cases, you may need to install separately in both folders. For example, the cache itself is copied to the obb folder, and other data is transferred to the data folder (for example, for virtual sequencers or synthesizers, these are banks of sounds or effects).
If the user does not know what the program cache folder looks like (you never know, what if the archive was extracted to some other place and the user cannot find the data), it is worth looking for a folder with a name like com.android.player (for a music player ) or another name. Any cache folder has a “com.” attribute at the beginning of its name. Next, in addition to the name “android,” there may be the name of the software developer, and then the name (sometimes abbreviated) of the application itself.
Problems with programs
Sometimes unexpected situations may arise when even the installed program refuses to work. The root causes can be called a discrepancy between the stated system requirements and the device itself. This usually concerns the cache, since problems with using universal distributions in the form of APK files are extremely rare. In this case, sometimes knowing the principles of clearing the cache or answering the question of how to unpack the cache on Android can help. In principle, you can delete the old cache folder, and then simply re-extract the data from the archive, after first making sure that the contents of the archive correspond to the characteristics of the mobile gadget in all respects.
Features of installing and transferring applications to memory cards
One of the priority conditions for many users is to install applications on removable SD cards, because sometimes you don’t want to clutter up the internal memory. And if there is still little of it, then this question becomes almost the most important one.
It’s worth saying right away that if for some reason the manufacturer of the mobile device itself has blocked this opportunity, you don’t even have to try to do anything. Even root rights won't help here. As a last resort, you can try to transfer the installed application from the internal storage to the card.

In this case, among the most well-known transfer tools are the Link2SD, AppMgr Pro III, etc. applications. The second utility is easier to use, since the Link2SD program will have to split the memory card into logical partitions, and for an inexperienced user this is fraught with consequences associated with loss of information. AppMgr Pro III automatically identifies applications that can be easily moved to another location. Again, please note: if this feature is blocked by the device manufacturer, nothing will work. The only way out may be to install new firmware, but this is recommended only for experienced users, otherwise you can completely “destroy” the entire system.
Clearing cache
Now let's look at the question of how to clear the cache on Android. In principle, here you can find two standard solutions. In the first case, as mentioned above, you can delete unnecessary information manually. But this applies only to installed programs, and not to the browser cache.
In order to understand how to clear the cache on Android after finishing work on the network or unloading any program or application from the device’s memory, it is better to use specialized utilities.

Among the most interesting and most functional programs, you can choose CCleaner (a computer utility optimized for mobile systems) or Clean Master, or something else. According to many experts, CCleaner is the best. When starting the analysis, you just need to check the box next to the “Cache” line. Once the scanning process is complete, a problem fix button will appear. With all this, optimization concerns not only the cache, but also RAM, reducing processor load, etc.
Conclusion
In conclusion, it remains to add that the problem of how to install the cache on Android (or how to clear it) is, in fact, not a problem at all. The main thing here is that the cache is in the right place, and that the mobile gadget itself or the user’s access rights meet the requirements specified by the developer of the software being installed. I think it’s now clear what cache is on Android, at least in general terms.
When downloading games from alternative sources and Internet resources, the user is always prompted to download a separate installation file (apk) and a file with the game cache. Without the correct location of the latter in the device memory, the application will not launch and execute correctly. Therefore, you need to know how to install a cache for a game on Android.
What is cache and where can you download it from?
The Android cache is an integral part of the application where the main content is stored: graphics, scripts, sounds, textures and much more.
On the Internet, on various Internet resources with video games, cache is stored as an archive next to the apk. On the page where there is a description of the game on Android and a link to download it, developers usually indicate in which folder cache should be unpacked.
But such information may not exist. To avoid questions about where to install the cache, video game developers reserve a specific folder in the Android device’s memory:
- for applications from Gameloft, the path to place the cache file is “sdcard/gameloft/games”;
- for Glu Mobile, the additional file must be located in “sdcard/glu”;
- for Electronic Arts, the game cache must be located in “sdcard/Android/data”;
- for video games from other manufacturers, the file can be located either in sdcard/Android/data or in “sdcard/Android/obb”.
You can move the cache file on your device to the desired folder using the file manager on your smartphone or computer.
To transfer the archive via a computer, you need to use Explorer. If you perform these operations using a mobile phone, you must additionally install one of the popular file managers with an archiver function (for example, ES Explorer).
You can use the built-in explorer, but then you will have to download the archiver separately.
How to move cache on phone using ES File Explorer app
After the program is downloaded from an Internet resource, you need to install it on your phone, and then start moving the cache.
Note: Unlike the cache, the installation fileapkyou don’t need to move it anywhere, and you can leave it in the “Downloads».
On the Android OS, everything that the user downloads from the Internet is automatically placed in the “Downloads” folder.
The process of transferring an archive with scripts and graphics via ES Explorer is not complicated and is carried out in just a few steps:

If everything is done correctly, the required file will appear in the “Obb” folder.

How to move game cache using a computer
Both methods, using File Explorer on a computer and a smartphone, are very similar. Which one to choose is the personal preference of each user.
In order to move cache using a computer to an Android gadget, you need to do the following:
- open Explorer on PC;
- click on the folder in which the downloaded cache file is stored (if the user has not changed the save location, then everything that they download from the Internet is located in the “Downloads” folder on drive C);

- right-click on the archive and select the “Extract here” option in the context menu;

- when the archiver reports the successful completion of the process, you should select the cache file, right-click and select the “Copy” option in the context menu;

- click on the phone in the object tree on the right side of Explorer;

- open the folder where you want to copy the cache file (in our case, “obb”). To do this, click on “Andoid” and “obb” one by one;
- Right-click and select the “Insert” option from the context menu;

- launch the application on your smartphone.
If the user transfers the cache incorrectly, the program will not start or will start downloading additional files on its own.
If games are installed via Google Play, then there is no need to manipulate the cache, since everything will be done automatically.
Transfer cache to memory card
To transfer cache to an SD card, you need to install the FolderMount application (superuser rights required). The principle of operation of this program is to create a pair between two folders. To do this you need to do the following:
- launch the application;
- Click on the plus icon in the upper right corner to create a new pair;

- fill in the fields: “name” (the name of the pair being created), “source” (the place where the cache file is stored) and “Destination” (the place on the SD where it should be moved);

- Click on the check mark icon in the upper right corner of the window.
Most of the games that are made for Android phones take up a lot of space and are almost always accompanied by file documents with a cache.
In this article we will look at how to install a game with a cache on Android.
Why do you need a cache?

A cache is a separate file that must be included with the game. This was invented by the developers for convenience when updating, so that you don’t have to download the entire toy again every time.
Games with a cache on Android provide that the update will affect it, and the rest remains unchanged.
There are several types of games:
- Those that can be installed on a gadget without using an additional archive.
- Those that will not be able to start without a separate archive file.
Installing cache for games
How to install cache for a game on Android – There are two common methods:
- Using the Android Market application - the most convenient and effective.
- Using a card reader or USB cable.
Android Market
There are absolutely no difficulties in this method. Simply download the toy using Android Market and install. And when setting up, you allow you to download the cache as a separate file.
This method, of course, is absolutely legal, but not everyone may like it, because all the toys will be paid and you can put them on your phone only after depositing money.

Uploading using a card reader or USB cable
It is good because it provides the opportunity to download pirated versions of toys onto your smartphone.
2 Create a new folder on it and rename it.
4 Now unpack the application and play.
Where to install the cache
It is also important where to install the game cache on Android? Most often, it is saved automatically according to the standard scheme and determines the path independently.
But if the file is too large, it can be saved in another location.
It is very important that this file document is placed strictly in the location where the folder designated for it is located.
Before you start downloading, you should read the instructions and understand exactly where they recommend saving each unzipped file - this is important.
If you place them in another place, you will not be able to play in the future. The file will not open.
There is a quick option that, using simple manipulations, will help you determine where the cache will go after installation.
To do this, you should start downloading without it and trace where the .apk will make the folder. Literally a couple of seconds will be enough to determine the location.
Next, we stop the process and drop our own file there, already saved using USB on the PC.

Installation from archive
It happens that this toy is downloaded, but not under the guise of a file with the .apk extension, but simply in the Obb format. Installing it will be a little more difficult, but not impossible.
The user can figure out that the process went the wrong way by seeing the format of the saved file.
It will look something like this “main.7610.com.rovio.battebay.obb.”.
To solve this problem, you need to find the game ID address and save it to this path /Android/obb
