Nikon focal length simulator. DSLR camera simulator. Bokeh simulator and depth of field calculator
I have been closely involved in photography for about 10 years now. Lately, more and more often I’ve been thinking about purchasing a DSLR camera, because the capabilities of my current Canon SX10 IS are already a little lacking)).
The only thing that stops you is that if you love different genres of shooting, then along with your DSLR camera you will have to carry a bunch of interchangeable lenses, which are also not cheap. And since I am interested in portrait photography, macro photography, and landscape photography, this option is not very suitable for me.
It’s the same with my current Canon: small, lightweight, extremely versatile (you can take photos from 0 cm and zoom objects twenty times only using optics). That's why I'm in no hurry to change my current camera)).
Many people are intimidated by the large number of settings that will need to be adjusted manually when switching to a reflex camera (SLR). They think with horror about how long it will take them to master this technique)). However, there is really nothing difficult about switching from a soap dish to a DSLR. To convince you of this, I present to your attention an online SLR Camera Simulator.
Using this simulator, you can play with camera settings by changing shutter speed, aperture, ISO, etc. and try to take your first photos.
There is a child in the viewfinder window who needs to be photographed. Your task is to select all the necessary parameters in such a way as to get a clear picture. Let's look at what these parameters are...
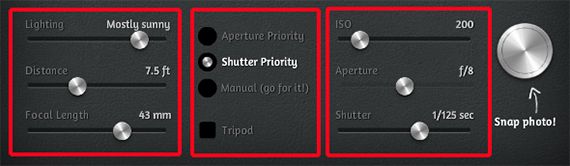
On the left side from top to bottom:
- type of lighting
- distance to subject
- zoom amount (focal length)
In the middle part you can select one of three shooting modes:
- aperture priority
- shutter priority
- fully manual mode
If you check the box next to "Tripod", this will mean that your DSLR camera is mounted on a tripod.
On the right side you can set the settings (available depending on the selected shooting mode):
- sensitivity (ISO)
- aperture opening degree
- excerpts
By pressing the round button on the very right side of the screen, you take a photo and immediately see the result. If the photo didn’t turn out well (blur, poor lighting, etc.), then a sad face appears under the photo with an explanation of where the mistake was made. Well, if everything is fine, then you will see a cheerful face)).

Between sad and cheerful faces there are also intermediate options, depending on how successful the photo is)).
Friends, I hope those who were afraid to switch from a soap dish to a DSLR will now completely get rid of their fears. Well, those who are simply interested in an online DSLR camera simulator will get great pleasure from it!
Attention! The project is currently closed and no longer available.
Hover your mouse over the parameter you are interested in and you will see a hint.
For detailed explanations, click on the number in the picture
Illumination of the photographed scene
No matter how expensive a camera you shoot with, the most important condition for obtaining a high-quality photograph is sufficient illumination of the subject. Apart from a couple of exceptions, we can say that there is never too much light.
Use this virtual camera engine to change the lighting of the scene you are shooting and experiment with different lighting conditions. As you move the slider, the corresponding light source symbol appears in the upper right corner of the viewfinder.
ISO - matrix sensitivity
ISO is the sensitivity parameter of the camera matrix. The higher this value, the more the light received by each pixel is amplified. High sensitivity values result in digital noise. In the photograph, noise is noticeable in the form of colored dots, especially in shadow areas and at high magnification of the image.
Recommendations for choosing sensor sensitivity are simple: use the lowest sensitivity possible. Raise ISO only in extreme cases, when all other options for obtaining normal exposure have already been exhausted.
Aperture
Aperture is a light-proof partition inside the lens with an adjustable opening size. Due to the size of the hole, the aperture allows you to change the sharpness of objects at different distances from the lens.
When all objects, regardless of the distance to the lens, are sharp, they speak of a large depth of field, while the aperture opening is very small. When only one object (or even part of it) turns out to be sharp, and everything else blurs as it moves away from the focus point, they say it is small and maximum.
The size of the aperture opening is displayed in the camera viewfinder as an aperture number (for example, F 5.6).
In addition to controlling the depth of field, the size of the aperture opening also affects the amount of light passing to the camera matrix. Therefore, when changing the aperture in manual mode, the shutter speed must be adjusted accordingly.
Shutter speed
To get a good photograph, the camera matrix needs to be illuminated for a certain time, which depends on the brightness of the objects being photographed and the brightness of the lighting.
Illuminating the camera sensor to take a photograph is called exposure. The time during which the camera matrix is illuminated with light is called shutter speed. Shutter speed is measured in seconds and fractions of a second, for example 2 sec, 1/125 sec, etc. - the designation in the viewfinder will be 2" and 125, respectively.
Under the same lighting conditions, shutter speed depends on the amount of light passing through the lens (aperture value) and the sensitivity of the matrix (ISO). By changing the shutter speed you can get different effects of moving objects, for example, freeze motion (an object hangs in the air) or blur motion (an object or background is blurred in the direction the object moves).
If there is insufficient light, long shutter speeds can lead to unwanted blurring of a moving object or even a stationary one due to small movements of the camera when the shutter is released. Such blurring is a photographic defect and is called shuffle.
Tripod
A tripod is a special stand for a camera, usually with three folding legs.
When photographing with long exposures, in order to avoid accidental movement of the camera (shaking) and, as a result, blurring of the frame, it is recommended to use a tripod, which allows you to set the camera motionless.
However, it should be remembered that a tripod will not help if the subject is moving. In this case, you can get rid of movement and blur in the image in the photo only by shortening the shutter speed.
Use this virtual camera option to understand the causes of movement and how to fix it.
Distance to subject
The distance to the subject affects the degree of background blur - The closer the camera is to the subject and further from the background, the smaller the depth of field will be and the more blurred the background will be.
Use this engine to observe this dependency. The distance is specified in feet - ft, 1 meter is approximately equal to 3 feet.
Lens focal length
The focal length of the lens affects not only but also the background blur - depth of field. The shorter the focal length of the lens, the greater the depth of field of the imaged space (DOF). At longer focal lengths, the depth of field decreases and the background becomes more blurred.
Use this property of the focal length of the lens to obtain a minimum depth of field!
The movement of this virtual camera slider simulates the rotation of the zoom ring of the Canon EF-S 18-55mm kit lens.
Aperture priority: Av or A mode
A shooting mode in which the photographer rigidly sets the aperture value. All other exposure parameters are set automatically.
Since the aperture directly affects the depth of field, this mode is convenient to use when you need to control the depth of field: to take pictures with a blurred background or to take pictures with the sharpest objects at different distances from the camera lens.
Shutter priority: TV or S mode
A shooting mode in which the photographer strictly sets the shutter speed value. All other exposure parameters are set automatically by the camera.
Shutter priority mode is convenient to use when you want to emphasize the movement of subjects using dynamic effects: blurring moving objects or, conversely, freezing movement.
Exposure indicator
An exposure meter is an electronic device that measures the illumination of a frame before shooting. Exposure is measured in conventional (light) units and is designated EV [Exposure Value]. Based on the measured illumination of the frame, the camera in any shooting mode except M automatically sets exposure parameters: shutter speed, aperture, ISO. In this case, the arrow under the exposure indicator scale is in the center of the scale, which corresponds to EV=0. If the set exposure parameters do not correspond to the measured illumination and the frame is expected to be underexposed, then the exposure indicator arrow will deviate to the left (for example, -2 EV), and in case of overexposure, to the right (for example, +1½ EV).
Manual mode M (Manual)
Fully manual shooting mode. This mode is usually used by experienced photographers because it produces better results in difficult lighting conditions, but requires a good knowledge of exposure basics and the ability to quickly adjust the camera. Mode M is most often used by experienced photographers when it is not possible to get a normal exposure at EV=0. In manual shooting mode, the camera’s automation is turned off, and all exposure parameters (shutter speed, aperture, ISO) are set by the photographer. However, in manual shooting mode, the camera's exposure meter and exposure indicator continue to work, helping the photographer set the required shooting parameters.
This is a wonderful educational site from the largest manufacturer of photographic equipment. It has three sections. The first will introduce you to brief information about what exposure, shutter speed, aperture, sensitivity are and what effect these and other parameters have on the photo. The second section is a virtual simulator with which you can practice shooting with various parameters. And finally, the third section is intended to test the information obtained in practice. Here you will be asked to temporarily complete tasks to photograph various objects.
CameraSim

Another great simulator that offers you to practice using a virtual SLR camera. You have to take a photo of a pretty girl who, not only can’t stand still for a second, but also holds some kind of rotating contraption in her hand. Several shooting modes are available here (aperture priority, shutter priority and fully manual), as well as all the necessary controls. After pressing the shutter, you will immediately see the shot you took and will be able to analyze the mistakes made.
Bokeh simulator

The following simulator is designed to introduce you to the concept of “depth of field”. You've probably seen photos where objects in front look very sharp, but the background is slightly blurred. To get such a photo, you need to correctly adjust the aperture, focal length and select the correct distance to the object. A special simulator will help you learn all these tricks, which allows you to select the best parameters to achieve the effect you have in mind.
Newbie to Expert Photo Editing in 5 Minutes

And the last resource of this short review will be useful to you if you want to edit the resulting photos. With its help, in just 5 minutes, as the creators promise, you will learn about the most common settings of modern photo editors and their impact on the appearance of the photo. And you can consolidate the acquired skills on real photographs in a wonderful online editor from the same developers.
And finally, a question for experienced photographers. What resources do you find most useful for learning the basics of this art?
Change the values below the screen and click the “Take Photo” button. The result will be reflected on the screen.
Parameters used in the simulator:
Lighting:
Lighting is a major factor in determining how your camera should be mounted. Use this slider to experiment with different types of lighting. The lack of lighting can be compensated by using a longer shutter speed or a wider aperture.
Distance:
Use this slider to simulate how close or far away you are in relation to the subject. Distance affects depth of field. By changing the depth of field, you can “blur” objects or the background, or give the photo greater clarity.
Focal length:
Focal length determines the boundaries of the frame or the angle of view of the lens. The longer the focal length, the smaller the angle (the lens captures a smaller area of the frame), and the larger the subject becomes in the frame.
By moving the slider to the left towards the wide angle, you not only create the greatest depth of field (a sharper photo), but also capture more of the frame. By moving the slider to the right, you create a shallower depth of field (usually only the main subject is in focus).
Shooting modes:
Exposure modes from DSLR cameras allow you to control one setting while the camera automatically adjusts others.
In shutter priority mode, set the shutter speed. The camera will set the aperture on its own. In aperture priority mode, set the aperture value and the camera will set the shutter speed.
In manual mode, you set the shutter speed and aperture yourself. Refer to the camera's light meter, which is located below the image. This will allow you to get the correct exposure.
Tripod:
Using a tripod in many cases allows you to get rid of the “shake” effect and get a clearer image.
ISO:
ISO – light sensitivity of the matrix or film. ISO is one of three parameters that affect exposure, along with shutter speed and aperture.
The lowest ISO value (100 in the simulator) allows you to get a cleaner image, without noise. But it requires more light - slow shutter speeds or an open aperture (smaller aperture values, for example, 2.8).
At high ISO settings (often above 400 or 800), “noise” can appear in the image, which degrades image quality.
Diaphragm:
The aperture determines the amount of light that will pass through the lens and hit the sensor (or film).
As the f value decreases, the size of the lens aperture increases and, accordingly, the amount of light hitting the sensor (or film).
Also, the size of the aperture significantly affects the part that is not in focus of the lens. At small aperture values, the background blur effect often occurs.
Excerpt:
Shutter speed is the time period when the shutter is open. At this time, light hits the matrix (or film) and creates an image.
High shutter speeds allow you to freeze motion in a photograph, but require a lot of light. Slow speeds allow you to shoot with less light, but may cause blurred images.
Exposure:
With exposure, you control the amount of light that hits the sensor (or film). Exposure depends on ISO, aperture and shutter speed. Move the sliders of these parameters and you can understand how they affect exposure.
The virtual camera simulator is a beginner photographer's simulator that will allow you to easily and clearly learn the relationship between shutter speed, aperture and ISO. Using the virtual simulator for a novice photographer, you can also easily understand the influence of aperture on depth of field and exposure, and shutter speed on exposure and blurring of a photo. In addition, using this camera simulator, you can experiment with camera settings both in manual mode and in shutter priority and aperture priority modes.
Learn how to set up a camera on the novice photographer's simulator
Brief instructions on virtual camera settings
Aperture - Aperture
Diaphragm (aperture) is a light-proof partition installed between the objective lenses. The diaphragm has an adjustable hole in the center to transmit a beam of light from the subject to the camera matrix. Depending on the size, the depth of field changes. The larger the aperture opening, the smaller In addition, the size of the aperture opening affects the exposure of the frame - the larger the opening, the more light passes to the matrix (or film).
To see how the aperture works, move the slider Aperture and observe changes in the depth of field and brightness of the photo. Above the slider are the digital aperture values, which correspond to a specific aperture opening size, shown in the figure on the right.
Shutter - Shutter
Shutter (shutter) - adjusts the exposure of the photo. The longer the shutter curtains are open (long shutter speed), the more light will hit the sensor. Move the slider Shutter and watch how the brightness of the picture changes, depending on the shutter speed indicated above the slider. In the picture on the right, you can see how the shutter works at specific shutter speeds - press the button test speed.
When photographing in manual mode, the most important thing to find is the combination of aperture and shutter speed that produces a frame of normal brightness.
When choosing a shutter speed, be aware that a slow shutter speed may result in particularly moving objects, such as a dog in the foreground running towards the viewer.
ISO - matrix sensitivity
If the range of shutter speeds and apertures of your camera does not allow you to obtain normal frame brightness, you need to change the sensitivity of the matrix - Please note that at high ISO values, colored dots appear in the picture - this is
Light meter - exposure meter
Almost all digital cameras have a built-in photo exposure meter - Light meter(light meter). An exposure meter is an electronic device for measuring the illumination of the subject being photographed. Many cameras have a built-in light meter that works in conjunction with an exposure indicator. The exposure indicator on the photographer's simulator is a scale under the frame image. As in a real digital camera, it shows how many stops the exposure set by the photographer differs from the one calculated by the camera’s automation.
Link Aperture / Shutter - A(Av) / S(Tv) mode
Switching the camera simulator to semi-automatic
Aperture priority mode is designated Av or A and is used to control the Photographer sets the desired value of depth of field (lens aperture), and the camera automatically adjusts the shutter speed suitable for shooting, using the aperture value already set by the photographer.
Shutter priority mode is designated S or Tv and works the same as aperture priority mode, but now the photographer sets the shutter speed, and the camera takes this setting into account and automatically selects the appropriate aperture.
Thus, in priority modes, aperture and shutter speed are linked to each other by the camera's automation and at the same time depend on the settings chosen by the photographer. Therefore, such modes are called semi-automatic. convenient to use if the photographer has little experience or simply does not have time to set the shutter speed and then the aperture one by one.
Link Aperture/Shutter[link shutter speed and aperture] - if you want to switch to semi-automatic priority mode, then put a cross in this box on the camera simulator. Now, when you change the shutter speed, the aperture value will change automatically and vice versa, when you change the aperture, the shutter speed will automatically change. This is how the equivalent interact. Depending on which camera simulator engine you control (Aperture or Shutter), the virtual simulator simulates the shutter priority or aperture priority mode, respectively.