Inbox folder. Inbox Zero - zero emails in the Inbox folder.
This section is intended for creating new folders in electronic mail mail, for distribution of letters. Folders help you organize your mail by distributing letters by topic or other parameters. Folders also allow you to block access to certain letters, locking the folder with a password.
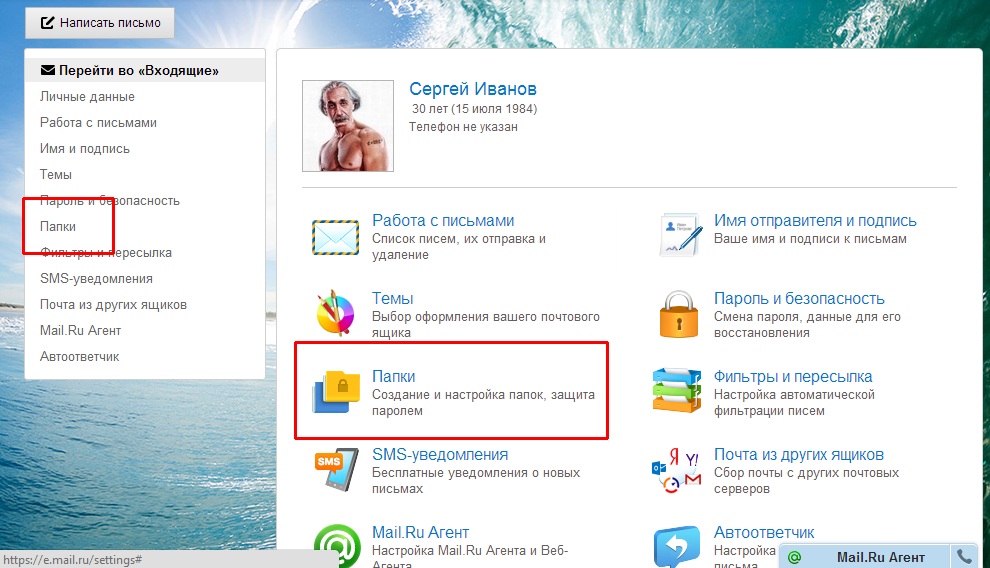
Go to settings - button in the upper right corner, next to the “Exit” button or click the “More” button and select “Settings”.
Select the “Folders” section either in the list on the left or on the right with an icon in the form of a yellow folder with a lock drawn on it.
The page contains a list of existing folders. At the top of the list is the “Add Folder” button; by clicking this button, you can accordingly create a new folder for letters. For example, let’s create a “Personal” folder and click “Add Folder”.

In the first field, write down the name of the new folder (any name is possible, but I’ll create “Personal”). In the second line we select the nesting level, that is, it’s like in operating system, either this folder will be visible and it will be equal to the others, or it will be located inside another folder. To make it more clear, I’ll create a folder nested in the existing “Inbox” folder. I open the “First level folder” field and select the “Inbox” folder.

Now select the folder availability. "Not available for mail programs(POP3)" - this means that if you check this box, you will not be able to open this folder from programs for use by email, such as Bat, Microsoft Outlook and the like. In this case, letters from the folder can only be opened in Mail.
You can create a password if someone else has access to your mail. To create a password, check the “Folder is password protected” box.

Additional lines appear to be filled in - we enter the password for the folder twice (you can see how to create a password in the “registration in mail” section), after the password we enter a secret question, the question is not selected, but is invented independently. The following is the answer to this question. The answer and the question do not have to be logically interconnected, the main thing is that you can later remember this answer. The answer is intended for password recovery; I do not advise you to write just anything, as one day you will definitely forget your password.
In the bottom line, enter the password for the Mail mailbox, that is, for the mailbox in which you are currently located. If you don’t remember your password, go to the “password recovery” section. After filling in all the data, click the “Add” button.

Now a new folder called “Personal” has appeared in the list of folders. If you point at a new folder, two buttons appear on the right - settings, and - delete folder. In the folder settings, you can rename the folder, make it inaccessible to email programs, and close it with a password. In general, this is all that we specify when creating a new folder.
All correspondence is distributed into folders. When you enter your mailbox, a list of letters in the folder is loaded "Inbox", where all your incoming emails go by default.
Folder navigation is available on the left side of the page. Listed above system folders: Inbox, Sent Items, Drafts, Spam, Trash (which cannot be deleted or renamed), your personal folders will be displayed below. Next to the folder name, the number of new (unread) messages in it is displayed.
To go to the desired folder and view the letters contained in it, click on its name. All folders have the same interface (see Fig. 1).
Fig.1. Incoming letters.
Incoming emails
Unread messages in the list will be highlighted in bold. Letters marked as "Important", will be marked red flag, and letters that contain attachments - paperclip .
You can change the number of letters from the standard 25 per page to the number that is convenient for you. To do this, go to the section "Settings"(menu bar at the top of the page), then select a subsection "Are common" and select a value convenient for you from the list. Don't forget to press the button "Save".
To check whether new letters have arrived, refresh the list of letters by clicking on the main menu button "Update".
You can sort the list of letters by date received or letter size. By default, the list is sorted in descending order of receipt date. To sort the list differently, click on the link " Sort " on the right above the list of letters. A sorting menu will appear (see Fig. 2), select the desired option.
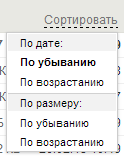
Fig.2. Sorting the list of letters.
The field is necessary to highlight a letter or letters "tick" for further action with them. Click on the icon to select the letter or deselect it if it is already there.
You can select letters manually with checkmarks or use group selection of all letters or according to the selected criterion. To select all letters on the current page, click on the icon above the list. Or select the desired criterion from the drop-down list (see Fig. 3) by clicking on the arrow next to the icon. This way you can highlight all emails, read, unread, important or unimportant emails on the current list page.

Fig.3. Group selection of letters.
Letters can be marked as "Read" or "Unread", as well as a special flag "Important". Messages not marked with a flag are considered "Unimportant". In addition to this letter, you can note as SPAM, such letters are automatically considered read and transferred to the " Spam".
In order to change the status of letters, tick the required letters, then select from the drop-down list "Mark"(see Fig. 4) new status.

Fig.4. Changing the status of letters.
To move emails to another folder, select the required emails, then select the name of the target folder from the drop-down list "Move"(see Fig. 5).
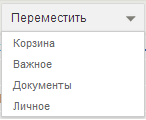
Fig.5. Moving letters.
Note: The following restrictions apply when moving folders:
- from the "Inbox" folder it is possible to move to the "Trash" folder or to personal folders;
- You can move from the "Sent Items" folder to the "Trash" folder or to personal folders;
- Moving from the "Drafts" folder is not possible;
- from the "Spam" folder it is possible to move it to the "Inbox", Trash or personal folders;
- You can move from the "Trash" folder to the "Inbox" folder or to personal folders;
- You can move from personal folders to your Inbox, Trash, or other personal folders.
After successfully completing an action with a letter, a system message highlighted with a green background is displayed above the list (see Fig. 6). It will automatically close when the page is refreshed or when you navigate to another page. You can also close it manually by clicking on the cross. Such messages will appear when working not only with letters, but also with folders, contacts and interface settings.
Fig.6. System message.
At the top of the page there is a search bar for letters. When you place the cursor in a line, an advanced search form appears (see Fig. 7).
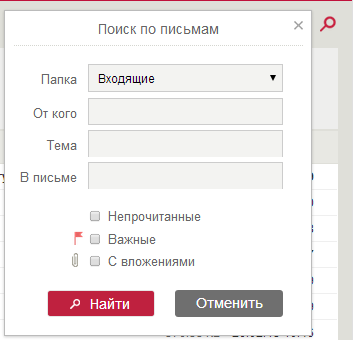
Fig.7. Letter search form.
In the drop-down list, select the folder in which the letters will be searched. By default, the search is performed in your Inbox. Letters can be found by the occurrence of a given string in:
- Sender's email address - From whom.
- Subject of the letter - Subject.
- Text of the letter - In a letter.
Below you can mark which letters to look for. If no checkbox is checked, then any emails will be searched if checked:
- Unread- search ONLY unread messages.
- Important- search ONLY for emails marked as IMPORTANT.
- With attachments- search ONLY for emails with attachments.
To find letters by given parameters, press the button "Find". The search results will be displayed in the general list of letters (see Fig. 8), the search terms will be displayed in the search bar.
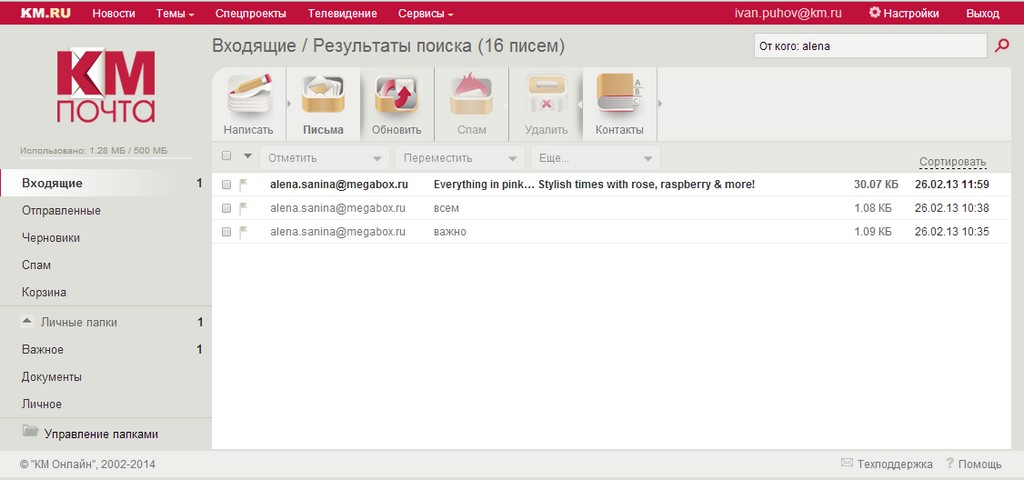
Fig.8. Letter search results.
Since we addressed our letter to ourselves, after the next procedure of sending and receiving messages we will receive it. Default incoming messages placed in a folder Inbox(Inbox). IN this section describes in detail how to work with this folder and incoming messages.
Working with a message
Typically, when a new message arrives, a notification dialog box appears prompting you to open the incoming message. Moreover, they notify about the incoming message sound signal and an envelope-shaped icon on the system tray next to the clock.
In folder Inbox(Inbox) double-click the incoming message, a letter sent to yourself (Fig. 9.30). As you can see, the message has completely retained the format, attachment and other elements associated with it, but let’s talk about everything in order.
So, since our message contained additional parameters Vote(Voting) Mark for execution(Follow Up) and Importance(Importance), at the top of the letter on the yellow information strip they are all listed. Moreover, as you can see, at the top of the incoming message a voting panel with buttons is displayed Test passed and Test failed. We will talk about replies and forwarding a little later, but now, since you have read this message, you can complete the checklist. Click the button of the same name on the toolbar Standard and check the box Completed(Complete). Under the name of the mark in the information strip will appear additional message on completion of familiarization on the relevant date.
Rice. 9.30.
Moreover, as expected, a dialog box appeared asking you to confirm receipt and reading of this message. If you want confirmation to be sent automatically, check the box Don't ask again about sending confirmations and click Yes.
Comment
This dialog box might not appear; in this case, a response to the delivery and reading request will be sent automatically (see section 9.10.1 “Message Processing”).
Next come the fields From(From), To whom(That), Copy(SS), Sent(Sent) and Subject(Subject). These fields are read and copy only, with the exception of the From(From) displaying the name and email address sender. If you do not have this sender in your contact list, the adding procedure can be carried out without leaving the form Message(Message). Hover your mouse over the field From(From) and click right click. Select the command from the context menu Add to contacts(Add To Contacts). A form will appear Contact(Contact) with automatically filled fields Full name (Full Name) and Email mail(E-mail Address). Add additional information if necessary and save the contact (See Chapter 4 "Contacts").
The next large field displays the information sent by the sender. Note that this field is not available for input, although it does show formatting options for the existing text. But the user can copy the text of the message, as well as save its background or embedded images.
Example 9.22. Saving message background
Filename:=< Им I file>
The only formatting procedure available to the recipient in this case is increasing or decreasing the font size. Changing the font size is done by clicking the button of the same name on the toolbar Standard.
Sometimes the incoming message does not identify the text. What you see is not Russian text, but an incomprehensible set of characters. One of the problems that arises in this case is the incorrect determination of the encoding of the incoming message. You can manually try to change the encoding by selecting corresponding value from the list > View > Encoding.
The last field considered here is The attachment(Attachments). To save or open an attachment, follow the following example.
Example 9.23. Saving attached files
In principle, there is another more convenient and quick way saving investments. You can simply double-click on the attached file icon. A dialog box will appear Opening an attachment(Opening Mail Attachments), notifying about the possibility of containing a virus in an attached file (Fig. 9.31). Since we have attached this file, you can be almost one hundred percent sure that it does not contain viruses, and feel free to click the button Save attachment(Save it to disk). In the dialog box that appears, select a folder to store the file. Otherwise, if a message with an attached file does not inspire you with due confidence, simply delete it.
Sometimes the attachment contains a file whose editor is known to Windows, such as pictures or an audio attachment. Thus, if there is no protection for opening an attachment, double-clicking on the file icon will open it and, accordingly, possible infection virus. At safe work Outlook will issue a warning and offer two options: open or save to disk. I strongly advise you not to open such files from Outlook, but first save them on disk, and then be sure to check them for viruses. And only after these procedures open the file. Of course, these actions somewhat slow down the message processing process, but if the computer is infected with a virus, this process may stop altogether.
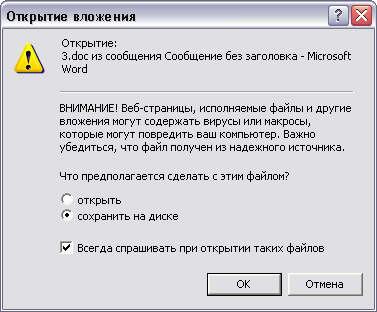
Rice. 9.31. Dialog window Opening an attachment
As you can see, viewing and processing the received message is quite simple. Sometimes, when more than one message arrives, it is convenient to use the special buttons Next or Back(Back) to go to the next or previous message without leaving the already open form.
In addition to working with a message by opening its form, you can work with it directly in one of the folder views Inbox, which will be discussed in the next section.
Folder views Inbox
As mentioned above, received messages can be seen in the folder Inbox(Inbox), sent - in a folder Sent(Sent), unsent - in the folder Drafts(Draft). For all of these folders, Microsoft Outlook offers several standard views. We will consider views using the example of a folder Inbox. In table 9.6 describes standard folder views Inbox.
| Performance | Displayed Items |
| Messages | List of all messages. Displayed fields: Severity, Icon, Tag, Attachment, From, Subject, Received |
| Messages with AutoPreview | List of all messages with the first three lines of text for messages not yet opened |
| By Following-Up Flag | List of all messages grouped by stamp with a specific due date |
| Last Seven Days | Messages received in the last seven days |
| Flagged for next seven days | Messages scheduled for the next seven days |
| By subject (By Conversation topic) | List of all messages grouped by Subject field |
| By Sender | List of all messages grouped by From field |
| Unread Messages | Messages marked as unread |
| By recipient (Send To) | Messages grouped by To field |
| Message Timeline | All messages are displayed in chronological order on the timeline |
Table 9.6. Folder views Inbox
In Fig. 9.32 shows the performance Messages with auto view
(Message with AutoPreview) with a preview area.

Rice. 9.32. Performance Messages with auto-view and viewing area
Example 9.24. Changing the view
> View > Current View > Auto-Preview Messages
> View > Viewport
Comment
Viewport options can be set in the dialog box View area(Preview Pane) by selecting the command > Tools > Options Advanced Preview Pane.
When you open Gmail, the most recent conversations appear in your inbox. When you return to the Gmail app after using other apps, the last screen you were on appears.
Opening Gmail
Conversations with new messages appear at the very top of your inbox. All your messages appear in your Inbox unless you delete, archive, or filter them.
If you made the Priority folder your default inbox in the web version of Gmail, you'll be able to view that folder and make it your default inbox in the Gmail app on your phone. See section.
Your current Google account appears in the upper right corner of your inbox. If you use multiple accounts, you should click the current account to switch accounts, as shown in . Adding accounts and working with them is described in the section.
Topics of threads with new messages are highlighted with bold lines. To read a message in a thread, click on the topic of the thread. additional information are given in the section.
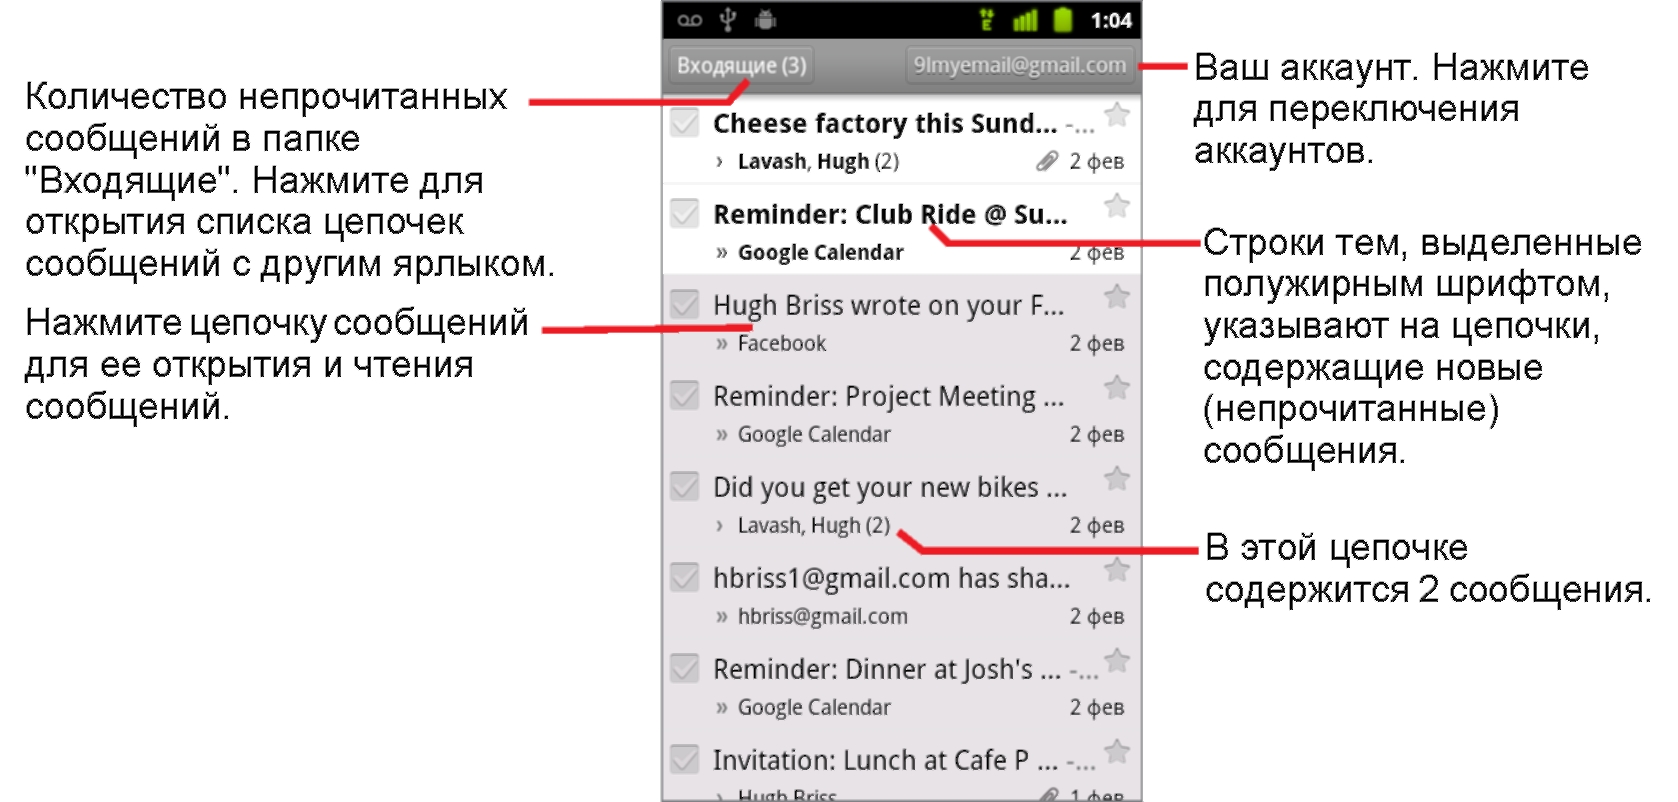
” indicates messages sent directly to you.
> indicates messages of which a copy has been sent to you.
Other messages have been sent to you as a group member.
If you use the Priority folder, messages in threads can also indicate whether they were marked as important by the Gmail app or by you (see):
Important messages are marked with a yellow icon:
Indicates important messages sent directly to you.
Indicates important messages of which a copy has been sent to you.
Indicates important messages you have received as a group member.
Open your inbox when using Gmail
If you have set your default inbox to Priority, this folder will open instead of your Inbox (see ).
Switching accounts
Gmail displays threads, messages, and settings from only one Google account at one time. If you use multiple accounts, you can open the Accounts screen to view the number unread messages in each account, as well as to switch between accounts.
Adding and setting up accounts is described in the section "Accounts".
1. In your inbox, tap your current account in the top right corner of the screen, or tap Menu, and then Accounts.
Each account is displayed along with the number of unread messages in the Inbox or Priority folder, depending on the default inbox. In addition, the default inbox for each account is displayed (see section).
2. Tap the account containing the message you would like to read.
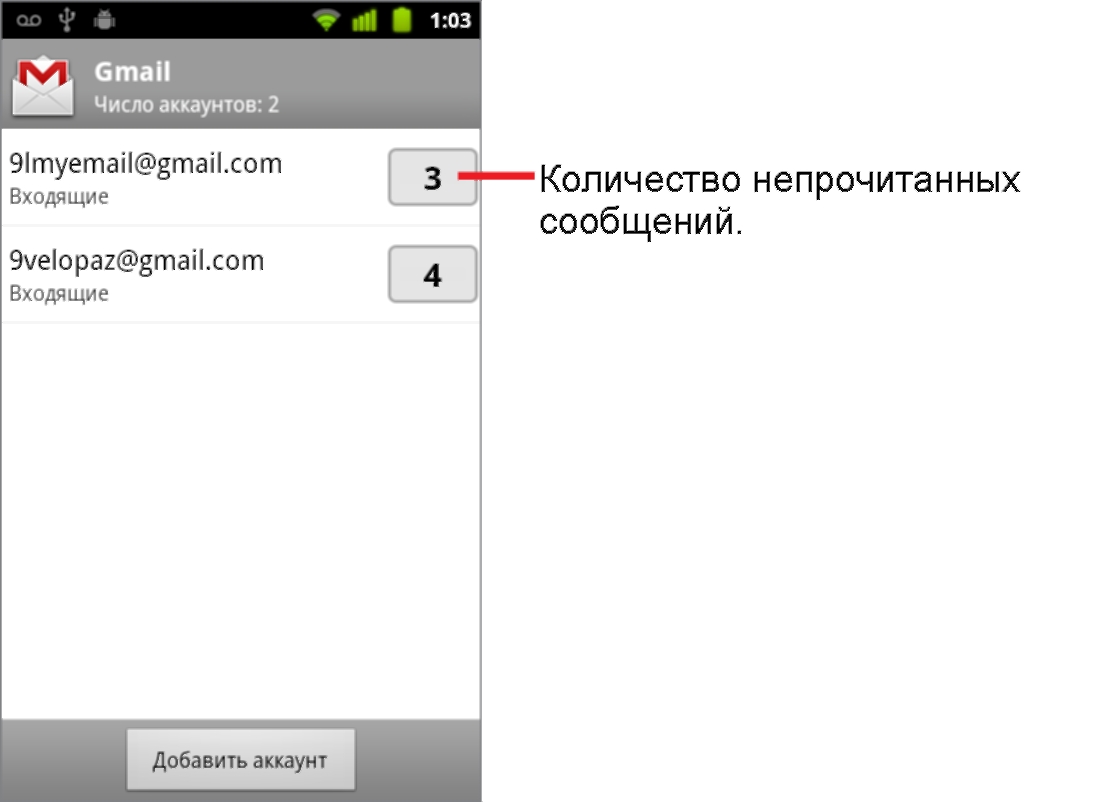
The Inbox or Priority folder for a specific account opens depending on which folder has been set as the default inbox.
Use Gmail offline
If you are not connected to mobile network or Wi-Fi networks(for example, you switched to Airplane mode), you can use Gmail to read messages stored on your phone (see section) and also to compose new messages.
Messages you send are stored on your phone as Outbox until your connection is restored. After this, messages will be sent automatically. You can view messages labeled "Outbox" (see section).
IN mailbox the following are available standard folders:
- Outbox. Emails that were not sent because the Internet connection was lost. When the connection is restored, the emails will be sent automatically.
- Archive . Folder for storing old letters.
Note. If there are no letters in the Archive, the folder is not displayed. To move a letter to this folder, right-click on it and select Archive.
Inbox. All new emails (except for spam and emails that end up in other folders using automatic email sorting).
Sent. All emails you sent.
Deleted. All emails that you deleted manually or using automatic email sorting.
Spam. Emails that have been identified as spam.
Drafts. Letter drafts and templates.
Standard folders are not edited or deleted.
Personal folders
To add a personal folder, click New Folder. You can add multiple personal folders - they will all appear as subfolders in the Inbox.
On the menu Settings → Folders and labels you can edit personal folders:
- create subfolders inside Inbox folders ;
- rename, clean up or delete folders;
- mark all emails in a folder as read;
- create rules for automatic sorting of letters.
Note. You can create up to 1017 personal folders with a maximum nesting of 32 folders.
Sort the list of personal folders
Personal folders in the list can be moved and rearranged. To do this, drag the desired folder to a new location in the folder list.
If you can't drag a folder, check that the option is enabled Allow drag and drop of emails and folders.
By default, personal folders are sorted alphabetically. If you move even one folder, alphabetical order cannot be restored automatically. But you can manually drag the folder to its original location. New folders will then be shown at the bottom of the list, rather than in alphabetical order.