How to set up a tp link tl wr741nd router: step-by-step instructions. Typical configuration of Tp-link routers
Tp-Link has created an excellent application for smartphones and tablets called TP-LINK Tether. Using this program, you can manage your Wi-Fi router and even configure it. The application is really very interesting and functional. TP-LINK Tether can be installed on mobile devices that run Android or iOS. I checked it on iPad tablet 2 mini, and on two Android smartphones, everything works great.
In this article I want to talk in more detail about this program and show how it can be used to manage or configure a Tp-Link router. I would like to note right away that the TP-LINK Tether program does not work with all routers from this manufacturer. AND a large number of It simply does not support popular models. Full list supported routers can be found on the program page in Google Play, or in App Store (see links below).
Among the supported models you can see TL-WR841ND starting from V9, TL-WR741ND V5, TL-WR740N V5 V6, Tp-Link Archer routers, TL-WDR4300 V1, etc. I will check using the example of Tp-Link Archer C20i, and TL-WR740N V5. Be sure to pay attention to the hardware versions of the router. The hardware version can be viewed on the sticker at the bottom of the router. Well, if the program still does not know how to work with your router, then you can configure everything according to the instructions. Via a browser from a mobile device.
In the same Google Play you can see many reviews that TP-LINK Tether does not see the router or does not connect. My program saw two routers without any problems and connected to them. It seems to me that most of those who left reviews were simply trying to connect to routers that are not on the list of supported ones. And many do not pay attention to the hardware version of their devices.
TP-LINK Tether: how to download and connect to the router?
As I wrote above, the program can be installed from the application store. Here are the links:
- If you have an iOS device (iPhone, iPad, iPod Touch), then go to the App Store and install: https://itunes.apple.com/ru/app/tp-link-tether/id599496594
- Well, a link to Google Play if you have Android (version no lower than 2.3.3): https://play.google.com/store/apps/details?id=com.tplink.tether
Or just on mobile device enter "tp-link" in the search and install the application.
In order to manage or configure your router from a tablet or smartphone, you need to connect to it via Wi-Fi. Most likely, you are already connected to it. Well, if you have new router, and you want to configure it through the TP-LINK Tether program, then connect to a Wi-Fi network with a standard name, which will appear immediately after plugging the router into a power outlet. The name of this very network, and standard password indicated on the sticker at the bottom of the router.
Then simply launch the TP-LINK Tether program on your mobile device. will appear short description functions. Click on the button Begin. And if you are already connected to your router, then it should appear in the program. Or pull down to refresh. So we select our router and indicate the username and password. Default: admin and admin. If you changed them, please indicate yours.
Press the button Entrance, and get into the settings of your router through the Tether application.
How to use TP-LINK Tether and manage the router?
I connected and wrote an article using the TL-WR740N V5 as an example. Therefore, if you have a different router, then there may be more sections and functions in the program. For example, after connecting to the Archer C20i, a Guest Network section appeared, where you can manage your wireless guest Wi-Fi network. It all depends on the router model.
The main page is a network diagram. It displays the devices that are connected to your router. We click on any client and see information about him. But the most important thing here is blocking clients. Just choose required device, and press the button Block. The blocked device will be disconnected from the router and will not be able to connect to it. Blocked devices are displayed on the Management – Blocked Clients tab. There you can unlock it. This is much easier than going into the router settings, as I showed.

Wireless mode
Here are the minimum Wi-Fi settings networks. If you select this tab, you will see a switch that can be used to turn off Wi-Fi altogether. But be careful here, because you yourself are connected via Wi-Fi :)
And if you click on the name of your network, a page will open where you can change this same SSID name, or change the Wi-Fi password. You can also disable the password with a switch and make your network open. To save changes, just click on the button Ready.

If you have changed your network name or password, do not forget to connect your device again, with the new password.
Parental control
We will not dwell on this section in detail. In it you can simply add and remove devices to which parental controls will be applied. As far as I understand, you first need to configure the parental control itself in the router settings through the browser, and simply manage the devices through the program.
Blocked clients
This section displays those devices that you have blocked from connecting to your router. Here you can unlock them.

Internet connection
A very important section that should be used exclusively when setting up a router for the first time, or changing providers. There you can set connection parameters to your Internet provider. If you just bought a Tp-Link router and want to configure it, then connect the cable from your Internet provider or ADSL modem to the WAN connector of the router and go to the Internet Connection section.
If your Internet is already configured, then there you will see information on connecting to your provider (I don't have internet connection). To set up a connection, click on the top Connection type... Select from the list the connection type that your Internet provider uses (it is very important to choose correct connection!) , for example PPPoE, and if necessary, then set the username and password, which is also issued by the provider. To save the settings, click the button Save.

If you specified everything correctly, the router will connect to the provider and begin distributing the Internet. Otherwise, you will have a connection without internet access. If you need to ask some special settings (IP address, MTU, clone MAC address), then perform the settings through the browser. How I showed it.
System
There you can reset the router, reboot it, and change the password that is used to enter the settings of the router and the TP-LINK Tether application.

That’s actually all the capabilities of the Tether program.
What to do if TP-LINK Tether does not connect?
I will enter if the program does not see your router or does not accept the password.
- The first step is to make sure that Tether actually supports your router. A complete list of devices is available on the program page on Google Play and the App Store. Links at the beginning of the article. Special attention check the hardware version of your router. It is indicated on a sticker on the device itself.
- Next, make sure that your Android or iOS device is connected to the Wi-Fi network of the router you want to manage.
- If the program writes that “Login failed”, the password is not suitable, then most likely you are simply entering it incorrectly. By default, the password is admin. But it is quite possible that you or someone else changed it in the router settings. In this case, you will have to do.
I noticed that many people ask if there is a version of the TP-LINK Tether program for Windows and Windows Phone. No, there is no such version yet. But it is possible that Tp-Link will soon make such an application for Windows 10, for example.
Afterword
An excellent program that works reliably. There seem to be few functions, but there is everything you need. I think they will add even more features in new versions. At the time of writing this article, the version of the Tether program is 2.5.5.
It’s nice that Tp-Link has made a program not only for its top-end devices, but also for budget ones. Although there is a limitation in the hardware version of the routers that can be controlled. The program does not support older hardware versions. I think that in the near future all router manufacturers will make similar programs for mobile devices.
I will be glad to see your opinion and feedback about the Tether application in the comments.
Hello! Now we will connect and configure the Tp-link TL-WR841N Wi-Fi router. If you have a TL-WR841ND model, then these instructions will also suit you. Let's look at the entire process of connecting the router, setting up the Internet, Wi-Fi network and setting a password for the Wi-Fi network.
All this with photos, and detailed description. So you shouldn’t have any problems setting up the Tp-link TL-WR841N router. Just follow the instructions.
A few words about Tp-link TL-WR841N (TL-WR841ND). Very successful model Wi-Fi router, which is very popular. Indeed, a successful model, with an excellent price/quality ratio. It seems to me that for home use, an undemanding user cannot find a better router. I myself, in practice, tested the operation of the Tp-link TL-WR841N. It has been working perfectly for more than five years, distributing Wi-Fi to a large number of devices. It works very stably, I don’t even remember that the Internet was lost on it or something else. You can read more about Tp-link TL-WR841N at. There you will find a short review and my review.
If you have already purchased this router, then it’s time to move on to configuration. Let's do everything according to this scheme:
- Connecting the Tp-link TL-WR841N router.
- Setting up an Internet connection (WAN).
- Setting up a Wi-Fi network on the TL-WR841N.
- Setting a password to protect your Wi-Fi network.
- Changing the admin password, which protects the router settings.
Connection Tp-link TL-WR841N
Connect the power adapter to the router and plug it into a power outlet. If the indicators on the router do not light up, then turn on the power using the button located on the rear panel.
If you configure the router via cable (which comes included), having connected it to a computer or laptop, then take a network cable and connect the computer to the router. On the router, connect the cable to the LAN connector (one of 4):

Second end network cable on the computer we connect it to the connector network card:


Connecting and setting up a Wi-Fi network
If you want to configure the router via Wi-Fi, and not by connecting via cable, then just connect to the Wi-Fi network, which will appear immediately after turning on the power on the Tp-link TL-WR841N router. The network will have a standard name (something like this: "TP-LINK_084313"), and will not be protected.
You can even connect to this network from a tablet or phone and set up a router without a computer.
You probably found a disk included with the TL-WR841N. There is a utility for configuring the router. So, we will configure without a disk, through the router’s web interface. We will not need the disk in this instruction. If you want to configure via the utility from the disk, you can do this according to the instructions.
The Internet must be connected to the router. And your computer, tablet, laptop, etc. must be connected to Tp-link via cable or Wi-Fi. The router's power must be turned on. If everything is ready, then you can proceed to configuration.
The router settings will open.
And if the router has already connected to the provider and is distributing the Internet, then you can continue setting up.
Setting up a Wi-Fi network and setting a password on the Tp-link TL-WR841N router
To configure Wi-Fi, you need to open the tab on the settings page Wireless - Wireless Settings. On this page we need in the field Wireless Network Name come up with and write down a name for your Wi-Fi network, and in the drop-down menu Region select the country where you live. Leave the rest of the settings as they are in the screenshot below.

To protect our wireless network with a password, go to the tab Wireless - Wireless Security. There you need to select the security type WPA/WPA2 - Personal (Recommended).
In field PSK Password create and write down a password that will protect your Wi-Fi network. You can read more about setting a password on the TL-WR841N router in the article.

Save the settings by clicking the button Save.
Change admin password. Protecting your router settings
I already wrote in a separate article about how to do this in the router settings. Let's, while we are in the settings of the Tp-link TL-WR841N, immediately change the password that is used to protect the settings page. So that everyone who connects to your network will not be able to go into the router settings and change them.
Open the tab System Tools - Password. Enter your old username and password first (default - admin). Then enter your new username below (you can leave admin) and a new password. I advise you to write down this password somewhere so you don’t forget. Save the settings with the button Save.

That's it, setup Tp-link router TL-WR841N is complete. All that remains is to reboot the router. This can be done by turning off/on the power, or from the settings. On the tab System Tools - Reboot, you need to click on the Reboot button.
After setup and reboot, a Wi-Fi network will appear with the name that we set during the setup process. And to connect to a wireless network, use the password that we also set when setting up the router.
You can already connect your devices to the router. If you set up via cable, but want to connect via Wi-Fi, then the laptop can be disconnected from the router and connect via a wireless network.
You can leave your feedback and questions in the comments!
For example, a router is installed in a house or apartment, but in the back room a laptop, phone or tablet has a weak signal level. At the same time, it is so weak that connection is sometimes impossible.
You can, of course, connect a more powerful one to your laptop Wi-Fi adapter, but what to do with your phone and tablet? In this case, an access point that supports the operating mode will help us - repeater or repeater. Access point TL-WR740N will connect via Wi-Fi to your router and transmit the wireless signal further than a phone, tablet or other client device can. With the help of a TP-Link repeater you can boost Wi-Fi signal for your devices.
Setting up an access point in Wi-Fi repeater mode
Router TP-Link connects to a computer or laptop using a cable " twisted pair" Power is connected to the access point using a power supply. The network card settings should be set to default.
After setting up the access point, the cable from the computer to the access point can be disconnected.
Open the browser Internet Explorer, Mozilla, Opera, Chrome or any other, and enter the address 192.168.0.1 . This is the default, you can also see it on the bottom of the router.
In the next window, enter your username admin, password admin.
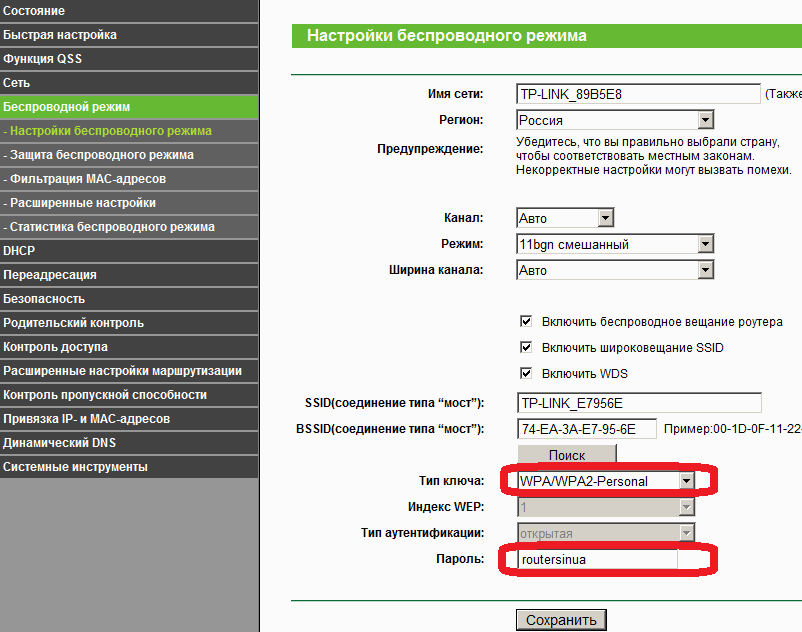
Open the menu: Wireless mode - Wireless mode settings - .
After - a group of text fields will appear below. Click the “Search” button

In the window that appears, click “Connection” opposite the Wifi network to which we will connect.

Select the encryption type: open, or . In the last column we enter wifi network password, which we want to connect to. We also install channel number, the same as the Wi-Fi network with which we want to create a WDS connection.
After this, save the settings by clicking the Save button. If the wifi network channel differs from the required one, you will receive the following note:
Your access point's channel does not match the bridged access point's channel, do you want to change your channel to the bridged access point's channel?
We confirm, and the channel should automatically change to the correct one.
Now all that remains is to configure options wifi security networks. Go to the menu: Wireless mode - Wireless protection. We select the encryption type and password that is used on the router to which our TP-Link repeater is connected. In our case, encryption was used.
Please note that if you use on your router, then in the fields Type, WEP Key Format, WEP Key, Key Type Settings similar to the router to which the access point will be connected must be specified. Otherwise, the TP-Link repeater will not connect to the router. Don't forget to indicate correct region where your router is located. If the source router has a different number in the channel column, then the repeater cannot connect to the router due to incorrect specified parameters security.
After configuring the security settings, save the settings with the Save button and reboot.
Checking WDS mode activation
You can find out that the TP-Link repeater was able to connect to the router in the menu State.

Open the menu and look at the connection parameters. In field Name ()- the name of the wifi network should appear, in the field - the poppy of the router distributing the network, as well as channel number and other parameters.
Connecting equipment to a Wi-Fi network with WDS
You can connect to WDS Wi-Fi network smartphone with Wi-Fi, tablet or laptop. To connect a laptop to a Wi-Fi network, in the lower right corner of the screen we find the icon Wi-Fi control connections. Select our Wi-Fi network from the list and click the “Connect” button.
Enter the password to connect to the Wi-Fi network, which was set in the router settings. After this, the laptop will connect to the Wi-Fi network.
Checking the connection of devices to the Wi-Fi repeater
After connecting any wireless device(laptop, phone, tablet) to a Wi-Fi network, let’s check that the device is connected to the repeater and not to the router. To do this, on the access point, open the menu Wireless mode - Wireless mode statistics and see the devices connected to the TP-Link repeater.
If the MAC address of your device is not in the list, and the Internet works on it, then the device has connected to the router, since at this point the router’s signal is better than the repeater’s signal. Place the access point far from the router and connect next to it. If the device still cannot connect to the access point, check that the access point is connected to the router and that its encryption type and password are set correctly in the security settings.
TP-Link routers and modems are deservedly popular for their reliability, low cost and ease of management. The instructions are given using the TD-W8960N model as an example.
Before turning on
The main function of the router is to create a local wireless network that connects computers, laptops and mobile gadgets within the home/office. The second, no less important task is connecting this network to the Internet. Therefore, before turning on the router for the first time, it is advisable to have the connection settings with the provider at hand. They are usually specified in the contract or in separate instructions from the provider. If there are no settings, then when connecting you need to call technical support and ask for this information.
Before turning it on, you need to look at the bottom of the case: in TP-Link models, the following information is needed to configure the router:
IP address: usually 192.168.1.1
· Login: admin
· Password: admin
If the values in your model are different, it is better to rewrite or remember them in advance.
Turning on the wireless modem for the first time
1. Connect the data cable from your Internet provider to the router. Typically this is a telephone cable (ADSL connection, “leased line”), or an Ethernet wire (“fiber optic”, LAN). If the connection source is a 3G/4G modem, then you should connect it to the router’s USB port.
2. Connect the router to the power supply: TP-Link supplies a power cable included.
Connecting to a router
If everything is in order, then after 20-60 seconds the router is completely ready for use. This time is needed to download the firmware. Indicators - LEDs on the front panel will help you find out about its performance. By the way, on TP Link routers these “lights” glow with a soft, pleasant light, without irritating even in the dark. Indicators are equipped with icons or inscriptions. From left to right:
· Power indicator: When the device is turned on, it should always be on.
· Internet: shows the functionality of the Internet connection. Doesn't work when first turned on; in online mode it flickers or lights up constantly.
· ADSL or LAN; 3G, 4G for Beeline and others mobile operators: depending on the type of provider, shows the presence of a signal from it. When you turn it on for the first time, it may blink, or it may be off.
· WLAN (WiFi/Wireless): access point indicator. Flickers or lights up when first connected.
· WDS: not present on all models, it is responsible for expanding wireless network coverage.
· Other “light bulbs” may be present - USB port, QSS fast connection, 2-6 local network ports, etc. It is normal if these indicators are not lit yet. If the device is used as a repeater, the light signaling may be different.
Connecting a PC to a Wireless Network
A smartphone/tablet is also suitable for setting up a TP-Link modem, but we will consider the good old connection from a PC or laptop. If the router is working, then it is already “distributing” the wireless network (or expanding its coverage area using WDS technologies). It is called standard and boring - like TP-Link_15616, and is visible from any device. It works without a password and this needs to be changed as soon as possible.
Connect the computer to new network Wi-Fi. Icon wireless connection in the Windows tray will be crossed out with a cross (or another icon of the missing Internet).
You can configure your TP-Link router through a browser. We enter it into address bar 192.168.1.1 (no www): This is the router's control panel. Remember - the IP address, plus the login and password are printed on the bottom of the case? So, instant authorization - and we are in the depths of the access point. If it is possible to change the language, then in the case of TP-Link you can do this with confidence: the company is famous for its decent translation of its firmware.
Everything about wireless router settings
Step-by-step instructions - connecting to the Internet, setting a network password, advanced parameters: WDS, MAC addresses, connection encryption algorithms.
TP-Link control panel home page
On home page(Device Info) nothing can be changed - this is a purely informational section. At the top there is information about the firmware and model version, below are the current indicators of the access point and connection with the provider, as well as the date and time.
Attention! When the router is fully configured, all values in the Device Info table should have non-zero values. If there are zeros anywhere (or values like 0.0.0.0), there is something wrong with the connection. True, the repeater mode allows zero values.
How to connect a router to the Internet
Connecting and setting up the Internet occurs in the Quick Setup section ( quick setup TP-Link router) side menu on the left. In other models, this section may be called WAN Settings / WAN Configurations.

How to connect a TP-Link router to the Internet: WAN and ADSL settings
In this section, it all comes down to entering 2-5 connection parameters that are provided by the provider. In our example it is:
· connection method (WAN Link Type): PPPoE mode;
· VPI/VCI values set to 0 and 33;
· login (PPP Username) and password (PPP Password) for authorization with the provider (not to be confused with the login-password of your personal wireless network!).
Each provider has its own settings: for Beeline they are one, for MTS they are different. Although they differ slightly, you should check with your Internet operator. In any case, to connect the router to the Internet you will need to enter no more than a few values. When the router is working as a repeater, it should not be configured to connect to the Internet. These parameters are needed only for the access point.
How to set up a wireless network
In the left side menu there is a Wireless section (“ Wireless network", Wi-Fi and other names). Let's go there.
Basic wireless settings section

Basic wireless parameters of the TP-Link router
Basic wireless parameters of the TP-Link router:
· Enable Wireless: Enable the wireless network. There should be a check mark.
· Hide SSID Broadcast: hide the network name from the air. The unofficial name of the option is “paranoid mode”. With a correct password like 463sltjHe, it is impossible to hack the network, regardless of whether the relay transmits its name or not.
· Wireless network name: name of the wireless network. It’s better to use something personal to immediately distinguish your own network from neighboring ones: The-Best-Wi-Fi, Aleksey’s Network, etc. English letters, numbers, spaces are acceptable, but no Cyrillic.
· Country: optional. To operate the router TP-Link setup no country required. You can choose your region, or you can forget.
The Apply/Save button is standard for all sections - it must be clicked after setting, before moving to the next section. Attention! Before changing the network name, encryption type, password, WDS mode, etc., keep in mind: the computer’s connection to Wi-Fi will be interrupted. You just need to re-click on the connection icon in Windows and select the newly created network (enter a new password) for each device on the network. They do not connect on their own.
Security section – Wi-Fi security and password
Perhaps the most important section of the settings. The QSS parameter (more often called WPS on other routers) is responsible for quickly connecting new devices to your network at the touch of a button, without entering passwords. If we are setting up a network outside the home (in the office), then it is better to turn it off (disable).

· Network Authentication: security type. Remember the word WEP - and never use it at all. Exclusively WPA, or WPA2 - no other values are suitable for a secure connection. WPA type variations (Home or Enterprise) are also acceptable. However, there is an ancient belief: a person who does not encrypt his wireless network goes to heaven.
· Configuring Open in network encryption means that your Internet can be used by random strangers, and they can have access to computers on the network. Use it only when you know exactly what you are doing. Even public Wi-Fi networks with free access for cafes/gyms are now commonly protected with a password.
· Wireless Network Key: Enter your own network password. Do not confuse it with the password for connecting to your provider. It is this password that will allow other devices to connect to the network. If the device is used as a repeater, then you do not need to set a password. Passwords like 111111, qwerty, Andrey, etc. sooner or later they will definitely be picked up by their neighbors. Choose a complex password, with letters, numbers and special characters, at least 10-15 characters.
Old joke: best password geek is the name of his pet. After all, a professional IT specialist’s dog’s name is always something like sif723@59!kw.
· Encryption algorithm (WPA Encryption). Both AES and AES-TKIP are equally good, there is no fundamental difference.
Advanced settings section

Advanced Wi-Fi settings. Useful advancements.
As a rule, TP Link modems do not require advanced settings. Everything should work with default values.
2. Mode: b / g / n / ac or their variations - bgn, bg, etc. In fact, generations Wi-Fi standard. You should select the most recent connection mode in the settings, bgn setting, or, if present, bgn+ac. The rest are needed only for rare cases of device incompatibility.
· The ancient and slow a and b modes were hardly seen even by seasoned specialists. These are retained for compatibility purposes and should not be used.
· Old “g” mode: can be used if older devices categorically refuse to work with other modes.
· Modern standard “n”: the most common for most devices.
· Latest “ac” standard: not supported by all devices.
Rarely used settings
Other wireless sections of the TP-Link control panel are required only in special cases - for example, to connect to a VPN, so let’s go over them briefly.

MAC Filter – filtering by MAC address. Allows only manually configured devices to connect to the network, and only after entering a password. No strangers. It is not recommended for home use or for a small office where everyone has their own.
Setting up a VPN on a router: not possible on all models. This is a more advanced feature.

Wireless Bridge (WDS): the ability to use a Wi-Fi router as a “repeater” - a repeater of an existing one Wi-Fi signal. Used to “extend” the range of another working and configured router. In other cases, you need to use the already configured AP mode (Access Point mode).
Conclusion
Setting up the router – easy task even for non-specialists, and very, very necessary. Once you understand the parameters, you will no longer call specialists and adjusters - it’s only a matter of 2-3 minutes of time.
There are no uniform instructions for setting up wireless network settings, but the general principles are the same for all models. Only small details differ: some devices use the terms Wireless, others use Wi-Fi; The newest models work with the “ac” communication standard, older models work with b/g/n networks. The example of setting up a TP-Link access point is suitable for devices from ASUS, D-Link, and others - only the little things differ. Direct analogy: microwave ovens - the principle is the same, but the buttons are slightly different.
In this article I will tell you how you can do the initial setup of Tp-link routers. The advantage of this company in terms of settings is that almost all Tp-link routers are configured in almost the same way.
In addition, they have an intuitive color scheme ports. And even an inexperienced user will not have to think about where to connect which cable.
We will configure the router in three stages:
- Setting up an Internet connection
- Setting up Wi-fi on the router
So let's get started.
Preparing the router for setup
We turn on the router to the network. We connect the provider cable to the blue port on the router.
If you do not have this cable, you can connect to the router via Wi-Fi from any device.
Launch any browser and go to the site 196.168.0.1
If this data is not suitable, then you can reset the settings on the router. To do this, press the Reset button and hold for 10 seconds. All indicators on the router should blink. After this, we wait about a minute until the router boots up and try to log in again.
Setting up an Internet connection on a Tp Link router
To set up the connection, we will need data from your provider. They should have been given to you upon connection. If this data is not available, you will need to call the support service and find out how to get it. It will also be possible to clarify the protocol by which you connect to the Internet (PPPoE, PPtP, L2TP, etc.) We will configure PPPoE, since this is the most common protocol used to connect to the Internet.
- On the left in the menu, select the Network section (Netwotk)
- Next, select the protocol by which you are connecting (PPPoE, PPtp, L2Tp, etc.)
- We enter the login and password issued by the provider (if you have a PPtP connection, you also need to specify the server address)
- Secondary connection dot Dynamic IP
- WAN connection mode, put a dot on Connect automatically
- Click the Save button and wait for the page to refresh.
After the page has been updated, open new tab. If you did everything correctly, then the Internet should already be working. All that remains is to configure WiFi.
Setting up Wifi on a Tp Link router
Setting up Wifi couldn't be easier. If you have dual band router, then Wifi is configured separately for each 2.4 GHz and 5 GHz band!
- On the left, select the Wireless network section
- In the Network name (SSID) field, enter the name of the new Wifi networks with Latin letters
- Mode: 11bgn Mixed Channel: Auto
- Click Save. If the router prompts you to reboot, then it’s too early.
Now let's set a password for the Wifi network:
- On the left, select the Wireless Security section
- Select protection WPA/WPA2 – Personal or WPA-PSK/WPA2-PSK
- We select the version WPA2-PSK, and the encryption is AES
- Click Save
If the router prompts you to reboot the router (a red line appears), then reboot. After the reboot, we check the WiFi connection, everything should work.
Enjoy!