How to get to the recovery menu on a tablet. How to enter Recovery Mode on any Android device. What is the difference between Recovery Mode and DFU mode?
You can use Android and never go to the Recovery Menu. But if the phone does not turn on and does not enter Recovery, or you wanted to install custom firmware, then you will have to understand the reasons for the reluctance of the device to start.
This article is suitable for all brands that produce phones on Android 9/8/7/6: Samsung, HTC, Lenovo, LG, Sony, ZTE, Huawei, Meizu, Fly, Alcatel, Xiaomi, Nokia and others. We are not responsible for your actions.
Why doesn't Android go into Recovery?
Some smartphones do not have official Recovery at all, so you have to immediately install a custom one. If the message “No command” appears on the screen with the robot lying down, this means that Recovery is available, but there were problems launching it. To fix the problem, quickly press the power button and volume up key.
If Android absolutely does not boot into Recovery, then the reason for this behavior may be an error, which can also be eliminated by installing a custom Recovery. If installing custom Recovery does not help, you should contact service center— there may be hardware damage that cannot be eliminated using software methods.
How to enter the Recovery Menu
The login procedure differs depending on the mobile device manufacturer. To get into Recovery, you must first turn off the phone and then hold down a certain key combination. , controlled by the volume keys and the power button. You should not confuse Recovery with, in which everything is simply disabled third party applications. Recovery is, rather, engineering menu to control the phone bypassing the system.
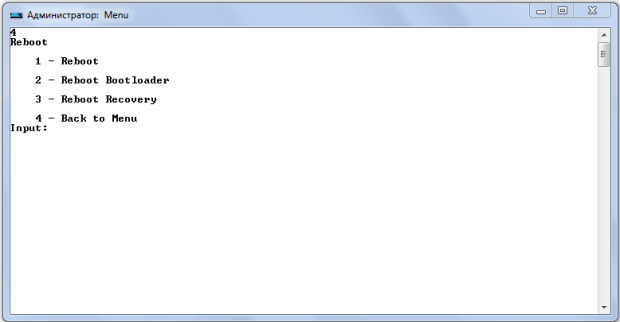
Keyboard shortcuts to enter Recovery on different phones:
- Lenovo - “Volume +” and “On”.
- HTC - "Volume -" and "On" or “Volume +” and “On”.
- Samsung - “Home”, “Volume +” and “On” press simultaneously.
- Meizu - "On" and “Volume +”.
- Xiaomi - "On" and “Volume +”.
- Fly - “On” and “Volume +” or “On.” and "Volume -".
- ASUS - "On" and “Volume +” or “On.” and "Volume -".

If the combination does not work and the phone does not connect, try looking for a combination specifically for your model. There are also universal ways to launch Recovery - using a computer or special applications. If you have a computer at hand:
- Download and install ADB and phone drivers.
- Connect Android via USB, .
- Launch ADB and run the command “adb reboot recovery”.
What to do if there is no computer? Install the Boot Droid application. In it you need to select the “Recovery” icon and click “Yes”.

You can also get into Recovery using Terminal Emulator. Type “su” in it, provide root access and execute the “reboot recovery” command.
Recovery features
Recovery Mode capabilities vary depending on the type. If this is the official recovery menu, then the functionality will not be the highest:
- Reboot to start Android normally.
- Installing updates.
- Factory reset.
- Clearing the cache.
- Backing up and restoring data.

Recovery Mode(recovery mode) is one of two emergency modes for Apple equipment. Recovery Mode makes it possible to restore functionality to the i-gadget if, due to a software failure or as a result of an unsuccessful jailbreak, the device turns off, does not want to boot and does not respond at all to button presses.
Recovery Mode And DFU Mode– modes provided by Apple, so their use does not entail loss of warranty. The differences between them have been discussed in detail in this article. In short, Recovery Mode more “soft” in terms of impact on mobile device and at the same time less effective - many problems are too much for him to handle. DFU Mode operates in iOS bypass and creates all files from scratch. resort to DFU It is recommended only in critical situations and only when the recovery mode has already been tried.
Before entering the gadget into Recovery Mode, take the USB cable and connect it to the PC port. Do not connect the cord to the device itself yet.
Step 1. Turn off your smartphone by long pressing the " Power» — wait until the screen goes dark. If the device is already turned off, you can skip this step.
Step 2. Hold down the " Home" and insert the cord. The iPhone will boot - you will see an image on its screen USB cable and logo iTunes. This is another difference between recovery mode: in DFU The iPhone just has a black screen - the user can understand that the mode is activated only by message in iTunes.
Step 3. A few seconds later in iTunes the following window will appear:

You need to click " OK». Then you can reset, restore or reflash the gadget.
How to get iPhone out of recovery mode
You need to exit recovery mode using the following algorithm:
Step 3. Click " Recovery Fix"and wait until the gadget boots up in normal mode.
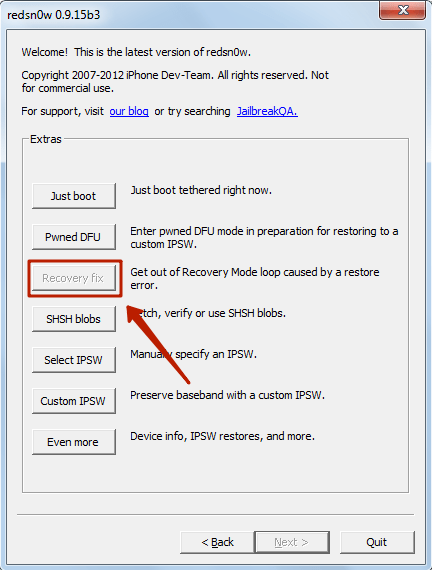
The Recovery Fix button becomes available only when the iPhone connected to the computer is in update mode.
You can also “break the loop” using iTunes. Just connect the gadget to your computer, go to device management mode and click “ Restore iPhone».

Why wasn't this method mentioned earlier? Because this way the user will lose all the data that was stored on the iPhone. In addition, the device will be updated to the latest iOS versions, and there will be no option left to return to the previous one (which the owner of the gadget was probably 100% happy with). Using special utilities there is a chance to get a device with the same operating system and content.
Conclusion
Recovery mode helps fix many iPhone problems, but it is extremely important to put your iPhone into recovery mode Right, otherwise there will be even more problems. If, for example, the user is in a hurry and disconnects the gadget from the PC before the update procedure is completed, the iPhone will fall into a recovery loop, from which the device can only be recovered by using special programs.
Any device with Android OS starts in Recovery mode. This is a standard feature. However, with the factory version you can perform too narrow a range of tasks. So, this is resetting the phone to initial settings, clearing the cache, as well as updating the system from the update.zip file. Obviously, users who are expanding their knowledge in the IT field are very dissatisfied with such a meager list. This is where specially developed Recovery Modes come to the rescue. CWM Recovery is a popular tool among Android users and a worthy replacement for the factory one.
Why do you need CWM Recovery mode?
Clockworkmod Recovery (CWM) is a famous alternative to factory recovery mode developed by Koushik Dutta. You can install it on most Android devices. CWM Recovery helps even in situations that sometimes seem hopeless to the average owner. That is why it is necessary to know about its existence, and also be able to use it.
 CWM mode has many options
What exactly does the utility do:
CWM: installation instructions
ClockworkMod is sewn into the internal memory of the device in place of the factory mode. In some cases, work is carried out on the gadget itself with access to Root rights, and in others - on a PC.
The article covers such basic methods as Rom Manager, FastBoot, Rashr and Odin. For many devices, companies themselves produce separate utilities, for example, Acer Recovery Installer for Acer devices. CWM is implemented into the device memory on these devices also through ADB software, which is suitable for devices manufactured by HTC.
Rom Manager: Rooting and embedding
Rom Manager is a utility created by the CWM developers. It is available for download at Google Play Market. Allows you to install CWM Recovery on the device itself without using a computer and a USB cable. Before using it, you must root the device, that is, obtain administrator rights.
Obtaining Root rights
The procedure is simple and can be easily carried out using special software. As an example, we can take the Framaroot program. Anyone can navigate its simple and intuitive interface, even without instructions.
 Click on the drop-down window
Select a method for obtaining Root rights. Follow the advice - restart the device for the changes to take effect.
 For the changes to take effect, restart the device
Launching Rom Manager
Now is the time to use the program:
 Select Recovery Setup
 Click on ClockworkMod Recovery to install
Video: how to flash Recovery with Rom Manager
Although the method is easy, it has a drawback: it is not suitable for all devices, as mentioned earlier. Before you start using this method, it would be logical to first determine that this program is compatible with the gadget. The list is available on the official Rom Manager website.
FastBoot Mode: Complex Method
The CWM installation method using FastBoot will require skill from the user, as it is much more complex than the previous one. It runs not on the device, but on the computer. It is recommended to use it only if you already have skills in such operations. Before installation, you need to download certain files to your computer or laptop. This list also includes Android platform SDK available for Windows, Mac and Linux.
Preparatory stage
What you need to have before installing CWM using FastBoot mode:
The Android SDK utility will help you install the necessary Android SDK Tools and Android SDK Platform tools packages:
 Download the Anroid SDK zip archive for Windows from the official website
 Find android file in the unzipped folder and open
Check the box to the left of Android SDK Platform-tools and click Install 1 package.
 Select Android SDK Platform-tools and click Install package
 Accept the license agreement
 The fastboot and adb files are located in the tools_version-windows folder after installing the Android SDK Platform-tools package
What else needs to be done before starting the firmware itself? Judging by the list above, you need the recovery-clockwork.img file. This is one of key tools for further work. Downloading it won't be difficult, but it doesn't end there. It is important to place this file in the platform-tools folder. For further convenience in the firmware, you need to rename it to recovery.img.
 Place the file in the platform-tools folder
Get straight to the point!
Now everything is ready for the CWM firmware, so you can safely get to work. Given below detailed description action in which it is quite difficult to get lost.
 Start your device in FastBoot mode
 To open command line, go to Start and enter cmd
 Type cd / and press Enter
 Enter the command with the path to the folder
 The adb devices command will help determine whether the PC sees the device
The level of complexity, as you can see, is high, so before the procedure it is strongly recommended to check that this method is suitable for the device, since it may not work in all gadgets. In practice, this method is good if the manufacturer of the device is HTC.
Rashr app
The installation method using Rashr is convenient and easy to perform; it is recommended for beginners. However, ironically, it also requires administrator rights. You can get them in a few steps. detailed instructions was given earlier in the section on Rom Manager.
How to work with Rashr
First you need to download the application itself. It is freely available at Play Market(Rashr- Flash Tool). You can also view the program on a third-party site, but you must beware of suspicious web pages so as not to catch a virus.
When the program is already on the phone, you need to open it and provide it with previously acquired Root rights upon request. Then everything is simple:
 Click CWM Recovery
 Select Recovery from the list of options available for your device
 Click Yes to confirm download
 To go to Recovery, click Yes
Video: CWM and Rashr
Odin: solution for Samsung
The previous three methods are suitable for different device models. The same method is effective for Samsung devices. This is a proprietary utility, so it cannot be used for devices from other manufacturers. There are many versions of this application. The latest one is Odin 3.09.
Here the standard factory version of Recovery is changed to a modified one using a PC, as with FastBoot:
 Download the Odin program on PC
- power/lock button and volume down (on older devices released before mid-2011);
- power/lock button, Home and volume down (all other devices).
 Click the Start button and wait for the firmware to finish
How to enable CWM Recovery mode after flashing
Once CWM mode has been installed using one of the above methods, you need to check if it works. You can launch ClockworkMod Recovery:
Possible difficulties
During the installation of an alternative Recovery Mode, in particular CWM, various difficulties and errors may arise. Which of them are the most common and how to solve them?
CWM Recovery does not recognize the memory card
CWM makes it possible to update your phone using an archive. When opening Recovery, the user sees a message that the flash card cannot be mounted. After installing another card, even with less memory, the problem disappears. The reason lies in the Windows system. The fact is that it diverges from card formatting standards. To ensure that formatting is done according to the specification of SD/SDHC/SDXC flash cards, and not just to standard form, it is recommended to use specialized software, for example, SD Formatter.
 The SD Formatter program allows you to correctly format the SD card
 CWM does not see the internal memory of the device: problem solution
When the recovery files are located on the internal memory, and therefore can only be recovered from there, a problem may arise. When you connect the USB cable to the PC and enable USB Debugging, the program reports that the Android device is not detected and you need to enable USB Debugging.
To solve this problem:
Recovery menu doesn't work
If when you launch the alternative recovery mode (volume + Home button or power) a picture appears with a lying robot, then the recovery was flashed, but when you restarted the device it was overwritten by the stock Recovery.
The problem is solved as follows.
Flashing a new Recovery mode means getting new functionality. Firmware methods vary in complexity, but ironically, the simplest of them require access to Root, that is, device administrator rights. When choosing a firmware method, you need to be guided by the phone model first. Rom Manager is not suitable for all devices. For HTC, the FastBoot method is more suitable, while for Samsung it would be more correct to choose Odin.
Android users are familiar with the concept of recovery – special regime device operation, such as BIOS or UEFI desktop computers. Like the latter, recovery allows you to carry out non-system manipulations with the device: reflash, reset data, do backups And so on. However, not everyone knows how to enter recovery mode on their device. Today we will try to fill this gap.
There are 3 main methods to enter this mode: key combination, loading using ADB and third-party applications. Let's look at them in order.
In some devices (for example, Sony model series 2012) there is no stock recovery!
Method 1: Keyboard shortcuts
The easiest way. To use it, do the following.
- Turn off your device.
- Further actions depend on which manufacturer of your device. For most devices (for example, LG, Xiaomi, Asus, Pixel/Nexus and Chinese B-brands), simultaneously pressing one of the volume buttons along with the power button will work. Let us also mention special non-standard cases.
- Samsung. Hold down the buttons "Home"+"Raise the volume"+"Nutrition" and release when recovery starts.
- Sony. Turn on the device. When the Sony logo lights up (for some models, when the notification indicator lights up), hold down "Volume Down". If it didn't work - "Volume Up". On the newest models, you need to click on the logo. Also try turning on, holding down "Nutrition", after vibrations, release and press the button often "Volume Up".
- Lenovo and the latest Motorola. Press simultaneously "Volume Plus"+"Volume minus" And "Inclusion".
- In recovery, control is done using the volume buttons to navigate through menu items and the power button to confirm.
If none of the above combinations work, try the following methods.
Method 2: ADB

Fast, efficient and does not require a computer or turning off the device.
Method 4: Quick Reboot Pro (Root only)
A faster and more convenient alternative to entering a command in the terminal is an application with the same functionality - for example, Quick Reboot Pro. Like the option with terminal commands, this will only work on devices with installed root rights.

The methods described above for entering recovery mode are the most common. Due to the policies of Google, owners and distributors of Android, access to recovery mode without root rights is possible only in the first two ways described above.