How to number pages in Word. What does continuous numbering mean?
Many users very often have to work with documents in which a large number of pages. It is very difficult to navigate in such a file, since it will take a lot of time to find the desired paragraph or section. In this article, we'll look at how to number pages in Word to make it easier to navigate through the text.
Thanks to this, you can quickly navigate through the document and correctly determine where exactly you are. Moreover, if you plan to print this file in the future, numbering will save you from possible confusion in the sequence of pages.
In order to number a document in the Microsoft Word editor, you must do the following:
- First of all, let's open a file with large contents.

- After that, go to the “Insert” tab and click on the “Header and Footers” button. In the menu that appears, select “Page Number”. You will be asked where exactly to insert this element (when you hover over each item, you will see preliminary options on the right):

- above or below;

- on the fields;

- current position.

- Immediately after this, you will see that a field for entering information will appear at the top or bottom (depending on the selected numbering type). In addition, the top panel will open new inset"Constructor". If you click on the “Position” icon, you can adjust the distance from the top and bottom edges. This way you can manually specify indents before the text.

Just don't overdo it. Consider the borders of the sheet. If you overdo it, you can go beyond print.
- In order to save the settings, you need to click on the “Close header and footer window” button.

- Immediately after this, the dotted line will automatically disappear. As a result of this, you will see a neat number located at the bottom of the sheet.

If you don’t like something or it didn’t turn out the way you wanted, you can always resume editing. To do this, just double-click the left mouse button on the element located in the footer.

Options
For more detailed settings There is a special menu item that is located on the “Design” tab.

Let's consider each parameter separately.
Default in Word editor an automatic content numbering order is configured (starting from the very beginning and with number 1). But in some situations this is not necessary. For example, if the first page is the title page. Especially if it is an official document and they will put a stamp there.
In order to fix this, you need to check the “Special header for the first page” item in the “Options” menu. Immediately after this, you will see the corresponding inscription at the bottom of the sheet.


If you remove this checkbox, the number will appear on the title page again.

Different headers and footers for even and odd pages
To activate this setting, you need to check the corresponding box. Immediately after this, another inscription will be displayed near the frame. Now you can specify specific text for the header or footer of the top or bottom of an even or odd sheet.

Thanks to this, you can number the pages however you like. The main thing is not to overdo it. Otherwise you may end up with an unreadable document.

Additional items
In addition to numbers, you can add anything to the footer. In addition, you can change the position of the elements. For example, make sure that everything that is there is aligned to the left. To do this, just click on the desired icon on the “Home” tab.

You can also add text. For example, you can start with the combination “Page No.”

In this case the text will be static. and page numbers increase.

You can also insert the current date and time. To do this you need to do the following.
- Go to the "Design" tab. After that, click on the “Date and Time” icon. In the menu that appears, you can select any format. To insert, click on the “OK” button.

- To prevent the date from sticking to the number, you need to place the cursor after this element and press the Tab button on the keyboard.
- Thanks to this, the document will look much more beautiful.

If you want to move to the third block (on the right), you need to press the Tab key again.
Microsoft developers tried to make the headers and footers more rich. In order to insert more information about the file, you need to do the following:
- Double-click on the bottom field to enable editing.
- Open the “Design” tab on the toolbar.
- Then click on the “Document Details” icon.
- Immediately after this you will see possible options inserts:
- author's name;
- file name;
- the path to the file;
- document's name;
- document property:
- author;
- organization address;
- address Email organizations;
- annotation;
- date of publication;
- keywords;
- Name;
- organization;
- notes;
- supervisor;
- state;
- organization phone number;
- subject;
- organization fax.

You can put in whatever you want, but don't overdo it.
Page number format
In addition, you can customize the display of the appearance of the numbering. To do this, you need to do the following.
- In the menu that appears, click on the “Header and Footer” button.
- Next, select the “Page Number” section.
- Then click on the item that interests us.

- Immediately after this you will see the following window.

If you wish, you can specify which number to start counting from. By default, a new document starts at "1", but you can specify any value. For example, the number "5". To save, click on the “OK” button.

As a result of this, you will see that the countdown has started from the specified parameter.

Sometimes you need to make sure that a set of numbers other than Arabic is used. To do this, just select the desired option.

For example, to make Roman numerals, you need to click on the appropriate item. To save, click on the “OK” button.


In addition to everything described above, you can include the document title number in the header and footer. To do this, call up the “Page Number Format” window (how to do this is shown earlier) and check the appropriate box.

To add numbered headings, do the following:
- Click on the title of the section (in our case, this is the title of the verse).
- Then click on the Heading 1 style.
- Immediately after this you will see that appearance the text will change. But this is not enough.

- Make the title line active.
- Click on the triangle next to the “Multi-level list” icon.
- Select an option for headings.

- As a result of this you will see the following.

- Try checking the box next to the desired item again.

- This time everything should work out. The chapter number will appear next to the page number.

How to insert content
The convenience of numbering is that thanks to it you can create a table of contents. To do this you need to do the following.
- Go to the beginning or end of the document.

- In order to separate from the main text, you need to press the key combination Ctrl + Enter.

- As a result of this, you will find yourself on a new sheet.
- Then go to the "Links" tab.
- Click on the "Table of Contents" icon.
- After that, select any of the options.

- As a result, you will see the following result.

How to remove numbering
If you don't like what you've done, you can always delete it. To do this you need to take the following steps.
- Go to the "Insert" tab.
- Click on the "Header and Footer" button.
- In the menu that appears, select the “Page Number” section.
- Then click on “Delete numbers”.

- Thanks to this, everything will disappear without a trace.

Conclusion
This article discussed the main points when working with page numbering in the Word editor. If something doesn't work out for you, you may be doing something wrong. Try reading it again. In addition, you can access online help on the Microsoft website.
Video instruction
In addition to the instructions above, you can watch the video for additional comments.
To correctly format a document in a word processor, you need not only to know the basics of visual text design, but also to know how to number pages in Word.
Thanks to this, you can create a file division into sections and subsections, create a table of contents and a title page.
Using headers and footers
- lower;
- upper.
The footer usually contains text footnotes and short explanations that may appear along the text.
You can place the sheet number in both the header and footer.
Double-click the top or bottom margin of the document to add information to the footer of any page (Word 2013 version).
To correctly enter the number in the headers and footers, select one of them. Then in the designer tab that opens, select “Page number”.
Select the number position and desired style as shown in the picture.

In the same way, you can add headings, the date and time the file was created, information about the author, and other types of data to the footers.
Manually numbering only the first page
Sometimes users need to number only the very first sheet of a document.
To number only the first one in Word, follow the instructions:
- Move the manipulator cursor to the end of the last line. Then select the “Insert” menu item and tear the page into two invisible sections. This way you can enter numbers separately for each section.
Only the first page will serve as the first section;

- After the break in the frame, select the desired header and footer and add a number as shown in the image above.

Display numbering only on the first page
In the same way, you can add a number for one sheet in all earlier versions of the Word program.
Numbering from a specific page
Most often, users need to add document numbering from a specific sheet: from the second, third, and so on.
All methods are similar in versions of Word 2003, 2007, 2010.
Advice! In Word it is also possible to make the written number different from the real one. In this way, you can put numbers on all pages except the first few, which are intended for the title, annotation, introduction and content.
To number the sheets of a document from a specific sheet to the end of the file, follow these instructions:
- Get started with headers and footers. To do this, click on one of them anywhere in the text. Open the drop-down list, which is designed to work with numbers, as shown in the figure below and open the window for formatting numbers;

Setting the number format in Word
- Using this window, you can set some formatting for the document, namely: set the appearance of the numbers (Arabic or Roman numerals, other symbols), include chapter numbers ( this function necessary to create content).
You can also configure numbering from a specific sheet. In this case, the first one will be assigned from the page specified by the user. In the "start with" field, enter the sheet you want.

Formatting sheet numbers (from page 3)
In the same way, you can number starting from 3, 4, 2, 5 pages and so on.
Automatic numbering
Automatic numbering can be configured not only for pages, but also for pictures, rows in a table, and other text elements.
Using this type of notation will greatly facilitate the work during the creation of the entire work.
Also, by setting up numbering automatically, you can protect yourself from the appearance in the document of numberings that are not related to each other, the so-called floating numbers.
Let's consider the option when automatic numbering needs to be configured for document objects. In this case, you need to create a special style.
Styles of Word files are saved and allow you to work with new files according to the same principle.
To create a style automatically, follow the instructions below:
- Go to the main tab of the program and in the field with styles, open the drop-down list, as shown in the figure. Click on “create style”;

- Then click on the “Format” key and select the numbering tab;

- Set up the type of numbering.

Setting up automatic display of numbering of all objects
The style creation panel has a convenient user interface, so you can configure the display of the page number without title page(all except the first one).
Numbering of all pages except the first
To start numbering from the second page (without the title page), you first need to do this for all sheets in the standard way, as shown in the figure above in the article.
Then click on the number on the first page and in the designer, check the box next to “special header and footer for the first sheet.”
After performing this action, the document will be numbered starting from the second to the end of the file.

How to number pages in Word 2007, 2013
How to number pages in Word: Examples for all versions
When preparing abstracts, term papers or even dissertations, it may be necessary to number the pages not from the first page of the document, but, for example, from the third. And if you haven’t done such tricky numbering before, then most likely without outside help you won't succeed.
In this article we will talk about how to make page numbering from page 3 in Word. The article will be relevant for modern versions of Word, that is, for Word 2007, 2010, 2013 and 2016. The article will also be useful for those who need to number starting from 4, 5 or any other page.
Step No. 1. Turn on the display of all symbols.
In order to make pagination from page 3 we will use section breaks. And in order to make it more convenient to work with these breaks, it is better to immediately turn on the display of all symbols. This way we can see whether a partition break has been established and where it is located.
To enable the display of all characters, you need to go to the “Home” tab and click on the button with the paragraph sign.
Step #2: Insert a section break at the end of the second page.
Now that all the characters are visible in the document, you can start working with section breaks. In order to make pagination from the third page we need to insert a section break at the end of the second.
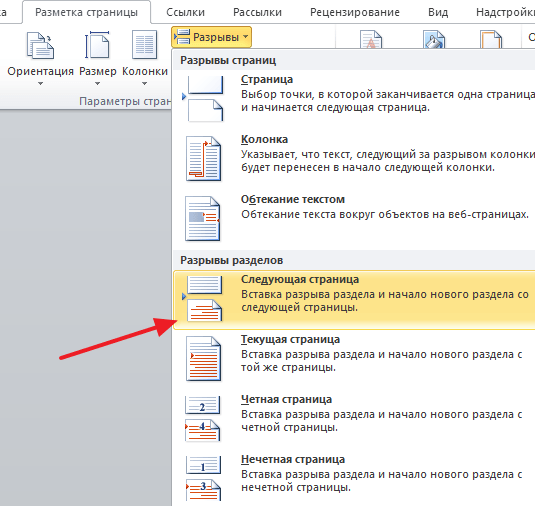
Therefore, place the cursor at the end of the second page of your document, go to the “Page Layout” tab and click on the “Breaks” button there. As a result, a menu will open in which you need to select the “Next Page” option.
If you did everything correctly, then at the very end of the second page (after all the text) you should have a section break.

If a section break appears inside the text or at the beginning of the next page, it must be removed and reinstalled.
Step No. 3. Separate the headers and footers in different sections.
After setting a section break, your Word document will have two sections. The first section is the first two pages, and the second section is the third page and all the rest. In order to be able to number from page 3, you need to separate the headers and footers of the first and second sections.
To do this, go to the third page of the document and double-click on the header where the page numbering should be placed. For example, if you want to number pages at the bottom of a sheet, then you need to go to the third page and double-click on the footer.
As a result of this double click, the header and footer editing mode will turn on and the “Design” tab will appear at the top of the Word window. Go to this tab and click on the “Same as previous section” button.

After clicking on this button, the footers of the first and second sections will be processed separately, which means that you can now make separate numbering for the first two pages and for all other pages starting from the third.
Step No. 4. We number the pages from the third page.
Now the preparation is complete and you can number the pages from the third page. To do this, go to page 3 of your Word document and place the cursor there.

The result will be small window with numbering settings. Here you need to switch to the “Start with” mode and specify the number from which page numbering should begin on the third page. Usually the number 1 or 3 is selected. If you select the number 1, then the third page of the document will be numbered as the first, the quarter page as the second, etc.

After you have chosen what number the numbering should start from, click on the “Page Number” button again and turn on the numbering.

We need to remind you that if you have set up footers, then the page number should be inserted exactly at the bottom of the page. Otherwise nothing will work.
If the document consists of more than two pages, it is advisable to number the pages before printing. This will make it much easier to navigate. For some types of documents, for example scientific works, numbering is necessary.
To number pages, do the following.
1. Go to the Insert tab of the ribbon and in the Header and Footer group click on the Page Number button (Fig. 10.4).
Rice. 10.4. Button menu Page number
2. In the menu that opens, move the mouse pointer to the desired position of the number on the page (at the bottom, at the top, in the margins, or in the place where the cursor is placed) and in the submenu that appears, click on the required option (Fig. 10.5).

Rice. 10.5. Selecting the page number position from the list
The number of the specified format will appear in the selected place on the page, and the program will switch to the mode of working with headers and footers (Fig. 10.6). Read more about headers and footers in section. 7.2.

Rice. 10.6. Inserted page number
If you need to customize the page number format, in the Page Number button menu, select the Page Number Format command. The Page Number Format window will appear, in which you can set the numbering of chapters, as well as specify the format of the number (instead of Arabic numerals, you can select Roman numerals, alphabetic letters, etc.) (Fig. 10.7).

Rice. 10.7. Page Number Format window
To delete page numbers, use the Delete page numbers command in the Page Number button menu.
If you need no number on the first page of the document, do the following.
1. Click the button in the lower right corner of the Page Setup group of the Page Layout tab.
2. In the Page Setup window that opens, go to the Paper Source tab (Fig. 10.8).

Rice. 10.8. Paper Source tab of the Page Setup window
3. Select the first page checkbox in the Differentiate Headers and Footers area.
From the lesson " How to number pages in Word 2007» you can learn about page numbering methods in a worldwide popular office text editing program - Microsoft Word. In this tutorial we will use the 2007 version of this program.
Our task: Learn how to number pages and automatically number all pages in a document.
What do we need: only Microsoft program Word 2007, which is usually installed along with other office programs Microsoft company. Program developer website - Microsoft Word
Let's say we have a ready Microsoft document Word and we need to number all the pages in it. Let's say this file is in the folder:
Fig 1. Microsoft file Word in a folder
Perhaps your file will not have “.docx” in the name, but only the file name, for example “document”. This is the same thing, it depends on the settings on the computer (whether file extensions are shown or not, this function can be turned on or off).
We open the file we have by double-clicking the left mouse button on the file icon. After a while our file will open and we will see the contents:

Fig 2. Contents of the document.docx file
Yes, maybe it will be a different work :)

Figure 3. "Insert" tab
In this tab, find the “Header and Footer” block and left-click on the item “ Page number ", after which the menu will appear:

Fig 4. Managing page numbers
Next, we will be asked to choose where we want to place the page numbers and how they should be numbered. Positioning options are available to choose from: at the top of the page, at the bottom of the page, and in the page margins. Most often in documents the page number is indicated at the bottom of the page, in the center.
At this stage, there is no need to mentally imagine where it will be and what it will look like, all positions show visually what it will look like in reality. To see an example page number locations just hover your mouse over the required positioning element, let's say we want to place page numbers at the bottom and in the center:

Fig 5. Pagination menu
We point to " At the bottom of the page" and select in the center. After selecting the position of the page numbers (clicking the left mouse button on the type of positioning), the program will automatically switch to the so-called “ Constructor" and the cursor will automatically be positioned on the page number:

Fig 6. "Design" tab
We don’t change anything here, but simply click on the “ Close the header and footer window»:

Fig 7. Button to close design mode
Now, as we see, having looked through our document, all pages are numbered in Arabic numerals from 1 to the number of sheets in the document. But what should we do if we are not satisfied that the page numbering in Word will be in Arabic numerals? This means we need to change the format of the page numbers. To do this we find at the top open document Word tab " Insert" and click on it with the left mouse button. In this tab we find the item “Page number” and in the pop-up menu click on the item “ Page number format...»:

Fig 8. Tab with number formatting
After clicking, the “ Page number format»:
Now our document has page numbering and this numbering is in Roman numerals. If you change your mind and decide to number the pages in a different format, then you need to do these simple steps again.
In further lessons we will learn how to remove page numbers both completely and partially from the first page.